Marp or Markdown Presentation Ecosystem is a collection of tools that allows the generation of presentations of different formats from a markdown template. The tools are written in JavaScript and have a number of options that allow presentations of different styles and formats.
This tools stood out to me as it has syntax highlighting built in and allows the creation of presentations using markdown. The presentation can also be altered using standard CSS styles.
I've spent many hours fiddling with presentations in Keynote and Google Slides, so I wanted something that would be simple to use and generate the presentation files I needed.
In this article I will look at getting Marp installed, creating a presentation and then generating presentation files.
Project Setup
Getting set up with Marp is pretty easy. Assuming you have npm installed you can initialise a project and get the marp-cli package installed in just two steps. This allows you to create one or more presentations file formats from a markdown file using the command line.
$ npm init --yes
$ npm install --save-dev @marp-team/marp-cli
The marp-cli tool includes the marp-core package and the marpit framework, which is what is used to generate the presentations.
You should then create some directories for the input and output of files. I normally create a "dist" directory for the presentation files and a "src" directory for my markdown files. The slides file is kept in src and is called "slides.md".
The normal structure of a Marp project that I use to generate presentations is like this.
/dist
/node_modules
package-lock.json
package.json
/src
--slides.md
The slides markdown file is pretty simple, and consists of a front-matter section, followed by the slides themselves, formatted using standard markdown syntax. Each of the slides is separated by three dashes "---".
Front-matter
The front-matter section is a special area at the top of your slides that you can detail a few items for your presentation as a set of YAML data. This includes things like the theme to use, the option to add pagination, the header and footer to include on every page, and the size of the presentation format.
For example, to use the default format and add pagination to the slides you would add the following.
---
theme: default
paginate: true
marp: true
---
It's a good idea to add the "marp: true" directive as this helps with previewing the slides, which we'll come onto later.
The theme can be set to one of "default", "gia" or "uncover". Each theme can be given one or more class attributes to change the theme in some way. The following sets the default theme, but also adds an "invert" class to invert the colours on the theme.
---
theme: default
class:
  - invert
paginate: true
marp: true
---
Some themes also allow the addition of a "lead" class, which will centre align everything.
It's also possible to inject styles into the header section by the use of a "style" attribute. The section element is the viewport of each slide and so the following will set the background colour to light grey for every slide.
---
theme: uncover
style: |
  section {
    background-color: #ccc;
  }
marp: true
---
There's lots more information about themes and how to use them in the marp-core theme documentation.
The following is a typical header that I use on my Marp created presentations. This uses a centred and inverted uncover theme, with pagination, and a footer on every page with the site ident.
---
theme: uncover
paginate: true
class:
  - lead
  - invert
size: 16:9
footer: "[hashbangcode.com](https://www.hashbangcode.com)"
marp: true
---
This template gives me the look and flexibility I need to generate slides quickly.
Slides
With the front-matter in place it's now time to look at how to generate slides. Each slide is separated from the previous slide with three slashes (---) on a single line, but after that it's pretty standard markdown.
To create a slide with a single main header element (to introduce a section) you would do something like this.
---
# Test
Bullet points are creating by adding a single dash to the start of a line. The following will generate a slide with a smaller heading and two bullet points.
---
## Slide 1
- Bullet one.
- Bullet two.
To create a sub bullet just indent one of the bullets by two spaces.
---
## Slide 1
- Bullet one.
  - Inner bullet.
- Bullet two.
Marp has syntax highlighting built in, and so use that system you just surround the code with three back ticks (```). You can also stipulate the type of syntax highlighting required by including the language after the back ticks.
The following slide contains a block of PHP code, which will be rendered using the PHP syntax highlighter.
## Slide 2
- Bullet one, with syntax highlighted code.
```php
<?php
echo 'Hello World';
```
- Bullet two.
Images can also be added quite easily to your slides using the image syntax. To add a file called image.png to your slide just add it to the same directory as your markdown file and add the following to your slide.

Note that the file is loaded relative to the presentation, which means you need to point back to where the original file is located. The alternative to this is to put your files somewhere on the internet, where they will always be accessible.

The square brackets can contain meta information about the image. For example, you can use the width attribute to set the image to be a certain width on your slide and keep the aspect ratio of the image intact. In this case we are setting the image to be 900px wide.

There are a lot more meta information available for image, so it's a good idea to read through the Marp image syntax documentation page to see what's available.
Preview Slides In Visual Studio Code
Creating the slides seems quite abstract unless you can actually see the slides you create. The great thing about the Marp project is that it comes with a slide preview tool for VS Code.
This preview tool helps immensely when creating slides as it gives instant feedback on how your slides will turn out. I have found that the preview in VS Code is exactly how the slides will turn out when generated.
To install the extension, open up VS Code and search the extensions for "Marp for VS Code".

With the extension installed you can then open up your slides.md file and click the open preview side by side button to see the preview window.
You should see something like this when writing your slides.
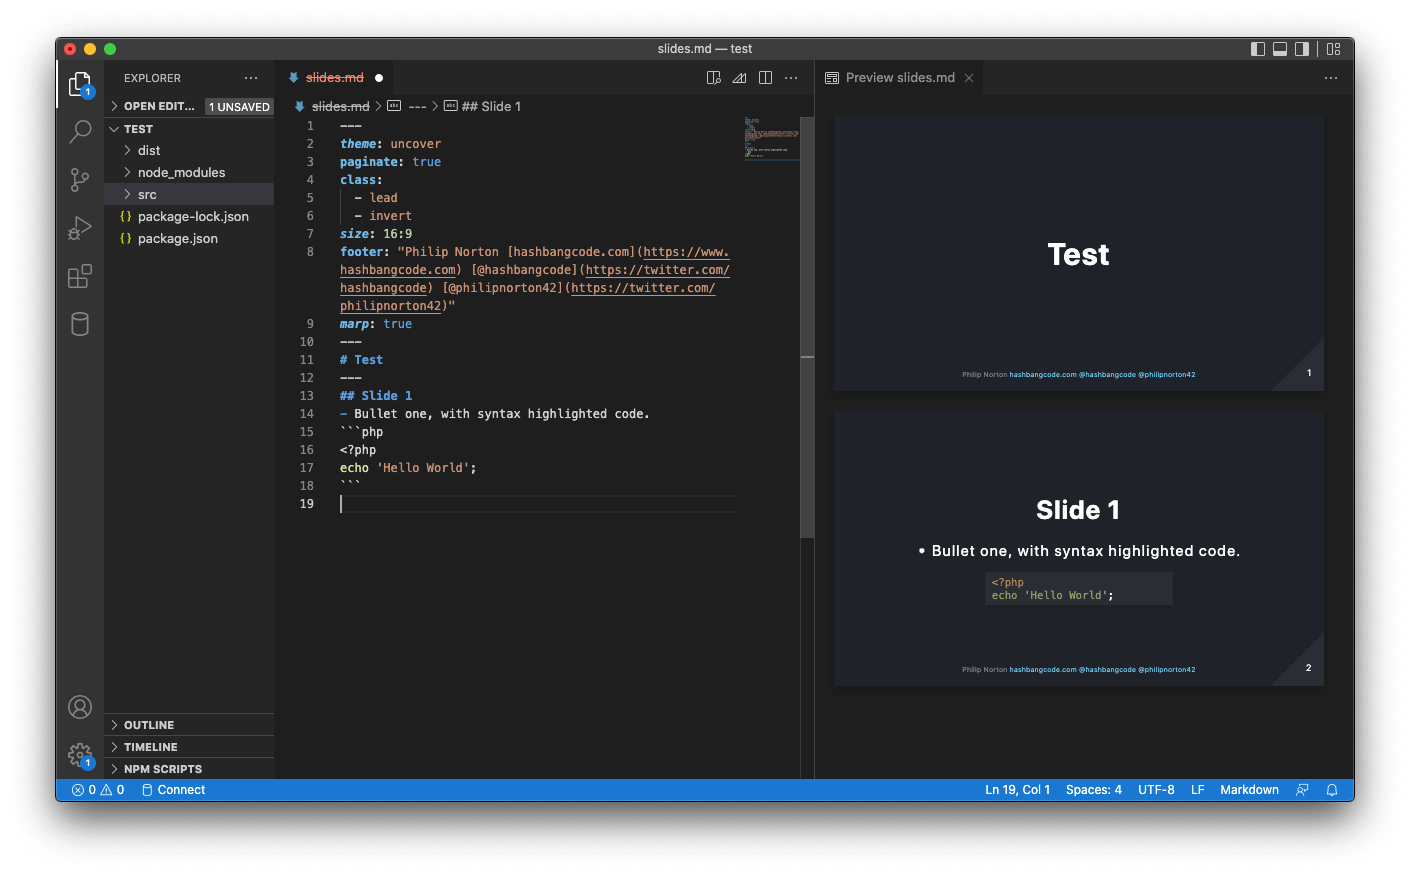
Note! The "marp: true" directive in your front-matter section is vitally important in order to generate the previews correctly. Without this in place your markdown will be formatted as standard markdown and not as a presentation.
Once you are happy with how your slides look it's time to generate the files.
Creating The Presentation Files
With your presentation created the final step is to generate presentation files. Marp is capable of generating HTML, PDF and PPTX files, all based on your original markdown.
The HTML version is a fully featured presentation system, with the ability to break out a speaker notes window with timings and a next slide preview.
To generate a HTML presentation just run the "npx marp" command, passing in the output and input directories. If you have used local images in your presentation then you also need to add the "--allow-local-files" flag.
$ npx marp --output=dist --input-dir=src --allow-local-files
[  INFO ] Converting 1 markdown...
[  INFO ] src/slides.md => dist/slides.html
This will generate a file called "slides.html" in the output directory. The file name is the same name as the original markdown file.
The --allow-local-files flag is used to prevent any files from your local environment being injected into a presentation, which is a security feature. This is important if you are hosting a Marp service, but since we are creating presentations locally we know what the markup contains and where the files are.
If you want more information about why this is a security feature enabled by default see this page on local file security in Marp.
To generate a PDF of the presentation just include the --pdf flag.
$ npx marp --pdf --output=dist --input-dir=src  --allow-local-files
[  INFO ] Converting 1 markdown...
[  WARN ] Insecure local file accessing is enabled for conversion from src/slides.md.
[  INFO ] src/slides.md => dist/slides.pdf
And use the --pptx flag to generate a Powerpoint format file.
$ npx marp --pptx --output=dist --input-dir=src --allow-local-files
[  INFO ] Converting 1 markdown...
[  WARN ] Insecure local file accessing is enabled for conversion from src/slides.md.
[  INFO ] src/slides.md => dist/slides.pptx
Note that although the powerpoint format file works, it isn't a normal presentation. Each slide is actually a screenshot of the slide, set as a background image. You can generate the file if that's a requirement of your presentation, but just be warned that you can change anything in the presentation.
We can simplify the use of the output and input directories by injecting some configuration into the package.json file. The "marp" section below informs Marp about the input and output directories and allows local files to be used within the presentation itself.
{
  "name": "my-marp-talk",
  "version": "1.0.0",
  "description": "My marp talk.",
  "main": "index.js",
  "license": "Apache2",
  "devDependencies": {
    "@marp-team/marp-cli": "^1.7.0"
  },
  "marp": {
    "allowLocalFiles": true,
    "inputDir": "src",
    "output": "dist"
  }
}
With this in place we can simplify the command by leaving out the additional flags.
$ npx marp
[ INFO ] Converting 1 markdown...
[ INFO ] src/slides.md => dist/slides.html
Resources
Here are a few sites that might help you get started with Marp.
Conclusion
I'm really liking Marp. The system can take a little bit of getting used to, but it is a very powerful system that has many options available. The preview tool in VS Code really sells this system as something that I want to use to generate presentations. This is now my go to tool when creating new presentations and the results have been great.
I haven't gone into a great deal of detail with regards to generating the slides in this article, but the basic syntax is very simple (it's just markdown after all). There are also a number of directives available that can change slides, all of which are documented on the Marp documentation site.
If you are interested, I have created a Marp presentation template that I use to easily setup new presentations and generate files in different formats. This is based on a Marp template repository created by Peter Fisher, who originally told me about the Marp project. Thanks Peter!

Add new comment