Ajax Dialogs in Drupal are a good way of presenting content to a user without them having to navigate away from the page they are looking at.
This is useful when presenting a list of items or a link to something like a terms and conditions page. Users can click a link and view the content as a dialog box.
Creating dialogs in Drupal is built into the platform and are powered through the jQuery UI dialog component.
Drupal provides a way to create the following types of dialogs.
- Normal dialogs - The dialog shows on top of the content on the page. It is possible to show multiple dialogs on the page at the same time.
- Modal dialogs - The dialog creates an overlay that disables other elements on the page. Only one modal dialog can be shown on the page at once.
- Off-canvas dialogs - The dialog slides in from edge of the browser window. This is useful if you want to show lots of content and is also a better option for showing dialog boxes on mobile views.
There are a number of ways in which dialogs can be created, but there is very little documentation on the subject.
This article will cover how to create different types dialogs in Drupal and in a few different ways, including how content editors can easily add dialogs into content with little programming knowledge.
Creating Dialogs Using PHP Classes
Ajax dialogs are generated in Drupal using a number of PHP classes. The different classes are used to generate different types of dialog. First, let's look at generating a normal ajax dialog box.
Creating Normal Ajax Dialogs Using OpenDialogCommand
Drupal uses the Drupal\Core\Ajax\OpenDialogCommand class to generate dialogs, which in turn use the jQuery UI dialog component to show the dialog to the user. Although there are different ways to create dialogs they all use or extend this class; so it is a good starting point in getting to grips with Drupal dialogs.
As the class namespace suggests, the OpenDialogCommand is a component of the ajax command systems in Drupal; and so needs to be returned as part of an AjaxResponse object. A controller action can be used to create an AjaxResponse and add a command to open a dialog window. In order to do this we will also need a secondary controller action to initiate the callback via an ajax enabled link.
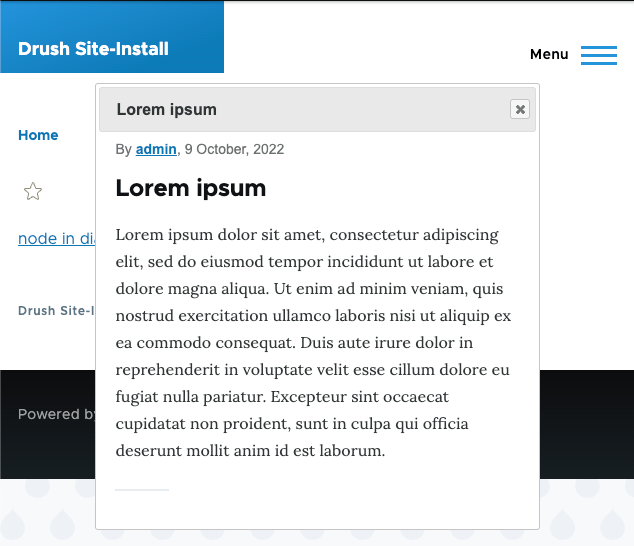
The following screenshot shows what we will end up with at the end of this process. This is a page of content that is rendered and returned in a dialog box after clicking on a link on the page.
To use the OpenDialogCommand class we need to create a route that points to a controller action. This will be added to a file called mymodule.routing.yml.
mymodule_display_dialog:
  path: '/test-dialog'
  defaults:
    _controller: '\Drupal\mymodule\Controller\DialogController::createModal'
  requirements:
    _access: 'TRUE'
The controller action will return a AjaxResponse object containing a OpenDialogCommand object. In order to make the content returned more relevant we are loading and rendering a node in the body of the command dialog.
Also note that part of the returned AjaxResponse object is the core/drupal.dialog.ajax library. This is required in order to load the jQuery UI dialog component that generates the dialogs and the Drupal JavaScript code that converts returned ajax response into something the dialog component can understand. We can add this library either before or after this point, as long as it is available as the dialog response is rendered.
Here is the controller class that will return the ajax response and display the dialog box.
<?php

namespace Drupal\mymodule\Controller;

use Drupal\Core\Ajax\AjaxResponse;
use Drupal\Core\Ajax\OpenDialogCommand;
use Drupal\Core\Controller\ControllerBase;
use Symfony\Component\DependencyInjection\ContainerInterface;

class DialogController extends ControllerBase {

  /**
   * The entity type manager.
   *
   * @var \Drupal\Core\Entity\EntityTypeManagerInterface
   */
  protected $entityTypeManager;

  /**
   * Creates a new DialogController object.
   *
   * @param \Drupal\Core\Entity\EntityTypeManagerInterface $entity_type_manager
   *   The entity type manager.
   */
  public function __construct($entity_type_manager) {
    $this->entityTypeManager = $entity_type_manager;
  }

  /**
   * {@inheritdoc}
   */
  public static function create(ContainerInterface $container) {
    return new static(
      $container->get('entity_type.manager'),
    );
  }

  public function createDialog() {
    // Load a specific node.
    $node = $this->entityTypeManager->getStorage('node')->load(1);

    // Convert node into a render array.
    $viewBuilder = $this->entityTypeManager->getViewBuilder('node');
    $content = $viewBuilder->view($node, 'teaser');

    // Get the title of the node.
    $title = $node->getTitle();

    // Create the AjaxResponse object.
    $response = new AjaxResponse();

    // Attach the library needed to use the OpenDialogCommand response.
    $attachments['library'][] = 'core/drupal.dialog.ajax';
    $response->setAttachments($attachments);

    // Add the open dialog command to the ajax response.
    $response->addCommand(new OpenDialogCommand('#my-dialog-selector', $title, $content, ['width' => '70%']));
    return $response;
  }

}
Note that the above example uses dependency injection to pull in the needed services. For more information please see the article on an introduction to services and dependency injection.
The OpenDialogCommand object has a number of parameters in its constructor, so let's break them down here.
- $selector - This is the ID of the wrapper around the dialog you are generating, which is being set to "my-dialog-selector in the above example. Use the ID if you want to target the dialog using styles or interact with it using JavaScript.
- $title - This is the title of the dialog, which in the above code we are setting to the title of the node.
- $content - The content of the dialog window, which can be in the form of a string or a render array. In the above code we are adding the teaser of the node as a render array to the content.
- $dialog_options - This is an optional array of parameters that can be passed to the jQuery UI dialog. You can see a full list of the options on the jQuery UI dialog documentation. In the above example we are setting the width of the dialog window to be 70%.
- $settings - This is an optional array of parameters that will be passed to the Drupal behaviours on the content of the dialog.
This controller action does nothing on its own, so let's create an ajax enabled link to it so that we can trigger it. All we need to to do is create a route that we can use to display a render array that contains a link that will open the dialog.
mymodule_display_page:
  path: '/test-page'
  defaults:
    _controller: '\Drupal\mymodule\Controller\DialogController::displayPage'
  requirements:
    _access: 'TRUE'
The action itself contains a render array that is added to the same DialogController class we created before. All we do in this action is create a render array that will print a link that points to the dialog controller action we created in the previous step.
In order to enable ajax, however, we need to add the class use-ajax to the link attributes. This lets Drupal know that this is a link that should return an ajax response, rather than a navigable link. Without this class in place you'll just get a page of raw json being printed out to the browser.
Here is the new action that will display a link to the user.
  public function displayPage() {
    $output = [];

    $output['a_dialog_link'] = [
      '#type' => 'link',
      '#url' => new Url('mymodule_display_modal'),
      '#title' => 'node in dialog',
      '#attributes' => [
        'class' => ['use-ajax'],
      ],
    ];

    $output['#attached']['library'][] = 'core/drupal.dialog.ajax';

    return $output;
  }
Note the inclusion of the core/drupal.dialog.ajax library on this side of the ajax response. This is to cover an edge case where anonymous users do not get all of the required libraries from the ajax response and instead need those libraries to be loaded before hand. If you have a problem with your anonymous users not being able to use dialogs then attach the dialog library to your initial page response rather than to the response.
If we now visit the page at "/test-page" we will see a link with the text "node in dialog". When we click this link we should see the contents of the node rendered as a dialog, just like the screenshot at the start of this section.
Creating Modal Ajax Dialogs Using OpenModalDialogCommand
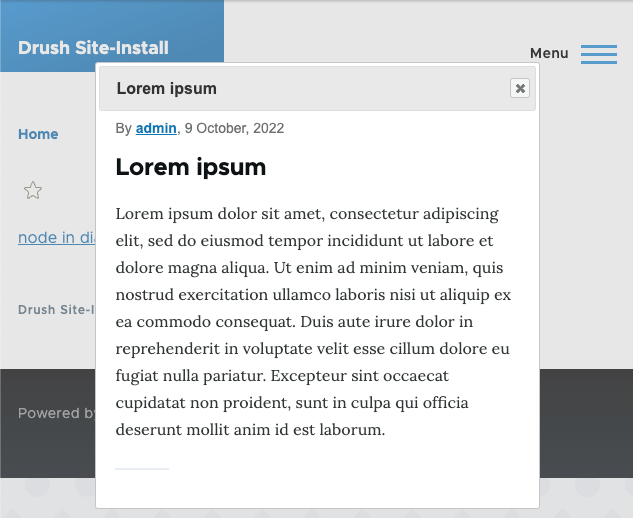
A modal ajax dialog is the same as the normal ajax dialog, except that it prevents the rest of the page from being interacted with. This is done by creating an overlay below the dialog but above other elements that prevents links behind the dialog being clicked.
Here is a screenshot of the ajax dialog we create above, but this time rendered as a modal dialog.
There are two ways in which we can create a modal ajax dialog like this.
The first is to simply add the 'modal' option to the options array we send to the OpenDialogCommand. This will communicate to the jQuery UI dialog component that we want to create a modal dialog.
$options = [
  'width' => '70%',
  'modal' => TRUE,
];
$response->addCommand(new OpenDialogCommand('#my-dialog-selector', $title, $content, $options));
The second option is to use a dedicated class called Drupal\Core\Ajax\OpenModalDialogCommand instead. This class extends the OpenDialogCommand class and hard codes the same modal option to be true. It also removes the selector from the constructor and hard codes this as "#drupal-modal".
To use the OpenModalDialogCommand class in the createDialog action we just need to add the class to the namespaces section at the top of the file.
use Drupal\Core\Ajax\OpenModalDialogCommand;
Then, we just change the createDialog command to use the OpenModalDialogCommand instead of the OpenDialogCommand.
  public function createDialog() {
    // Load a specific node.
    $node = $this->entityTypeManager->getStorage('node')->load(1);

    // Convert node into a render array.
    $viewBuilder = $this->entityTypeManager->getViewBuilder('node');
    $content = $viewBuilder->view($node, 'teaser');

    // Get the title of the node.
    $title = $node->getTitle();

    // Create the AjaxResponse object.
    $response = new AjaxResponse();

    // Attach the library needed to use the OpenDialogCommand response.
    $attachments['library'][] = 'core/drupal.dialog.ajax';
    $response->setAttachments($attachments);

    // Add the open dialog command to the ajax response.
    $response->addCommand(new OpenModalDialogCommand($title, $content, ['width' => '70%']));
    return $response;
  }
Now, when we click on the dialog link we will see a modal window instead of the normal dialog window.
Creating Off Canvas Ajax Dialogs Using OpenOffCanvasDialogCommand
Off canvas ajax dialogs either slide in from the right hand side side or the top of the page. This is different to the modal and normal ajax dialogs that appear in the middle of the screen
Here is an example of an off canvas ajax dialog that slides in from the right hand side and takes up 70% of the page width. Note that at certain breakpoints the off canvas ajax dialog will fill the entire screen, so if your page doesn't look like this then make the browser window a little bigger.

In order to use this type of dialog you need to include the Drupal\Core\Ajax\OpenOffCanvasDialogCommand class into the namespace area at the top of the file.
use Drupal\Core\Ajax\OpenOffCanvasDialogCommand;
The OpenOffCanvasDialogCommand class extends the OpenDialogCommand class and is essentially a normal dialog with a few options set. It is used in more or less the same way as the OpenModalDialogCommand class as it accepts less options than the OpenDialogCommand class.
  public function createDialog() {
    // Load a specific node.
    $node = $this->entityTypeManager->getStorage('node')->load(1);

    // Convert node into a render array.
    $viewBuilder = $this->entityTypeManager->getViewBuilder('node');
    $content = $viewBuilder->view($node, 'teaser');

    // Get the title of the node.
    $title = $node->getTitle();

    // Create the AjaxResponse object.
    $response = new AjaxResponse();

    // Attach the library needed to use the OpenDialogCommand response.
    $attachments['library'][] = 'core/drupal.dialog.ajax';
    $attachments['library'][] = 'core/drupal.dialog.off_canvas';
    $response->setAttachments($attachments);

    // Add the open dialog command to the ajax response.
    $response->addCommand(new OpenOffCanvasDialogCommand($title, $content, ['width' => '70%']));
    return $response;
  }
The key part of this is that you also need to add the core/drupal.dialog.off_canvas library to the page in order for the off canvas dialog to work correctly. If you load the dialog without this library in place you will get just a normal ajax dialog window. You can add it to the ajax response as part of the off canvas dialog command just like other ajax dialogs.
Perhaps the most reliable way of doing this is adding it to the render array that generates the link as an attachment to the render array.
  public function displayPage() {
    $output = [];

    $output['a_dialog_link'] = [
      '#type' => 'link',
      '#url' => new Url('mymodule_display_modal'),
      '#title' => 'node in dialog',
      '#attributes' => [
        'class' => ['use-ajax'],
      ],
    ];

    $output['#attached']['library'][] = 'core/drupal.dialog.ajax';
    $output['#attached']['library'][] = 'core/drupal.dialog.off_canvas';

    return $output;
  }
By default, the off canvas ajax dialog will appear from the right hand side. If you want to change this to the top of the page then you can set the $position property to 'top'. This is the last property in the constructor after the $settings property so that needs to be set to NULL to bypass it. As the width setting doesn't make sense in this context (and isn't used) that has been removed also.
$response->addCommand(new OpenOffCanvasDialogCommand($title, $content, [], NULL, 'top'));
With this change in place the dialog will appear from the top of the screen.
Adding An Ajax Dialog Using Attributes
The good news is that you don't need to go through all of this to generate an ajax dialog, you can just instruct Drupal that you want an ajax dialog creating and the system will fill in the blanks for you. There are a few ways in which this can be done; using a render array to add the attributes, adding attributes to link definitions, and editing HTML.
All of these methods use the same attributes in the HTML to inform Drupal that an ajax dialog box is to be used for this link. The 'use-ajax' class is still needed to tell Drupal that this is an ajax link, but we also add a couple of additional attributes to set up the dialog.
- data-dialog-type - This is the type of dialog being generated, which can be one of the values dialog, dialog.off_canvas, dialog.off_canvas_top and modal.
- data-dialog-options - This is a json encoded set of values that you can pass to the dialog component. This is essentially the same as the options parameter from the dialog command objects and allows you to set any value in the dialog.
- data-dialog-renderer - This parameter can add some extra information about how to render the dialog. It isn't used much, but can be used to convert a normal dialog into an off canvas dialog using either the parameters off_canvas or off_canvas_top. In more technical terms, it is appended to the _wrapper_format parameter of the ajax request and can be used to update how the request is handled.
Let's look at some different ways in which we can use this.
Adding An Ajax Dialog Using A Render Array
To create an ajax dialog using a render array you need to add the ajax dialog attributes to a rendered link (along with the important use-ajax class).
The following example will generate a link to a page of content and use a modal dialog with a width of 70% to show that content to the user. We use the Drupal\Component\Serialization\Json class to handle the json encoding here.
  public function displayPage() {

    $output = [];

    $node = $this->entityTypeManager->getStorage('node')->load(1);
    $url = $node->toUrl()->setAbsolute();

    $output['a_dialog_link'] = [
      '#type' => 'link',
      '#url' => $url,
      '#title' => 'node in dialog',
      '#attributes' => [
        'class' => ['use-ajax'],
        'data-dialog-type' => 'modal',
        'data-dialog-options' => Json::encode([
          'width' => '70%',
        ]),
      ],
    ];

    $output['#attached']['library'][] = 'core/drupal.dialog.ajax';

    return $output;
  }
One issue that might cause you a problem with these attribute methods is how the end result is rendered, so let's look into that here before moving on.
When you open the ajax dialog you might notice something a bit strange if you have comments enabled on the node you are linking to. If this is the case then your dialog box might look a little something like this with buttons at the bottom of your dialog box.
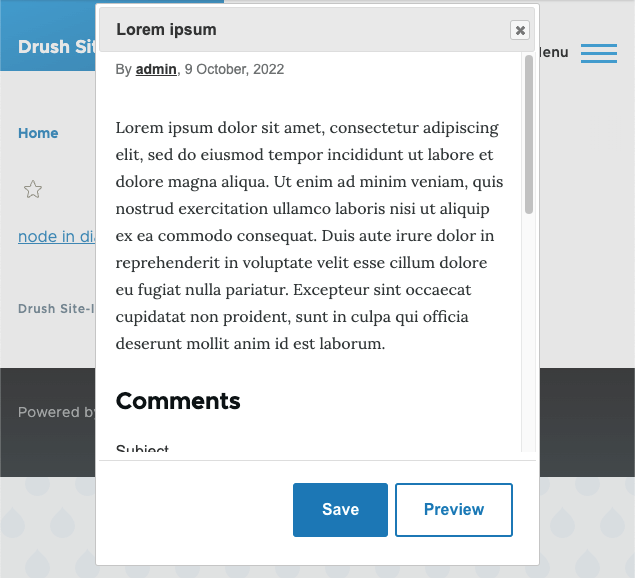
This is being caused because the default rendering for nodes is 'full' and the comment form is therefore being rendered into the response to the ajax request. Drupal will auto-detect any buttons in the response and display them in the footer of the dialog box. This behaviour can be turned off using the drupalAutoButtons option when creating the dialog command objects, but when passed through the link render array like this we don't have access to that option.
To get around this, we need to change the render mode of the node when it is being accessed through the ajax dialog rendering. We can then select a render mode that doesn't have the comments form printed out and we can then create a less confusing dialog display.
This can be done using a hook_entity_view_mode_alter() hook, which we use to swap the view mode based on the context of the response. The following shows an implementation of this hook that listens for articles being rendered in the full mode through a modal ajax dialog box and changes this to teaser.
/**
 * Implements hook_entity_view_mode_alter()
 */
function mymodule_entity_view_mode_alter(&$view_mode, Drupal\Core\Entity\EntityInterface $entity, $context) {
  if ($entity->getEntityTypeId() == 'node' && $entity->bundle() == 'article' && $view_mode == 'full') {
    $isAjax = \Drupal::request()->isXmlHttpRequest();
    $wrapperFormat = \Drupal::request()->get('_wrapper_format');
    if ($isAjax === TRUE && $wrapperFormat == 'drupal_modal') {
      $view_mode = 'teaser';
    }
  }
}
With this hook in place our article node is printed out without the comment buttons. The ajax dialog essentially functions just like it did when we were creating the ajax commands at the start of this article. It's probably a good idea to have a render mode for dialog boxes before settings things up as it keeps your dialogs in a consistent state.
As a side note careful when using the _wrapper_format parameter in the ajax request. It is possible to change this using the data-dialog-renderer attribute, which will append information to the end of the wrapper format sting. For example, if you set the data-dialog-type attribute to be "dialog" and the data-dialog-renderer attribute to be "off_canvas", then the _wrapper_format string would be "drupal_dialog.off_canvas".
The drupalAutoButtons options is set to false inside the OpenOffCanvasDialogCommand and as such no buttons will be shown. It is still a good idea, however, to adapt the content to fit with the display and select the correct display mode when shown in an ajax dialog.
For completeness, let's look at the two ways you can show an off canvas dialog box to users.
To create an off canvas dialog using just the data-dialog-type attribute.
  public function displayPage() {

    $output = [];

    $node = $this->entityTypeManager->getStorage('node')->load(1);
    $url = $node->toUrl()->setAbsolute();

    $output['a_dialog_link'] = [
      '#type' => 'link',
      '#url' => $url,
      '#title' => 'node in dialog',
      '#attributes' => [
        'class' => ['use-ajax'],
        'data-dialog-type' => 'dialog.off_canvas',
      ],
    ];

    $output['#attached']['library'][] = 'core/drupal.dialog.ajax';
    $output['#attached']['library'][] = 'core/drupal.dialog.off_canvas';

    return $output;
  }
To create an off canvas dialog using a combination of the data-dialog-type and data-dialog-renderer attributes.
  public function displayPage() {

    $output = [];

    $node = $this->entityTypeManager->getStorage('node')->load(1);
    $url = $node->toUrl()->setAbsolute();

    $output['a_dialog_link'] = [
      '#type' => 'link',
      '#url' => $url,
      '#title' => 'node in dialog',
      '#attributes' => [
        'class' => ['use-ajax'],
        'data-dialog-type' => 'dialog',
        'data-dialog-renderer' => 'off_canvas',
      ],
    ];

    $output['#attached']['library'][] = 'core/drupal.dialog.ajax';
    $output['#attached']['library'][] = 'core/drupal.dialog.off_canvas';

    return $output;
  }
If you're interested in how the attributes get change to dialog boxes then look at the classes Drupal\Core\Render\MainContent\DialogRenderer, Drupal\Core\Render\MainContent\ModalRenderer and Drupal\Core\Render\MainContent\OffCanvasRenderer. These classes are used to convert the ajax request into a AjaxResponse that contains a flavour of dialog command class, just like we worked through at the start of the article.
Adding An Ajax Dialog With Link Definitions
It is possible to add ajax dialog options to links that are defined in modules using attributes information.
The following code would be created in a file called mymodule.links.menu.yml and renders a page of content using an off canvas ajax dialog. I should note that it's probably not the greatest idea to add hard coded links to content like this, but it shows exactly the same dialog box being created as the other examples in this article.
mymodule.example_node:
  title: 'node in dialog'
  route_name: entity.node.canonical
  route_parameters: {node: '1'}
  menu_name: main
  options:
    attributes:
      class: ['use-ajax']
      data-dialog-type: dialog
      data-dialog-renderer: off_canvas
You still need to make sure that the core/drupal.dialog.ajax and/or core/drupa.dialog.off_canvas libraries are available to the link in order for this to work. This can be done using either a hook_page_attachments_alter() hook, or just add the library into your theme layer so that it is always available.
Adding An Ajax Dialog In Content
Finally, it is also possible for your editors to add ajax dialogs to content, just be adding in the correct attributes to the link. This is essentially what we have been doing though adding attributes to render arrays and links, and will work as long as your users have access to add these attributes.
For example, we could change a normal link to a page of content to a modal ajax dialog by adding the use-ajax class and adding the data-dialog-type as modal to the link.
<a class="use-ajax" data-dialog-type="modal" href="/node/1">node in dialog</a>
It is also possible to pass options using the data-dialog-options attribute. This sets the width of the modal window to be 70%.
<a class="use-ajax" data-dialog-options="{"width":"70%"}" data-dialog-type="modal" href="/node/1">node in dialog</a>
You do need to be careful with the encoding of the parameters in your options here. Make sure you change all quote marks to be '"' so that they don't interfere with the rest of the HTML on the page.
Conclusion
The Drupal ajax dialog system is pretty powerful, but does take a little bit of understanding. At first it can seem like Drupal magically knows how to create these dialogs, but it is just different components plugged together in the right way. There are a few different ways to generate dialog boxes, which adds to the confusion, but they all go through the same few classes behind the scenes.
What is neat about this system is that your users can also make use of it without having to know a lot of programming details. It takes just two attributes to change a normal link to an ajax enabled modal popup and as long as your theme includes the dialog libraries it will work quite well.
If you want to know more there is a page on the Drupal website that goes through how to use Drupal dialog links as well as some extra data parameters.

Add new comment