Drupal SimpleTest is a module that will allow you to unit test your own modules or unit test any patches you have made for third party modules. This module will be integrated into Drupal 7, but for Drupal 6 you have to do a couple of thngs before you can start testing. This article is a very quick introduction to Drupal SimpleTest and will be followed up by more articles in the future.
The first step is to download and install the SimpleTest module as you would any other module. You can use Drush to do this if you know how.
Once it is running you will need to patch the core of Drupal to run any tests. I shouldn't have to point out that patching Drupal core is risky and you really shouldn't do this on a production side. The very fact that you are wanting to install SimpleTest means that you are trying to test things out, in which case you are doing all of this on a development server, right?
Anyway, there are a couple of ways in which you can apply the patch (which is found in the SimpleTest module directory) to your Drupal install. The CVS method (as described in the Simpletest install.txt file) is probably the quickest.
patch -p0 < path/to/simpletest/D6-core-simpletest.patch
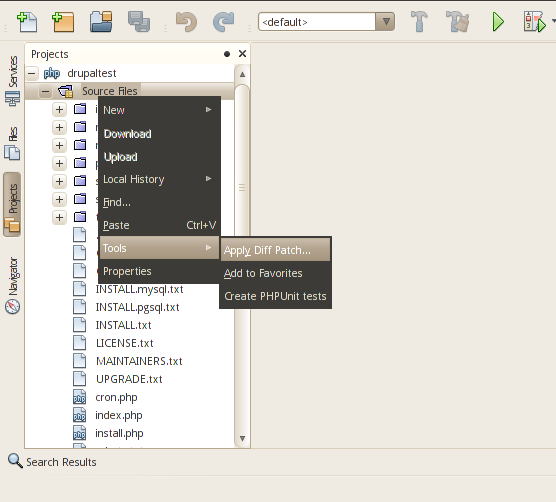
However, this method isn't always available on all systems. When this is the case I use the Netbeans IDE to apply the patch. To do this you first need to load the Drupal install as a project. Once this is done, right click on the source code and click on Tools > Apply Diff Patch...
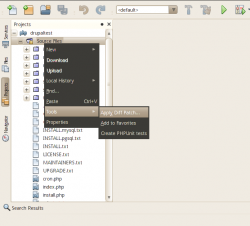
Drupal 6 SimpleTest Apply Patch 1
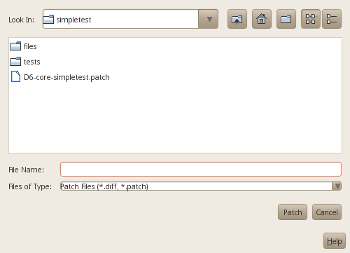
Then navigate to your SimpleTest directory and select the file D6-core-simpletest.patch.
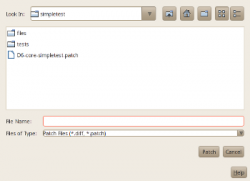
Drupal SimpleTest Selecting The Patch File
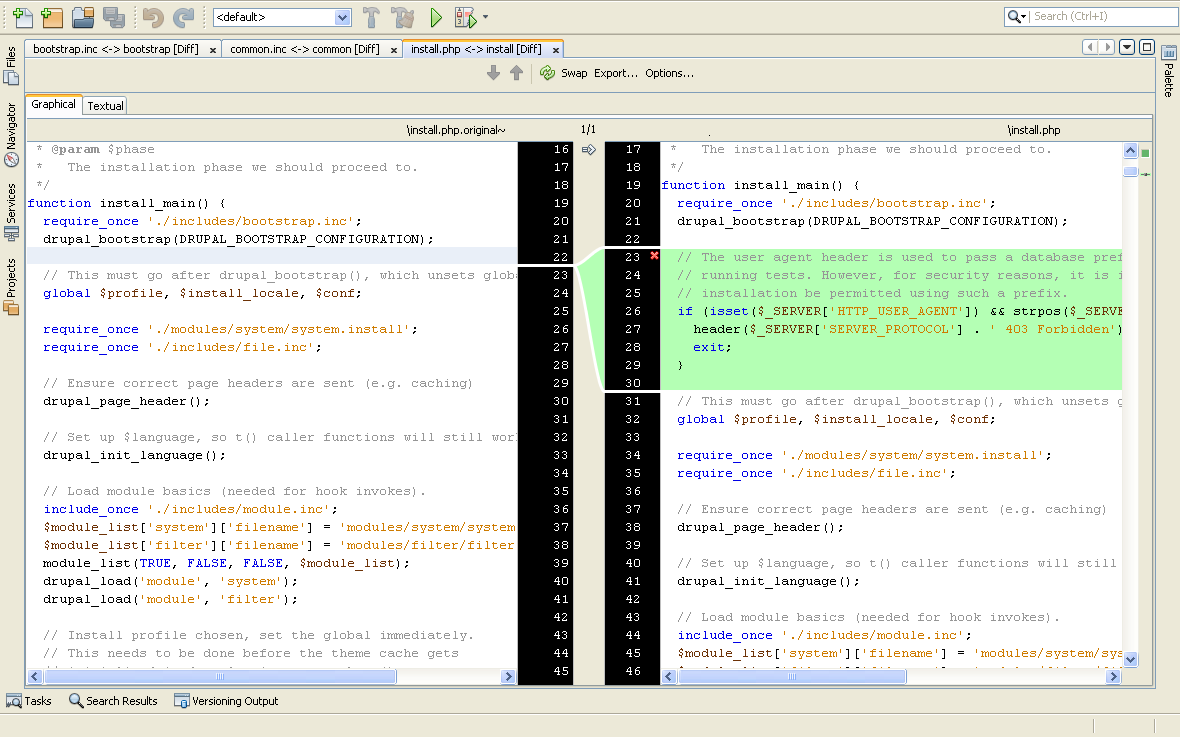
Once that the patch has been applied you can chose to see the changes applied in a difference report. This is what it looks like.
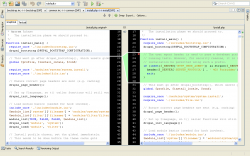
Drupal SimpleTest Netbeans Diff Report
From this point on there is no difference between Drupal 6 and Drupal 7 (other than the admin interface) in terms of using SimpleTest. In fact, SimpleTest is being used quite extensively in Drupal 7 and is therefore packed along with it.
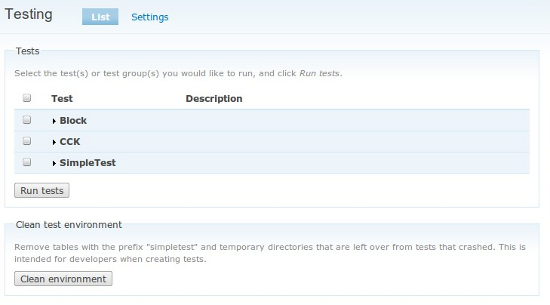
You can install the SimpleTest module like any other Drupal module, you can even do it before you install the patch. The patch is actually only needed to run the tests. To find the tests admin page go to Site Building > Testing or the URL /admin/build/testing, this page will show you the current tests available on your current install. By default you will see SimpleTest tests, but the more modules you install the more tests you will see avaliable. The screenshot below shows the SimpleTest admin screen with a couple of modules installed.
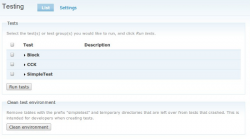
The SimpleTest admin page
By clicking on the checkbox to the side of a test you can run a group of tests together, but you can also click on the group name, which will produce a list of individual tests that you can run one at a time. When you run any tests you will see a page with a progress bar that shows which tests are being run and when it has finished you will be given a report on what tests passed or failed.
How SimpleTest Works
Before starting on how to write tests using SimpleTest it is important to understand how the system works. When a test is run through SimpleTest it installs a new version of Drupal using a temporary table name prefix, runs the test and then deletes the tables created. Things are slightly different with files as they will get copied or moved as they normally would so you need to take care of cleaning them up once your tests have run.
Due to a new install of Drupal being performed every time a test it run you need to make sure you set your code execution timeouts to be quite high or your test run might fall over. The most important thing to realise is that when SimpleTest installs Drupal, it is a very basic install with no modules installed (with the exception of the one you are currently testing) or anything else defined. This means that if you wanted to test your module along with the CCK or Views modules you would have to enable them before you could use them in your tests. The same thing applies to any variables, users, nodes or anything else that you might expect to have to create in a new install.
Some people might see this as a weak point in creating unit tests in Drupal, but it really makes you think about everything your code will do in the application, how it will interact with users, nodes, modules and themes, which is perhaps what unit testing is all about?
If your tests cause the code to fall over half way through the test run then you will need to clean up the temporary tables created. There is a button within the SimpleTest admin area labelled "Clean Up" which will allow you to do this. Tests can fail half way through if your code times out, but also if you have any syntax errors in your code.
Before you get started
To create unit tests for your own modules you need to create files with the extension ".test" in your module directory. For simple modules you can just create a file in the root directory of the module. For more complex modules with multiple test files and associated resources (eg, files used in the tests) it is possible to include everything in a directory called tests, which SimpleTest will also look for.
SimpleTest is used in an object orientated manner, so to run tests you extend one of two classes and add your own testing functions. These classes are DrupalWebTestCase and DrupalUnitTestCase and which one you use depends on what sort of things you want to test. The DrupalUnitTestCase class should only be used to test things that don't need database or file level access. These are things like string manipulations or calculations. The DrupalWebTestCase class should be used when testing essentially everything else inside your Drupal environment.
In order to get SimpleTest to register your tests and add them to the SimpleTest admin page you need to add a method called getInfo() to your extended class. The following defines a very simple testing class that won't run any tests. The getInfo() method returns an associative array that has the elements name, description and group. The name is the name of the class, the description will display what is tested in the class and the group is used by SimpleTest to group tests together.
class MyModuleTest extends DrupalWebTestCase {

    /**
    * Create an array of options for the simpletest module.
    *
    * @return array The array of options
    */
    public function getInfo() {
        return array(
            'name' => t('MyModule Example Test Class'),
            'description' => t('A description of what the class tests.'),
            'group' => t('MyModule'),
        );
    }
}
After you create this file in your module directory you will need to clear the caches to get it to display in your SimpleTest admin area. You can create more than one of these files if you want to test different aspects of your module. It is also a good idea to split apart the tests into sections based either on functionality or files. Before we start writing tests there are two important methods that must be introduced, these are setUp() and tearDown().
The setUp() function is used to bring the default Drupal install into line with what you want to test. This includes things like installing modules, creating variables, adding users or even logging users in. The setUp() method is the most important step before you try to test anything.
The tearDown() function is used to clean up anything that you did in your tests. This isn't needed for every test class as SimpleTest will do most of the cleanup itself, but sometimes you want to revert any changed or moved files back to their original state so it is useful in that sense.
For every test that is run SimpleTest will run the setUp() method, then run the test, and then run the tearDown() method.
The following is the previous class with the getInfo() method and the setUp() and tearDown() methods included.
class MyModuleTest extends DrupalWebTestCase {

    /**
     * Create an array of options for the simpletest module.
     *
     * @return array The array of options
     */
    public function getInfo() {
        return array(
            'name' => t('MyModule Example Test Class'),
            'description' => t('A description of what the class tests.'),
            'group' => t('MyModule'),
        );
    }

    /**
     * SimpleTest core method: code run before each and every test method.
     *
     * Optional. You only need this if you have setup tasks.
     */
    public function setUp() {
        // Always call the setUp() method from the parent class.
        parent::setUp();
    }

    /**
     * SimpleTest core method: code run after each and every test method.
     *
     * Optional. You only need this if you have setup tasks.
     */
    public function tearDown() {
        // Always call the tearDown() method from the parent class.
        parent::tearDown();
    }
}
To enable a module using the setUp() method just pass them one at a time as string parameters. For example, to enable the Content, Views and Context modules (to pick three at random) you would do the following.
parent::setUp('content', 'views', 'context');
Note that you don't need to include your own module in your setUp() method, SimpleTest will do this for you.
Make your own tests
To run your own tests all you have to do is create methods with the prefix "test". SimpleTest will pick these methods up automatically and add them to the list of tests it will run. Once you have decided what you want to test you can use the built in testing functions from SimpleTest to check the output. SimpleTest comes with a lot of testing functions that allow you to assert things as you would normally do when unit testing things. The code below is a simple example of a testing method that inspects the returned value of a function in a module.
public function testCheckText() {
    $expected_text = 'expected text';

    $text = my_module_text_function('input text');

    $this->assertTrue($text == $expected_text, t('Checking text alteration function.'));
}
This is an example of one of the many different assertion methods available in SimpleTest, and because we are extending the SimpleTest class that contains these methods we need to use $this to call them. An alternative to using assertTrue() here would have been to use assertEqual(), which works in more or less the same way, but here the first two parameters are the two variables you want to compare. The following is the same test as above, but written using assertEqual() instead.
public function testCheckText() {
    $expected_text = 'expected text';

    $text = my_module_text_function('input text');

    $this->assertEqual($text, $expected_text, t('Checking text alteration function.'));
}
For a full list of the different assertions available, check out the SimpleTest assertion reference page.
Helper functions
So far I have only looked at the most basic of logic testing, but there are lots of things to test within a Drupal site, and SimpleTest comes with a bunch of helpful methods that allow you to perform certain actions or send data to Drupal in different ways.
The two most useful helper methods are drupalPost() and drupalGet(), which perform post (form submission) and get (web browsing) requests respectively.
The drupalPost() method is used to send post data to Drupal, for example, when submitting a form of some sort. The most common example of submitting a form in a Drupal site is creating a node. Normally in Drupal you would create a node by creating an object and then passing it through the node_save() function. However, SimpleTest allows you to create a node by submitting the add node form in the same way as your normally would. The good thing about this method is that you will also be testing the privileges of the user you logged in as when using another SimpleTest helper method called drupalLogin(). Here is an example of the drupalPost() method creating a node. The return value of drupalPost() is the output sent back from the post request, you can then test this output.
$edit = array();
$edit['title'] = 'Node title';
$edit['body'] = 'Node body';
$output = $this->drupalPost('node/add/page', $edit, t('Save'));
SimpleTest also provides us with an easy way to do this with the drupalCreateNode() method, which works in a very similar way.
$node_array = array(
 'type' => 'page',
 'title' => 'Node title',
 'body' => 'Node body',
);
$node = $this->drupalCreateNode($node_array);
The drupalGet() method is the get equivalent of the drupalPost() method. With this you can check on the results of your actions when creating nodes, adding users and whatever else your module is going to do. The following snippet will grab the HTML contents of a page and return it, ready for you to test it for expected strings.
$output = $this->drupalGet('node/' . $node->nid));
Testing the return output of the get or post call is one way of making sure you action had the correct effect. However, whenever you perform an action in SimpleTest it is stored in an internal browser, which can then be tested in the same way as checking the returned output for your expected results. For example, lets say that we created a node using the drupalPost() method, we could then test the output of the page using assertRaw() to see if the things we wanted to save have been returned.
public function testCreateNode() {
    $edit = array();
    $edit['title'] = 'Node title';
    $edit['body'] = 'Node body';
    $this->drupalPost('node/add/page', $edit, t('Save'));
    $this->assertRaw('Node title', t('Node output found.'));
}
This can be confusing at first as it doesn't look like assertRaw() is doing anything, but it is the current page that gets looked at so there is no need to pass an output variable.
Debugging
Debugging in SimpleTest isn't that straightforward, if you print out anything it will simply be ignored and you'll never see it. SimpleTest comes with a debugging mode that you can activate to get it to print out or save information whilst it is running tests. Go to the SimpleTest admin page at /admin/build/testing/settings and check the setting labelled "Provide verbose information when running tests". With this enabled, every time you call drupalGet() or drupalPost() the content will be captured as a HTML file. You can also send output messages to the test results page by calling the verbose() method and passing some debugging output to it.
$this->verbose('Array contents: ' . var_export($array, true));
There is a lot more to Drupal SimpleTest than I have outlined here, but this should get you started on unit testing in Drupal. I hope to write a few more articles about SimpleTest in the future so make sure you subscribe to the feed if you are interested.
For more information on SimpleTest here are some useful links:
- SimepleTest module page
- SimepleTest help pages
- SimepleTest API pages
- SimepleTest Assertions
Add new comment