This is part five of a series of articles looking at HTMX in Drupal. If you are interested in reading more then there will be a list of related articles at the end of this article.
When I was thinking about ideas on demonstrating HTMX in Drupal I implemented things like infinite scroll, a tabbed interface, and a cascading select form. I basically recreating some things that I had done in non-Drupal HTMX inside a Drupal module.
I then had an idea to create something that I might actually find useful in my day to day work as a Drupal developer. This was some way of displaying nodes in different view modes.
In this article we will look at creating a simple form that allows users to enter a node ID and a view mode and see the node rendered in that view mode.
All of the code contained in this article can be found in the Drupal HTMX examples project on GitHub, but here we will go through what the code does and what actions it performs to generate content.
Just like the other articles on HTMX, I'm going to start with the basics and define the route.
The Route
The route we need here just needs to point the path /htmx-examples/display-mode-preview at our form class.
drupal_htmx_examples_display_mode_preview_form:
  path: "/htmx-examples/display-mode-preview"
  defaults:
    _form: '\Drupal\drupal_htmx_examples\Form\DisplayModePreviewForm'
    _title: "HTMX Display Mode Preview Form"
  requirements:
    _permission: "access content"
There isn't anything unusual about this route, it's just a regular form route.
Let's create the form for this route.
The Form
The form class has a couple of injected dependencies, which are as follows:
entity_type.manager - Used to load the node from the database, and to load the view builder to render the node.entity_display.repository - Used to load in a list of the available view modes for the node.
Here is the skeleton of the form without the buildForm() method, which we will come onto in a second.
<?php

namespace Drupal\drupal_htmx_examples\Form;

use Drupal\Core\Entity\EntityDisplayRepositoryInterface;
use Drupal\Core\Entity\EntityTypeManagerInterface;
use Drupal\Core\Form\FormBase;
use Drupal\Core\Form\FormStateInterface;
use Drupal\Core\Htmx\Htmx;
use Symfony\Component\DependencyInjection\ContainerInterface;

/**
 * Form to show nodes being rendered in different view modes.
 */
class DisplayModePreviewForm extends FormBase {

  /**
   * The entity type manager service.
   *
   * @var \Drupal\Core\Entity\EntityTypeManagerInterface
   */
  protected EntityTypeManagerInterface $entityTypeManager;

  /**
   * The entity display repository service.
   *
   * @var \Drupal\Core\Entity\EntityDisplayRepositoryInterface
   */
  protected EntityDisplayRepositoryInterface $entityDisplayRepository;

  public static function create(ContainerInterface $container): self {
    $instance = new static($container);
    $instance->entityTypeManager = $container->get('entity_type.manager');
    $instance->entityDisplayRepository = $container->get('entity_display.repository');
    return $instance;
  }

  public function getFormId() {
    return 'display_mode_preview_form';
  }

  public function submitForm(array &$form, FormStateInterface $form_state): void {
    // Do nothing.
  }

}
The buildForm() method is fairly busy, but essentially it needs to do the following:
- Accept the user input from the form (or set some sensible defaults if none have been set).
- Create the node field as a number field.
- Get a list of the available view modes for the entity type and use that to create a select element so that the user can select one.
- If the user has selected a node then load this node from the database.
- Use the view builder of the entity type to generate a render array for that node in the selected view mode (defaulting to "full").
- Create a HTML div element with the id of "node-preview-output" and pass the created render array to that element as a child. This will tell the render to render the node render array inside the div element.
Here is the code for the form action.
  public function buildForm(array $form, FormStateInterface $form_state) {
    // Get the input from the user, if any is set, setting some sensible
    // defaults.
    $nid = $form_state->getValue('node_id', '');
    $viewMode = $form_state->getValue('view_mode', 'full');

    // The node ID input field.
    $form['node_id'] = [
      '#type' => 'number',
      '#title' => $this->t('Node ID'),
      '#default_value' => $nid,
    ];

    // Load the view modes for the node.
    $viewModes = $this->entityDisplayRepository->getViewModes('node');
    $viewModesSelection = [];
    foreach ($viewModes as $id => $mode) {
      $viewModesSelection[$id] = $mode['label'];
    }

    // Create the view mode selection field.
    $form['view_mode'] = [
      '#title' => $this->t('View modes'),
      '#type' => 'select',
      '#empty_option' => $this->t('- Select -'),
      '#options' => $viewModesSelection,
      '#default_value' => $viewMode,
    ];

    // Create a placeholder for the node output.
    $form['output'] = [
      '#markup' => '<div id="node-preview-output"></div>',
    ];

    if ($nid === '') {
      // If no node ID is set then return here.
      return $form;
    }

    // Load the node using the entered ID.
    $nodeStorage = $this->entityTypeManager->getStorage('node');
    $node = $nodeStorage->load($nid);

    if (!$node) {
      // If we don't have a node (the user might have entered a node ID that
      // doesn't exist) then we return here with a simple message.
      $form['output'] = [
        '#type' => 'html_tag',
        '#tag' => 'div',
        '#value' => $this->t('Node not found'),
        '#attributes' => [
          'id' => 'node-preview-output',
        ],
      ];
      return $form;
    }

    // If we have a node, then render it using the selected view mode and
    // inject that into the 'children' element of the output form element. This
    // will render the node as the form element is rendered.
    $viewBuilder = $this->entityTypeManager->getViewBuilder('node');
    $renderArray = $viewBuilder->view($node, $viewMode);
    $form['output'] = [
      '#type' => 'html_tag',
      '#tag' => 'div',
      '#attributes' => [
        'id' => 'node-preview-output',
      ],
      'children' => $renderArray,
    ];

    return $form;
  }
The div element with the id of node-preview-output is added three times in the form logic, but we only ever render one of them at any time. We will use this element to inject content from the form into the page when the user interacts with it. By default, when the page loads, we just want to have a blank placeholder for the element.
The form does absolutely nothing without any HTMX in it, the submitForm() method doesn't need to do anything as that's all handled by the HTMX action. There isn't even s submit handler. So, let's add HTMX to the form to provide some functionality.
Adding HTMX
To add out interactivity we need to add HTMX to the node_id and view_mode fields.
Starting with the node_id field, we add the following HTMX setup to the field.
    $form['node_id'] = [
      '#type' => 'number',
      '#title' => $this->t('Node ID'),
      '#default_value' => $nid,
    ];

    (new Htmx())
      ->post()
      ->trigger('input delay:0.5s')
      ->target('#node-preview-output')
      // Select is required to pick out the correct element from our response, which will contain the entire form.
      ->select('#node-preview-output')
      ->swap('outerHTML')
      ->applyTo($form['node_id']);
This will add the following HTMX attributes to the form.
data-hx-post - This will send a POST request back to the form. Since we didn't add a parameter to the method it will automatically use the current route.- data-tx-trigger - This tells HTMX to issue a request to the form when the user enters some input into the field, but to give it a small 0.5 second delay before doing that.
data-hx-target - This tells HTMX where to place the element we have pulled out of the response. In our case we want to set the destination of the response to be the div element with the ID of node-preview-output.data-hx-select - A data-hx-select attribute is essential when dealing with HTMX forms in Drupal. If you have read my previous articles you will remember that when we make a HTMX request we get the entire form back from the server. We therefore need to tell HTMX to pick out of the response just the elements that we need. In this case we are using the selector string "#node-preview-output' which tells HTMX that we want to find the element that has that id, which contains our rendered node.data-hs-swap - Finally, we set the swap strategy to outerHTML, which tells HTMX to entirely replace the target element with the selected value from the response.
The view_mode field is set up using the following HTMX.
    $form['view_mode'] = [
      '#title' => $this->t('View modes'),
      '#type' => 'select',
      '#empty_option' => $this->t('- Select -'),
      '#options' => $viewModesSelection,
      '#default_value' => $viewMode,
    ];

    (new Htmx())
      ->post()
      ->target('#node-preview-output')
      // Select is required to pick out the correct element from our response, which will contain the entire form.
      ->select('#node-preview-output')
      ->swap('outerHTML')
      ->applyTo($form['view_mode']);
This will add a similar collection of HTMX attributes to the field field. In this case we haven't added a trigger attribute since the element is a select field and already has a trigger for when it is changed.
What we are essentially doing here it telling HTMX to listen to these two fields, issue a request to the form, and swap out the div element with the id of node-preview-output with the contents of the same element in the rendered response.
The HTMX Workflow
The HTMX elements work in the following way.
Note that I have simplified and removed quite a bit of the markup to make things easier to read and follow.
The HTMX workflow in action here is pretty simple, we start out with the three elements (the two form elements and the div element) in the form.
<div class="js-form-item form-item form-type-number js-form-type-number form-item-node-id js-form-item-node-id">
  <label for="edit-node-id" class="form-item__label">Node ID</label>
  <input data-hx-post="" data-hx-trigger="input delay:0.5s" data-hx-target="#node-preview-output" data-hx-select="#node-preview-output" data-drupal-selector="edit-node-id" type="number" id="edit-node-id" name="node_id" value="" step="1" class="form-number form-element form-element--type-number form-element--api-number">
</div>

<div class="js-form-item form-item form-type-select js-form-type-select form-item-view-mode js-form-item-view-mode">
<label for="edit-view-mode" class="form-item__label">View modes</label>
<select data-hx-post="" data-hx-target="#node-preview-output" data-hx-select="#node-preview-output" data-drupal-selector="edit-view-mode" id="edit-view-mode" name="view_mode" class="form-select form-element form-element--type-select">
  <option value="" selected="selected">- Select -</option>
  <option value="full">Full content</option>
  <option value="rss">RSS</option>
  <option value="search_index">Search index</option>
  <option value="search_result">Search result highlighting input</option>
  <option value="teaser">Teaser</option>
</select>
</div>

<div id="node-preview-output"></div>
When the user interacts with the form, say, by entering the node ID 42 and the view mode of "Teaser", HTMX will issue a request to the server which re-renders the form using that information. This response sent back contains the entire page, including the newly built form, which we extract the node-preview-output element from and replace it with the element of the same id on the page.
The node placed into the div element is fully rendered with the correct CSS due to the way that HTMX works in Drupal. Part of the core HTMX library is a file called htmx-assets.js, which is used to pull out CSS and JavaScript files from the response and add them to the header of the current page. This means that the full node is always rendered correctly, even if that node is rendered using a single directory component that wasn't part of the original page request.
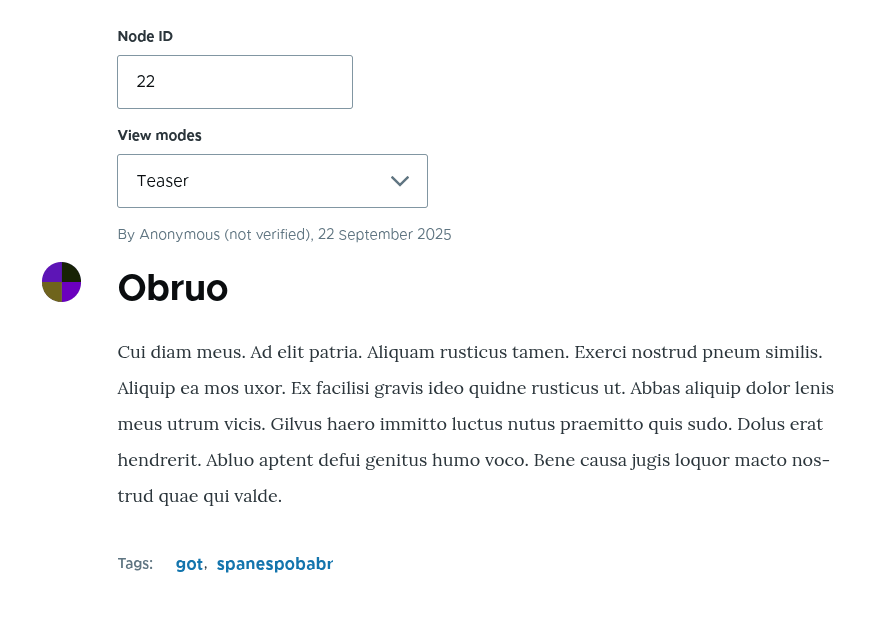
Here is a demonstration of the form in use, with a node preview loaded.
The combination of select and swap when working with forms is important to master when using HTMX in Drupal. In fact, it's so important that I'm going to copy the two things you must remember when building HTMX forms in Drupal from the previous article.
- The response from Drupal always contains the entire form so you must pick the elements you want out of the form response. If you don't do this you will see the form appearing inside the form, which is a bit of a mess.
- The form must have a consistent state. This means that you can't just add a bunch of elements to the form and expect it to work. The form state must re-build the form in exactly the same way with or without the HTMX request. This makes sense if you think at how forms are submitted. In the form workflow the forms are built and then submitted, so if the element doesn't exist in the build step, then it won't be part of the submitted values in the submit handler.
What's nice about this form is that the rendered form also works with single directory components. I've tested it on a few sites now and it does a good job of rendering any node in any view mode through the HTMX callback.
In fact, this could almost be a stand alone module. If you think it's useful enough to be a full module then let me know and I'll get the project created.

Add new comment