I have previously talked about installing SimpleSAMLphp using composer, so the next step is setting up the system to actually provide authentication against a SimpleSAMLphp system. As I spend a lot of time using Drupal I wanted to set up the authentication with Drupal and SimpleSAMLphp in order to see how things worked.
First, let's define a couple of terms that are important to this setup.
SP - Service Provider - This is the system that users are trying to log into, which in this setup is Drupal. The Drupal site is providing a 'service' and as such users want to authenticate with it. Service providers will generally create a local user to track the user within the site, although that's not always the case.
IdP - Identity Provider - The SimpleSAMLphp system holds the information about the users and is therefore called an identity provider as it provides the identity of the user. This is used by the Service Provider to authenticate the user.
What we need to do here is setup SimpleSAMLphp so that it has information about users and be the IdP. Then setup Drupal so that users can authenticate against SimpleSAMLphp and log into the site as a SP. You will see the terms SP and IdP thrown about a lot when people talk about SAML and other authentication systems, but this is essentially what we are trying to achieve here.
I won't delve too deeply into the SAML protocol as the wikipedia pages on SAML and SAML 2.0 are actually a pretty good resources on the subjects. SAML though, is a series of HTTP requests that contain XML as their payload, which is done using GET or POST requests through forms. Essentially, when a user goes to log into our SP they will be redirected to the IdP with a request that identifies the SP the user came from. The user will then authenticate on the IdP site before being redirected back to the SP. The payload of the redirection contains metadata about who the user is, which is used to authenticate them against the SP. The Drupal site can be setup in a way that it allows the registration of users held on the IdP as they are authenticated onto the site. Requests are encrypted between the two platforms to ensure the authentication is secure.
Setting Up Certificates
Throughout this article I'm going to assume that you have a composer based install of SimpleSAMLphp and a separate install of Drupal 9. They can even be on separate platforms or servers. What I was looking for was a mechanism where I could authenticate against a remote SimpleSAMLphp instance using Drupal, and so this article assumes that is how things are setup.
In order for the two platforms to communicate we need to create some certificates to use.
In your SimpleSAMLphp application, ensure you are in the directory simplesamlephp/dev/certs and run the following command to generate a couple of certificates.
openssl req -newkey rsa:3072 -new -x509 -days 3652 -nodes -out simplesaml.crt -keyout simplesaml.pem
These certificates will be our X.509 certificates for the IdP. Note that the 'dev' part in the simplesamlephp/dev/certs path assumes you have configured your SimpleSAMLphp system to pick up this directory through a combination of environment variables and system configuration. If you intend to roll this out to a production environment then you'll want to also create some production certificates.
Next, navigate to your Drupal codebase and create a directory called certs. Enter this directory and run the following command.
openssl req -newkey rsa:3072 -new -x509 -days 3652 -nodes -out drupal.crt -keyout drupal.pem
These certificates will be our X.509 certificates for the SP.
I think I should probably point out that these certificates shouldn't form a part of your Git repository. They are essentially credentials and as such shouldn't be stored in Git. You will need to find ways to deploy these certificates to your servers without them forming part of your repository. You can, for example, put the files on your production server and then create a symbolic link during your deployment process so that they appear in the same place as far as the two systems are concerned. These certificates will also last for a long time (3652 days, or about 10 years), which might not be best practice but should be fine for a locked down dev server.
With the certificates in place we can now move onto configuring SimpleSAMLphp.
Configuring SimpleSAMLphp
When you copied the metadata-templates directory to your local metadata directory during the SimpleSAMLphp install you will have created a file called saml20-idp-hosted.php. This comes bundled with a hosted IdP called __DYNAMIC:1__. SimpleSAMLphp will replace this with the URL of the site, which can create a little bit of confusion when exchanging identity configuration later on. I have found that the best way to understand what bits go where is to rename this to give your SAML IdP a proper name.
You also need to add your simplesaml.pem certificate to the privatekey configuration item, and the simplesaml.crt certificate to the certificate configuration item. The certificate locations are worked out based on the certdir configuration item set in the config.php file and as these files are just in that directory we don't need to supply any extra path information
The file at saml20-idp-hosted.php should now contain the following array.
$metadata['my_awesome_saml'] = [
    'host' => '__DEFAULT__',
    'privatekey' => 'simplesaml.pem',
    'certificate' => 'simplesaml.crt',
    'auth' => 'example-userpass',
];
Note that the above uses an authentication source called 'example-userpass'. This comes bundled with SimpleSAMLphp as an example authentication system and provides users based on a flat array of user and password credentials. This is fine to use for setup and testing, but it's probably not a good idea to use in production. The configuration for this authentication system is kept in the authsources.php file in your configuration directory. You also need to have enabled the 'exampleauth' module in your setup.
With this configuration array in place, head over to the "Federation" tab in your SimpleSAMLphp setup. You should now see your IdP in the list. This is viewable even without being logged in as the administrator of the application.

Click "Show metadata", you'll see a bunch of output. This consists of your metadata URL, the SAML 2.0 metadata XML, a PHP representation of the same and the public x509 certificate we created above that is used to encrypt/decrypt the data.

Copy the PHP output and paste it into saml20-ipd-remote.php in your metadata directory.
We'll come back to SimpleSAMLphp in a bit, but we first need to configure Drupal.
Configuring Drupal
In your Drupal instance, include the SAML Authentication module using composer.
composer require drupal/samlauth
As I side note, I did try and use the simplesamlphp_auth module, but that module expects an instance of SimpleSAMLphp to be installed alongside your Drupal application. What I was looking for was a solution that allowed a remote SAML authentication system to integrate with Drupal authentication. This way, I could exchange the SimpleSAMLphp application with some other SAML 2.0 authentication system if I needed to in the future.
Once you have installed the module head over to the configuration page at /admin/config/people/saml. There are a LOT of fields on this form and it is quite intimidating when you first see it so let's break down the form into sections.
LOGIN / LOGOUT
This controls the links users will click on to log in and log out using SAML, as well as some redirection after they perform those actions. You can probably leave this section as it is unless you want to specifically customise any of it.
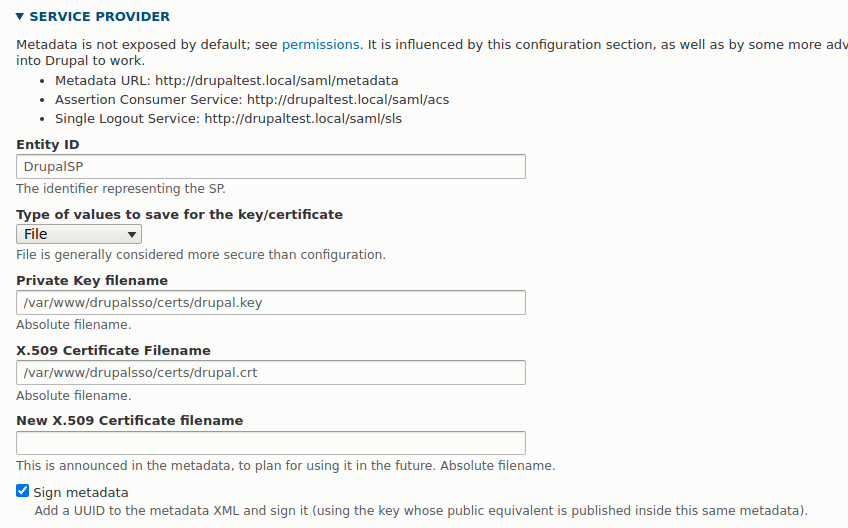
SERVICE PROVIDER
This section details the SP details of your Drupal site. The first field is called Entity ID and that is what your SP will be called when it is referred to in the SimpleSAMLphp application. Setting this to something useful allows you to identify what the SP configuration pertains to.
The next part of this section is the certificate that will be used to encrypt the XML metadata. There is quite a bit of detail in the SAML authentication module read me file about different ways to store this information. The safest way is probably to use the "file" setting for your certificate handling and simply reference the files directly in your application.
At the start of this article I created certificates for Drupal and stored them in a 'certs' directory. All you need to do here is reference the certificates in the fields in this section. Add drupal.key to the Private Key filename field and drupal.crt to the X.509 Certificate Filename field. The New x509 certificate filename isn't needed and so can be left blank.
Your configuration should look a little like the following.
IDENTITY PROVIDER
In this section we need to inform Drupal about our IdP system (ie, the instance of SimpleSAMLphp). If you look at the PHP code we generated earlier and stored in saml20-ipd-remote.php you should be able to see what items go where here. The Entity ID at the start of this section is the name we gave the IdP right at the start of the process, so in our case this is my_awesome_saml. The Single Sign On Service and Single Logout Service fields in the form are labelled as such in the PHP.
The X.509 certificate is the contents of the certData item in the PHP. Here, you have the option of uploading your certificate file to the server and referencing it, or copying the value of certData into the configuration form, which will in turn be exported into your Drupal configuration. How you store this value it up to you, but as this is a public certificate you might be able to get away with doing this through configuration. One thing to note is that if you copy the value from PHP then the module will add the header and footer of "BEGIN CERTIFICATE" automatically to the value, so don't worry if that is magically added.
Your configuration form should look something like the following.

USER INFO AND SYNCING
What you put in this section depends on what sort of authentication systems you have setup in your IdP. At the beginning I set up example-userpass as the authentication system, and the unique ID attribute and username attribute for this system is "uid". This will probably change depending on what authentication system you select.
Depending on your setup also depends on what you want your users to do. I selected the option to create users from SAML data here so that users I setup in the IdP would be automatically registered in the SP as they authenticated. It is also prudent to allow users to 'link' their accounts if they have certain Drupal roles. This means that the link between the IdP and the SP will be generated for existing users.
The rest of this form can probably be left as it is. You should probably select the sign requests for the different SAML messages as this encrypts the messages between the two platforms. There are also options to add extra debugging or logging that are also useful for setting up the system and finding issues.
Once you save the form you are now ready to start linking the two systems together.
Adding Drupal Configuration To SimpleSAMLphp
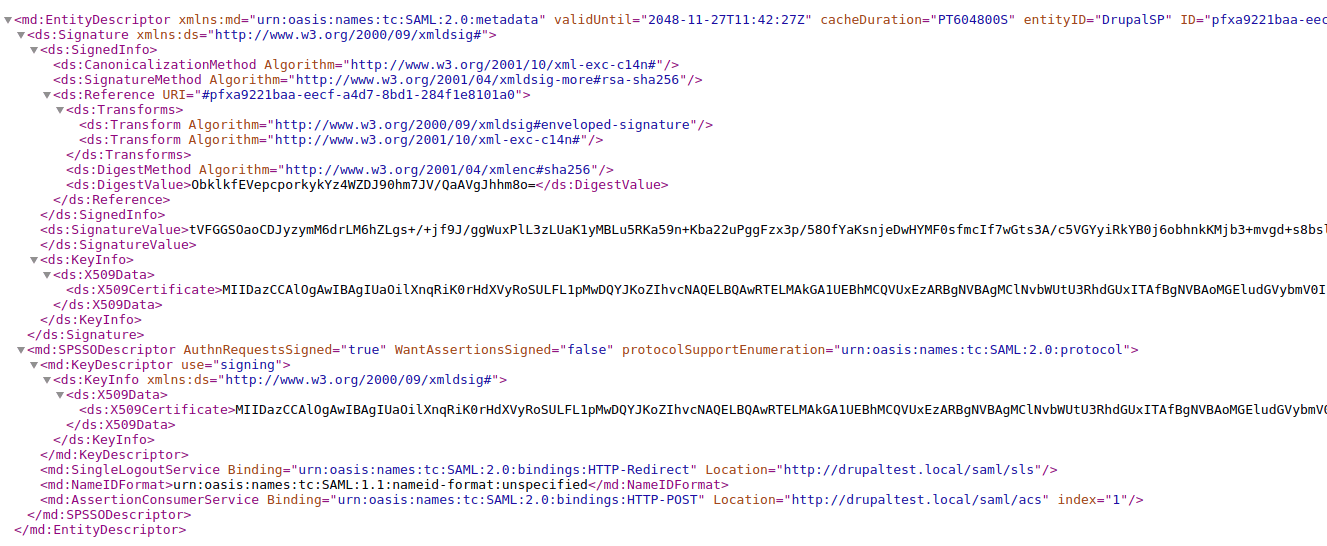
Go to the path /saml/metadata, you will see a bunch of XML on the page. It should look something like this.
Note that permissions are required to view this page.
Whilst this is great (and we can give this to any SAML IdP to set up our SP), what we really need to configure SimpleSAMLphp is a PHP array.
Copy this XML and go to back to your SimpleSAMLphp install. The application contains a tool called the Metadata parser, which can be found at the path /admin/metadata-converter.php. You also need to be logged into SimpleSAMLphp in order to use this tool. Paste the XML metadata into this page and click the "Parse" button. Copy the PHP code this tool produces and paste it into the file saml20-sp-remote.php in your metadata directory.
One word of warning is that the PHP settings will include an 'expire' configuration item, which is actually part of the XML metadata that comes out of the SAML Authentication module. As this setting doesn't make sense to include in the SimpleSAMLphp metadata I removed it. If you don't remove it then authentication will become impossible as your configuration will be deemed to have expired immediately. This setting is more for automatic configurations that we aren't using here.
Once the saml20-sp-remote.php is saved your are now ready to turn on your authentication in Drupal.
Drupal User Account Menu
The normal Drupal authentication system works alongside the SAML authentication system. This is actually an important consideration when setting up your site as it means that some users can bypass SAML and log into the site directly.
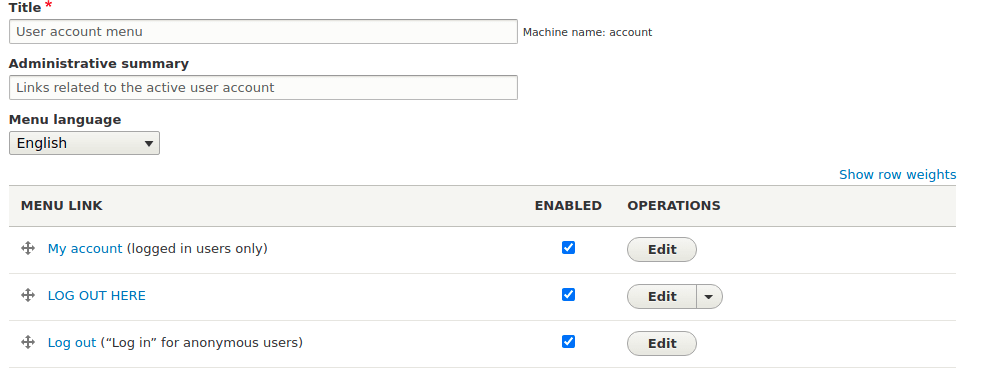
The SAML Authentication module adds a new menu link that we must enable in order for our users to be able to login using SAML. Head over to the user account menu administration page located at /admin/structure/menu/manage/account. You will see an additional link called "Log out" that is disabled by default. As we are currently logged in the link shows up as logout, but rest assured it will change depending on the context.
This menu link will pick up the name of the menu item you added at the start of the Drupal SAML authentication module configuration form. In my site this is called "LOG OUT HERE" so that I can clearly see the difference between the standard Drupal login link. When you are ready to roll out SAML authentication the enable this menu item, as in the following screenshot.
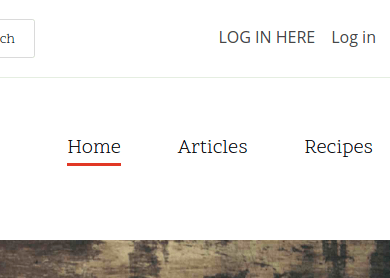
Now, when you view the site as an anonymous users you will see a link allowing you to login. In the screenshot below the "LOG IN HERE" link is my SAML authentication link, which is next door to the normal Drupal authentication link. This is on a default Drupal Umami theme. You are free to remove this Drupal authentication link if that is what you want to do with the site.
When you click the "LOG IN LINK" you should be taken to the authentication page in your SimpleSAMLphp application. Assuming you enter the correct details you will then be taken back to the Drupal site and authenticated.
As I mentioned above, I have only used the example authentication module to create users here. You will probably want to swap this out for something more useful. If you do this then you might see the user metadata change slightly, but the other implementation details should remain in place. The important thing to remember is to store your user information somewhere safe.
You might also notice that the sign in page on SimplySAMLphp is not themed, which makes sense as this is a different application. You will need to spend some time and effort in theming this application, but the idea is that it will become you central hub for the authentication of the rest of your sites. You can easily plug in additional SP sites (Drupal or not) by adding their meta data to the relevant files.
The important thing to remember is that the SP configuration needs to be a part of the IdP configuration and visa versa. This is why we converted the Drupal XML metadata from the SAML authentication module into an array to store inside of SimpleSAMLphp. On other words, both systems need to know about each other in order for information to be exchanged correctly.


Eric