I work on a couple of ThinkPad laptops (T490 and a P14s) and whilst they have fingerprint scanners I haven't really considered using them. I once attempted to get a fingerprint scanner working in Linux on an old HP laptop and that experience put me off trying again.
When I looked into the getting the fingerprint scanner working on a ThinkPad with Pop! OS installed it turned out to be quite easy. The drivers were already present so it was just a case of installing the correct software and adding my settings.
This article will assume that your machine has a Linux compatible fingerprint scanner and that you have installed the drivers for that scanner.
Installing The Software
Before you can add your settings to the system you'll need to install a couple of bits of software.
- fprintd - D-Bus daemon for fingerprint reader access. This essentially does the work of reading the fingerprint data from the hardware and presenting the data to other packages. See https://fprint.freedesktop.org/ for more information about this package.
- libpam-fprintd - PAM module (Pluggable Authentication Module) for fingerprint authentication through fprintd. This allows you to authenticate using data from the fprintd package.
These packages can be easily installed through apt.
sudo apt-get install fprintd libpam-fprintd
With those packages installed we can now configure the PAM system to accept fingerprints as an authentication mechanism. To do this we run the pam-auth-update command, as root.
sudo pam-auth-update
This should show you something like this (depending on what authentication systems you have installed).
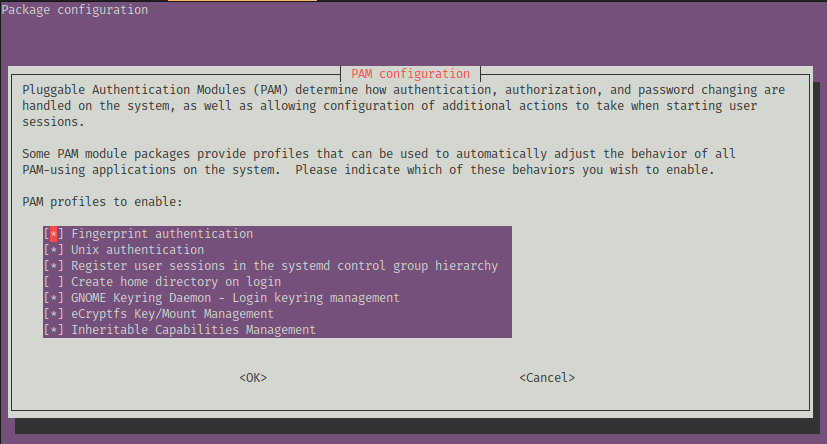
Use the arrow keys to highlight the option "Fingerprint authentication" and use the space bar to select it. Then, use the tab key to select OK and press space once more.
This will enable the fingerprint authentication module with the PAM system.
Alternatively, you can run the following, which will perform this action in one go.
sudo pam-auth-update --enable fprintd
With that all done you can now add your fingerprints to the authentication system.
Adding Fingerprints
There are two ways in which to add finger prints to the fprintd system. You can either use the command line or the settings menu. Let's look at the command line first.
Command Line
To enrol a fingerprint with the PAM system run the following command (with "enroll" spelt with two L's).
fprintd-enroll
Note that we aren't using sudo here. This is critical as we want to authenticate for the current user, NOT the root user.
After passing normal authentication you should see a prompt asking you to enrol your fingerprint. Just press your finger against the reader and it should activate and advance the prompt. You'll need to do this a few times in order to properly register your finger. This action will generate the following output.
fprintd-enroll
Using device /net/reactivated/Fprint/Device/0
Enrolling right-index-finger finger.
Enroll result: enroll-stage-passed
Enroll result: enroll-stage-passed
Enroll result: enroll-stage-passed
Enroll result: enroll-stage-passed
Enroll result: enroll-stage-passed
Enroll result: enroll-stage-passed
Enroll result: enroll-stage-passed
Enroll result: enroll-stage-passed
Enroll result: enroll-completed
By default, this registers your right-index-finger. Just pass the --finger flag to nominate another finger to scan, for example.
fprintd-enroll --finger left-index-finger
You can add as many finger prints as you like using different finger definitions.
To find out what fingerprints you have registered you can use the fprintd-list command, followed by the user who you want to inspect.
fprintd-list $USER
found 1 devices
Device at /net/reactivated/Fprint/Device/0
Using device /net/reactivated/Fprint/Device/0
Fingerprints for user philipnorton42 on Synaptics Sensors (press):
 - #0: right-index-finger
 - #1: left-index-finger
We can use the environment variable $USER as a short cut for the currently logged in user. Sudo access is required to access the fingerprints of any other user on the system.
If you want to verify that your fingerprint will work correctly then you can use the fprintd-verify command. This allows you to verify your default fingerprint without any flags.
fprintd-verify
Using device /net/reactivated/Fprint/Device/0
Listing enrolled fingers:
 - #0: right-index-finger
 - #1: left-index-finger
Verify started!
Verifying: right-index-finger
Verify result: verify-match (done)
You can also pass in the --finger flag to specify a finger to test.
fprintd-verify --finger left-index-finger
Using device /net/reactivated/Fprint/Device/0
Listing enrolled fingers:
 - #0: right-index-finger
 - #1: left-index-finger
Verify started!
Verifying: left-index-finger
Verify result: verify-match (done)
Finally, you can also delete a fingerprint using the fprintd-delete command, just pass in the user you want to delete the fingerprints for, or use the -f flag to delete a single fingerprint.
fprintd-delete $USER -f left-index-finger
If you want to reset your fingerprint and re-apply all of your fingers at the same time then you can use this bash script to do just that.
fprintd-delete "$USER"

for finger in {left,right}-{thumb,{index,middle,ring,little}-finger}; do fprintd-enroll -f "$finger" "$USER"; done
This will index all of your fingers, but it means you don't need to worry about what finger you registered if they are all registered.
Setting Menu
Open up the settings menu and open the Users tab. On this screen you should see a "Fingerprint Login" option. Clicking this option will show you the following dialog box (assuming that you have registered your right and left index fingers from the instructions above).
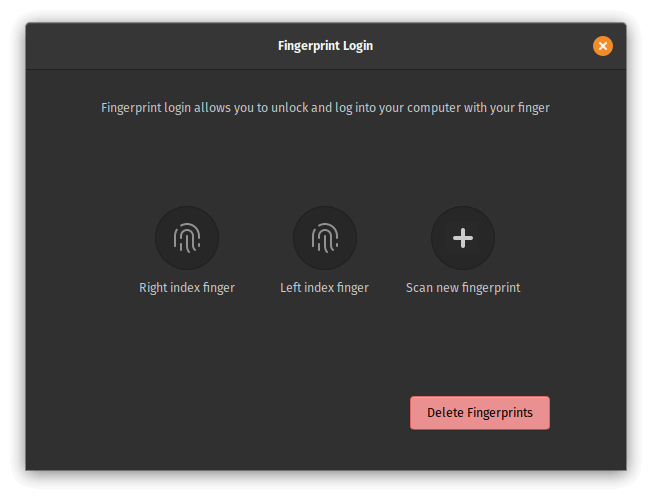
You can manage your fingerprints through this interface.
If you don't see this option then restart your machine to get Gnome to register the presence of the fingerprint reader software on your system.
Conclusion
After adding your fingerprints to the system you are now able to authenticate using the fingerprint scanner. As Pop! OS uses gnome the ability to manage and authenticate using a fingerprint is built in.
As a bonus, you can also authenticate using your fingerprint when running sudo commands or anything else that requires authentication and has PAM support.
The main difficulty in getting this all working is having the correct device installed on your machine. Thankfully, Lenovo use compatible devices in their ThinkPad machines, but you mileage may vary on any other machine. If you want to know if your driver is supported then take a look at the supported hardware list on the fprintd website.


Peter