This article relates to WordPress 3.0. Much of the code posted here won't work on previous versions and some of the information may change in newer versions.
WordPress already comes with five different content types built into the system.
Posts
This is the standard content type and is generally the most used in a blog install. Posts tend to be aggregated onto pages but this is not always the case.
Pages
This is a static content type and is used to display non-aggregated pages.
Attachments
Every time you upload a file through WordPress it will store a record of it in this area. You can see this list of files by going to the Media menu item in your admin area. This is what is used when you click on the Media Libray tab on the Add and Image dialog in the edit post screen.
Revisions
Every time you save a post in WordPress it creates a revision of that post, these revisions act as content types. Revisions are only shown in relation to the post they are linked to so they don't appear in the admin menu. It is also possible to stop WordPress creating them.
Navigation Menu Item
WordPress 3.0 has a nice menu editing interface, which internally uses a custom post type called nav_menu_item to create the menu links.
Throughout this post I will refer to a normal WordPress post as a post and custom post type as custom content type. This is in order to avoid any confusion over what I mean when referring to a post.
As of WordPress 3.0 it is now possible to create your own custom content types. WordPress provides all sorts of functionality that will allow you to set up different content types in different ways, this functionality is taken from the other content types already available within the system. Custom content types will also allow you to organise your content in better ways than was previously available using categories alone. Combining these two features means that you can add information boxes for different things on different types so that they don't all appear on the same form and you have to spend hours educating your users how to use it.
Although custom content types have been available in WordPress 3.0 since the beta releases I have found that the underlying code has changed too much to be able to put together a post on the subject. So I have waited until the feature went live before concentrating on it.
Creating a custom content type is possible via the use of the register_post_type() function. This function takes two parameters, the first is the machine readable name of the content type and the second is an array of options for that content type. There are lots of options to chose from, but we will come to those in a bit. To create a very simple content type you can use the following code, either as part of a module or within the theme.
// Create a hook for the function that will add our custompost type.
add_action('init', 'create_custompost');

function create_custompost(){
    // Run when init actions are run.
    $customPost = new Custompost();
}

class Custompost{
    public function __construct(){
        // Register the custompost type
        register_post_type('custompost',
            array(
                'public' => true, // show post type in admin ui and allow front end querying
            )
        );
    }
}
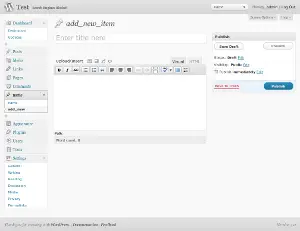
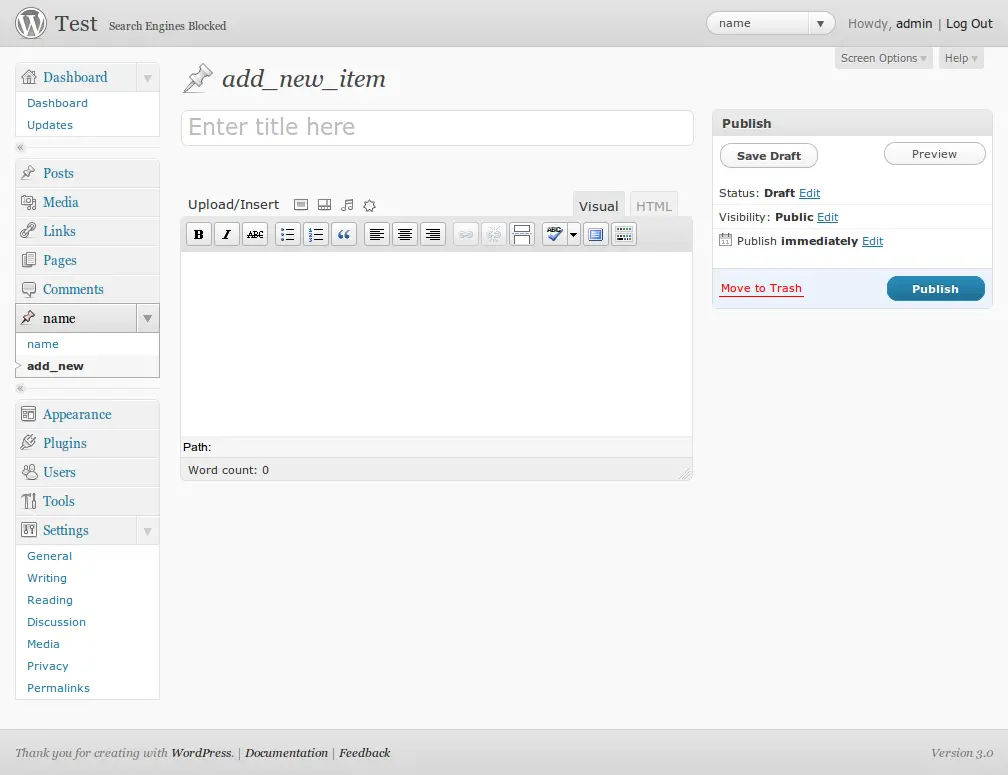
What we are doing here is creating a custom content type with the name 'custompost' and setting the public status to true. Setting the public value to true is a short hand for setting a bunch of other options to true and will make the type appear in the admin interface and on the front end of the site in things like search results or as a single page. You will now see a second menu item called Posts in the top left hand side of the admin interface, near the comments item. In this menu you will see the same sort of tabled list for posts and pages and a menu item labelled Add New. Clicking on Add New will take you to the normal create post form, but with only the default of Title and Body form elements. This is what the new custom content type looks like once activated.

Of course, having two menu items called Posts is entirely confusing, but changing this isn't difficult. All we need to do is set the labels item in the options array. The label item takes an array of strings, each item relates to what the item will be called in a particular context within either the admin or the front end. The bare minimum needed here is the name item, which you can set as follows.
// code removed for brevity
register_post_type('custompost',
    array(
        'public' => true, // show post type in admin ui and allow front end querying
        'labels' => array(
           'name'          => __('Custom Posts')
        ),
    )
);
// code removed for brevity
Here is a list of all of the labels items available for use within the label array.
- name : This is the general name for the post type, usually printed in a plural context. The default for this is Page if the custom content type is hierarchal, otherwise it is Post. This hierarchal naming is typical of the rest of the labels.
- singular_name : Name for one object of this post type. Default is Post/Page.
- add_new : Default is Add New for both hierarchical (ie, pages) and non-hierarchical (ie, posts) types.
- add_new_item : The header shown when creating a new post. Default is Add New Post/Add New Page
- edit_item : The header shown when editing a post. Default is Edit Post/Edit Page
- new_item : This is shown in the admin menu and in the favourites menu in the admin header. Default is New Post/New Page
- view_item : This is the label of the button to the right of the permalink control on the post page that allows you to view the post. Default is View Post/View Page
- search_items : This is the label of the search button on the tabulated posts admin page. Default is Search Posts/Search Pages
- not_found : This is shown when no posts are found in the admin page. Default is No posts found/No pages found
- not_found_in_trash : Shown on the trash page if no posts are found. Default is No posts found in Trash/No pages found in Trash
- parent_item_colon : This is the label for the parent page control on the edit post page. This string isn't used on non-hierarchical types. In hierarchical ones the default is Parent Page:
If you want to see exactly where these labels appear in your WordPress install then you can use the following labels array in your register_post_type() declaration. Remember that parent_item_colon is only used if the item is hierarchical.
'labels' => array(
    'name'               => __('name'),
    'singular_name'      => __('singular_name'),
    'add_new'            => __('add_new'),
    'add_new_item'       => __('add_new_item'),
    'edit_item'          => __('edit_item'),
    'new_item'           => __('new_item'),
    'view_item'          => __('view_item'),
    'search_items'       => __('search_items'),
    'not_found'          => __('not_found'),
    'not_found_in_trash' => __('not_found_in_trash'),
    'parent_item_colon'  => __('parent_item_colon'),
)
This is what the edit page looks like after the labels have been set up in this way.
There are lots of other items available that control how the custom content type acts, I have gone over each one here and given a full description as well as an example of its use.
description
This setting allows you to add a short descriptive summary of what the custom content type is. This won't appear on a default install of WordPress, you will need to use some other plugin settings to display this text. Defaults to blank.
'description' => __('Some description about the content type'),
public
This setting controls the visibility of the content type within the site, both in the admin and the front end. Setting this to true will set three other settings to true unless they are set independently. These settings are show_ui, exclude_from_search and publicly_queryable.
'public' => true,
show_ui This creates all of the admin interface, like the add and edit post screens, the menu item in the admin section and the tabulated list of posts. If this is set to false then no admin interface will be shown. This might be useful in some cases where you would like to create a content type that is not directly editable by your users.
exclude_from_search This tells WordPress whether or not to exclude the content type from search results. Setting either this or the public setting to true will cause this type to appear in search results pages on the front end.
publicly_queryable Post type queries can be run on the front end of the site to generate lists of content. This can be disabled if this is set to false.
'show_ui' => true,
'exclude_from_search' => true,
'publicly_queryable' => true,
menu_position
Every main menu item (eg. Posts, Users) on the right hand side of the admin area is given a number. These numbers start from 0 on the Dashboard link and go up in blocks of 5 to the top. It is important to note that there is a gap between the Comments (menu position 25) and the Appearance (menu position 60) menu items. Here is a table showing the menu positions you would need to use.
| Menu Position | Menu Item |
|---|
| 0 | Dashboard |
| 5 | Posts |
| 10 | Media |
| 15 | Links |
| 20 | Pages |
| 25 | Comments |
| --Break-- |
| 60 | Appearance |
| 65 | Plugins |
| 70 | Users |
| 75 | Tools |
| 80 | Settings |
So to make the menu for your custom post type appear below the Pages menu item you would give this setting a value of 20. To put the menu item underneath the Tools menu give this setting a value of 75. The default value for this setting is for it to appear below the Comments menu item.
'menu_position' => 30
menu_icon
This is a URL to the image that will be used when your menu item is added to the admin menu. Defaults to use the posts icon, which is a little pin. Your custom icon will probably be in your plugin directory, so to produce a link to it you might do something like the following.
'menu_icon' => WP_CONTENT_URL . '/plugins/' . plugin_basename(dirname(__FILE__)) . '/images/customcontent.png'
capability_type
This is a string that will be used when checking to see what users have access to read, edit and delete this custom content type. This setting defaults to "post" but is used in conjunction with the capabilities setting to create custom capabilities.
'capability_type' => 'custompost'
capabilities
This is an array of strings that tells WordPress what capabilities different users have in terms of this content type. If the capablity_type setting is set then each setting will be set using that setting. For example, edit_custompost for users that need to edit the custom post content type. Capabilities are created if you want to have more control over what users can do with your custom content type and don't want to stick with the default WordPress capabilities. The capabilities available are as follows.
- edit_post: This is a meta capability that allows users to edit a particular item of this content type. Defaults to "edit_ . $capability_type" (edit_post).
- edit_posts: This capability controls the editing of objects of this content type. Defaults to "edit_ . $capability_type . s" (edit_posts).
- edit_others_posts: This controls the editing of content type items that have been created by other users. Defaults to "edit_others_ . $capability_type . s" (edit_others_posts).
- publish_posts: Allows users to publish items of this content type. Defaults to "publish_ . $capability_type . s" (publish_posts).
- read_post: This capability controls whether users are allowed to read items of this content type. Defaults to "read_ . $capability_type" (read_post).
- read_private_posts: This controls access to private items of this content type. Defaults to "read_private . $capability_type . s" (read_private_posts).
- delete_post: This capability allows users to delete items of this content type. Defaults to "delete_ . $capability_type" (delete_post).
Using both capability_type and capability together means that you can create a very specific permission models for your custom content types. Unfortunately, you will need to install a separate plugin to allow site administrators to set up these permissions on a role by role basis.
hierarchical
This causes the content type to act as a page with hierarchical structure if true, or a post if false. Setting this to true will have an effect on other aspects of the type, such as certain labels. Defaults to false.
'hierarchical' => true
supports
The add_post_type_support() function can be used after the content type is created in order to add different capabilities to the content type. This setting is a shortcut for using that function. To use supports you need to pass it an array of items, each item being a string that will add a certain item to the edit content type page. It it also possible to use both the function and the supports item to set the fields available in the post. Here is a list of the different controls available.
One thing to note here is that the add_post_type_support() function doesn't effect the title or content editing areas, these items are only effected by the supports setting array. The default setting for this item is 'none', which internally means that only the title and content editing areas will be shown.
You might notice that categories is missing from the list above. These are set using the taxonomies setting and are not controlled through the supports settings.
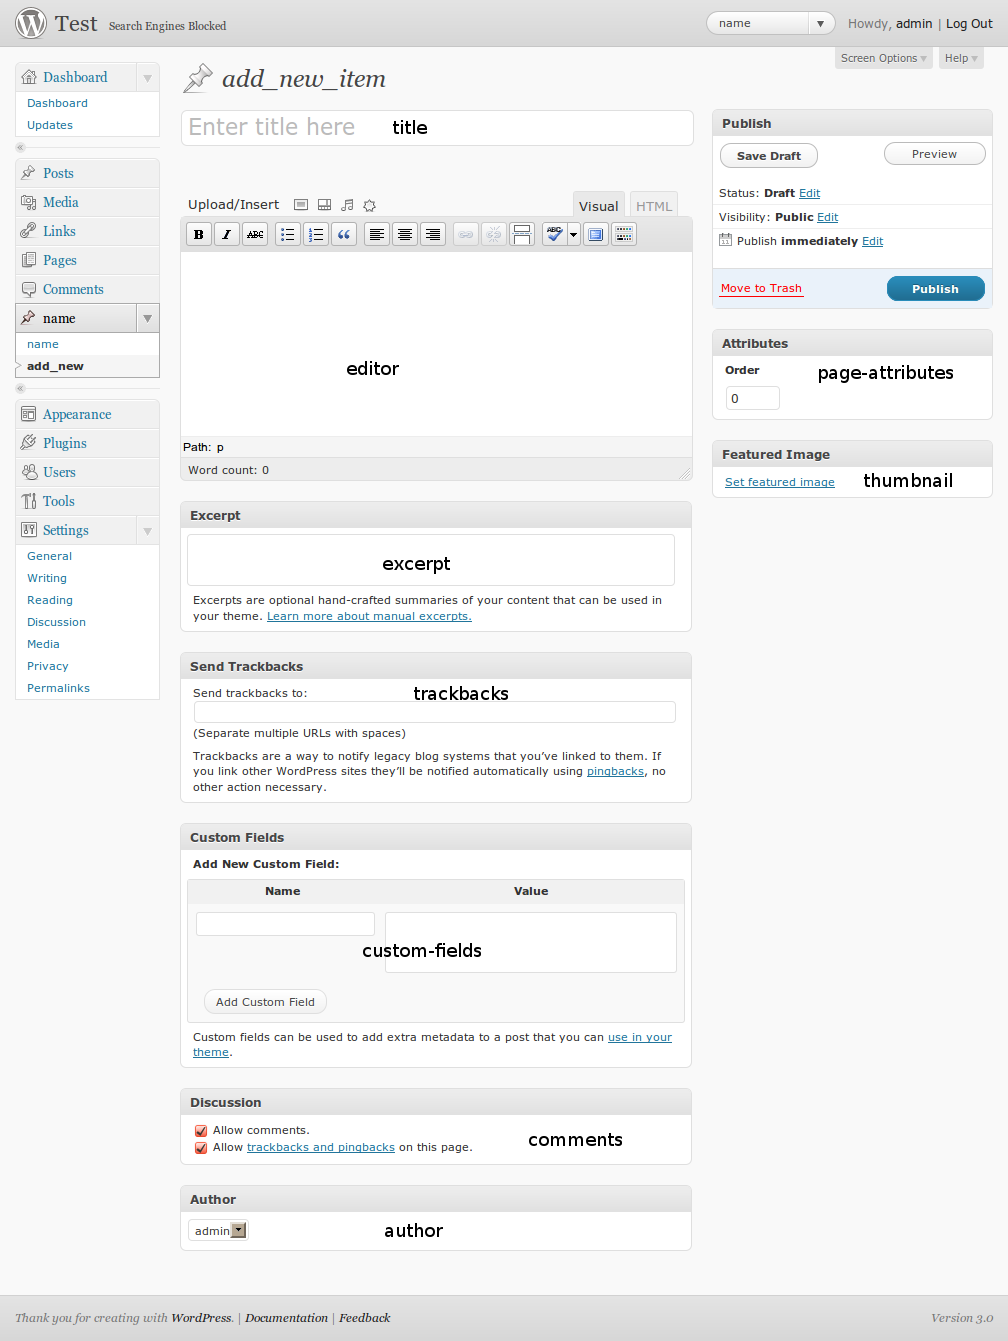
'supports' => array(
    'title',
    'editor',
    'comments',
    'revisions',
    'trackbacks',
    'author',
    'excerpt',
    'page-attributes',
    'thumbnail',
    'custom-fields',
),
With all of the supports items added our edit page will look like this.
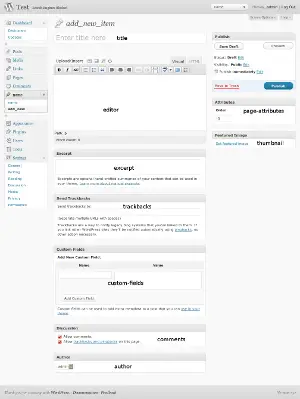
The one thing missing from this is the revisions box, which looks like the following diagram. Not only does WordPress display this box, but it also includes the surrounding functionality regarding revisions, such as differencing.

register_meta_box_cb
There are two ways to add meta boxes to your custom post types. The first is through the use of this setting, second is to use the standard meta box functionality after the content type has been created. However, they both use the same function calls so there is little difference between the two.
The register_meta_box_cb setting is a callback to a function that will be called when setting up the meta boxes for the edit form. Within this function you use the add_meta_box() function to register your meta box with this content type.
'register_meta_box_cb ' => 'addMeta'
You can add a call to the same function using add_action, like this:
add_action('admin_menu', 'addMeta');
From this point on both mechanisms will work in exactly the same way. The addMeta() is a function that you define that will call the add_meta_box() function that registers a meta box with your content type. In this call you also include an action that tells WordPress what function to call when it is saving the content type, thus enabling you to save your meta content. Here is a simple example of add_meta_box() in action.
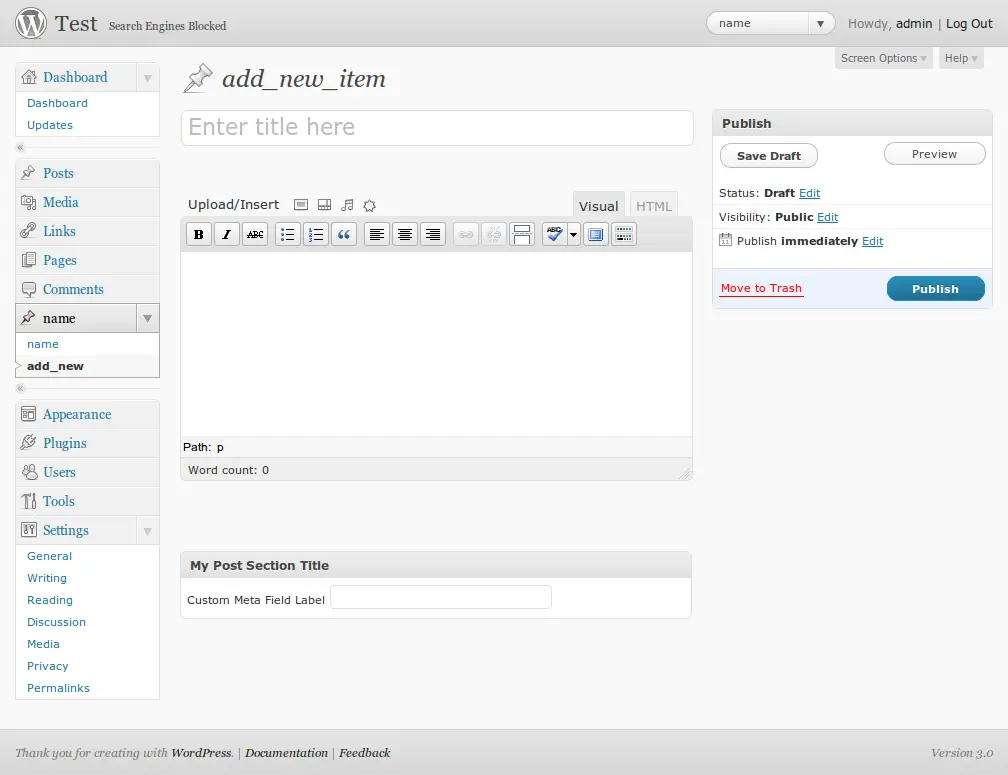
function addMeta(){
        add_meta_box('myplugin_sectionid',
            __( 'My Post Section Title', 'myplugin_textdomain'),
            'addMetaContent',
            'custompost',
            'advanced'
        );
        add_action('save_post', 'saveMetaContent');
    }
If you have created your meta box creation function in the normal way then you will find that the boxes get displayed ok, but the save function is not run. This is because the register_meta_box_cb setting registers an action that will be run just before the edit post form is displayed. This is too late to register a save action for the form, so the solution is to add in an extra action just after you have created your custom content type to integrate with the save_post action. If you use the register_meta_box_cb setting then include the following code somewhere underneath your register_post_type() function call.
add_action('save_post', 'saveMetaContent');
This add_meta_box() function creates a call back to another function that will add in the metadata form into the content of the custom content type edit form. In this example I have called this function addMetaContent().
function addMetaContent(){
    $args = func_get_args();
    $currentObject = $args[0];
    echo '<input type="hidden" name="myplugin_noncename" id="myplugin_noncename" value="' .
    wp_create_nonce(plugin_basename(__FILE__)) . '" />';

    //$metaContent = get_metadata('custompost', $currentObject->ID, 'custompost_subtitle', true);
    //$metaContent = get_post_meta($currentObject->ID, 'custompost_subtitle', true);
    $metaContent = get_metadata('post', $currentObject->ID, 'custompost_subtitle', true);

    // The actual fields for data entry
    echo '<label for="custompost_subtitle">' . __("Custom Meta Field Label") . '</label> ';
    echo '<input type="text" name="custompost_subtitle" value="'.$metaContent.'" size="25" />';
}
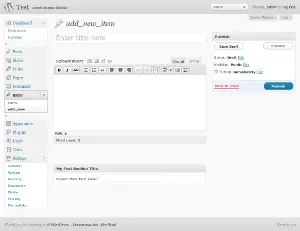
After setting this function call in place our edit page now looks like this.
This code will need the current value of the metadata to load this into the content. There are three separate ways to load (and save) metadata in WordPress, all of which have been used above, but only one has been left active. The normal way of loading and saving metadata in WordPress is to use the get_post_meta() function. This function will always use the wp_postmeta table (depending on your prefix) to load the metadata value for both post and pages. The get_metadata() function has the same effect as the get_post_meta() function, but the first parameter of this function is the name of the table used to load the metadata from. So in the code above, it is possible to load the metadata values from a table called wp_custompost, rather than using the wp_postmeta table.
I should note that it is important to make sure that the table exists before relying on it, as the get_metadata() function will return a value of false if the table doesn't exist.
After calling add_meta_box() I also register an action that will call a function (called saveMetaContent()) when WordPress saves a post. Because this function is not content specific we need to check that we are dealing with the right content type before saving the metadata.
The code below includes three different ways of interacting with content metadata, but with only the mechanism that interacts with the wp_postmeta table enabled. When writing your own plugins it is important that you select the type of functionality you want and remove the other two. It is bad practice to have lots of commented code in your plugin source code.
function saveMetaContent($post_id){

    // verify the correct post type.
    if ($_POST['post_type'] != 'custompost') {
        return $post_id;
    }

    // verify this came from the our screen and with proper authorization,
    // because save_post can be triggered at other times
    if (!wp_verify_nonce($_POST['myplugin_noncename'], plugin_basename(__FILE__))) {
        return $post_id;
    }

    // verify if this is an auto save routine. If it is our form has not been submitted, so we dont want
    // to do anything
    if (defined('DOING_AUTOSAVE') && DOING_AUTOSAVE) {
        return $post_id;
    }

    // Check permissions
    if ('custompost' == $_POST['post_type']) {
        if (!current_user_can('edit_post', $post_id)) {
            return $post_id;
        }
    }

    // OK, we're authenticated: we need to find and save the data
    // $meta_value     = get_metadata('custompost', $post_id, 'custompost_subtitle', true);
    // $meta_value     = get_post_meta($post_id, 'custompost_subtitle', true);
    $meta_value     = get_metadata('post', $post_id, 'custompost_subtitle', true);
    $new_meta_value = stripslashes($_POST['custompost_subtitle']);

    if (!is_null($new_meta_value) && '' == $meta_value) {
        //add_metadata('custompost', $post_id, 'custompost_subtitle', $new_meta_value, true);
        //add_post_meta($post_id, 'custompost_subtitle', $new_meta_value, true);
        add_metadata('post', $post_id, 'custompost_subtitle', $new_meta_value, true);
    } elseif ('' == $new_meta_value) {
        //delete_metadata('custompost', $post_id, 'custompost_subtitle', $meta_value);
        //delete_post_meta($post_id, 'custompost_subtitle', $meta_value);
        delete_metadata('post', $post_id, 'custompost_subtitle', $meta_value);
    } elseif ($new_meta_value != $meta_value) {
        //update_metadata('custompost', $post_id, 'custompost_subtitle', $new_meta_value);
        //update_post_meta($post_id, 'custompost_subtitle', $new_meta_value);
        update_metadata('post', $post_id, 'custompost_subtitle', $new_meta_value);
    }
}
taxonomies
This is an array of taxonomy tags that will be registered for the custom content type, the default setting is no taxonomies. The default existing categories for use with custom post types in WordPress are post_tag and categories. These can both be set by using the following.
'taxonomies' => array('post_tag', 'category')
Taxonomies can also be registered using the register_taxonomy() or register_taxonomy_for_object_type() functions.
add_action('init', 'createCustomTaxonomies', 0);

function createCustomTaxonomies(){
    register_taxonomy('type', 'custompost',
            array(
                'hierarchical' => false,
                'label'           => __('Type'),
                'query_var'  => true,
                'rewrite'       => true
                )
            );
}
You would then register the taxonomies you created with your custom content type in the same way as before, using the name as the reference.
'taxonomies' => array('post_tag', 'category', 'type')
permalink_epmask
This setting allows you to set your own permalink mask for the custom post type. The default setting for this value is EP_PERMALINK. How WordPress uses these masks is complicated and probably the subject for another post.
'permalink_epmask' => EP_PERMALINK
rewrite
Set this setting to false to prevent rewriting the URL of your custom content types. This setting can take an associative array of values that tell WordPress what sort of permalink to create. The default is to use the content type as the argument, although it can be set to false to prevent URL rewriting. This setting can also take an array of values to customize the permalink structure. The slug value will be used as the start of the permalink structure so to set your custom content URLs to something like:
podcasts/my-podcast-post
Use the following value in the rewrite setting.
'rewrite' => array('slug' => 'podcasts')
query_var
This can be set to false to prevent queries, or a string to value of the query_var to use for this post type.
'query_var' => 'custompost',
can_export
This controls whether the content type will be used in the export tool. If true then it will be included in all export output, otherwise it will be excluded.
'can_export' => true,
show_in_nav_menus
This controls whether the content type will be available for selection in new navigation menu feature available in WordPress 3.0. Normally, only Page types and Categories are available for selection, but setting this to true will make your content type appear in these menus. The default setting for this is true.
'show_in_nav_menus' => true,
Now that we have a very simple custom content type it is important to look at how they are displayed on the front end of WordPress. This is probably the best point to look at integrating the content type with the front end of the site.
There are several ways to print out a list of posts on a page, it just depends on what you need it to do. If you want to display the custom content type posts you have created on a particular page then you are probably best using the page of posts method and passing the post_type argument. The following code can be used to create a WP_Query object that can be used to print out all of the posts of a particular type.
$args = array(
  'caller_get_posts' => 1,
  'post_type' => 'custompost'
);

$my_query = new WP_Query($args);
Another thing you might want to do is to integrate your custom post types into the rest of the site by allowing them to be aggregated onto the front page. To do this you need to add a filter using the add_filter() function. Before using this function you should make sure that the code is not being run from the admin section of the site as this can lead to some odd problems. The following snippet uses the is_admin() function to make sure we are on the front end of the site, and then registers a function called getCustomPosts() to be run before the posts are queried from the database.
if (!is_admin()) {
    add_filter('pre_get_posts', 'getCustomPosts');
}
The getCustomPosts() function does some extra checking to make sure that we are not on a page (otherwise the page wouldn't be loaded) and that we are either looking at the home, archive or category page. This function receives the current WP_Query object, which is altered by the function to include our custom content type before being returned.
function getCustomPosts($query){
    if (!is_page() || is_home() || is_archive() || is_category()) {
        $query->set('post_type', array('post', 'custompost'));
    }
    return $query;
}
One thing that WordPress now allows is the inclusion of templates for specific content types. WordPress will use a file called single.php to render the content of a single post. This is still true for custom content types, but WordPress will also look for a template file related to your custom content type and give preference to that file. If you create a file called single-custompost.php, WordPress will use that to render the content of that page.
The last thing to look at with regards custom content types is to customise the table of posts in the admin section. We have already looked at how we can change the different labels available on this page, but it is also possible to add in columns to the content type so that different things are displayed in this table.
To interact with this table you need to use a combination of a filter and an action. The filter is called manage_edit_<custom post type>_columns and used to tell WordPress what columns you want to appear in the table.
The action is called manage_posts_custom_column and is used to tell WordPress on a post by post basis what values you want in a particular column.
Here is the code that adds the filters to WordPress.
add_filter("manage_edit-custompost_columns", "custompostColumns");
add_action("manage_posts_custom_column", "custonpostRowValues");
When creating the table there are a number of default columns you can either overwrite or keep, these are set by the filter. This is passed to the function as an associative array of values, the key of which is the column identifier and the value being the heading of the column. The following is a list of the different default values available.
What you do with these is up to you, but you can either overwrite them completely, change one value or even add to them. The following snippet shows the columns being reset to a completely different set of values but keeping cb and title as these are useful. Also of note here is that I have assigned a field to bring back a metadata value for the post in question.
function custompostColumns($columns)
{
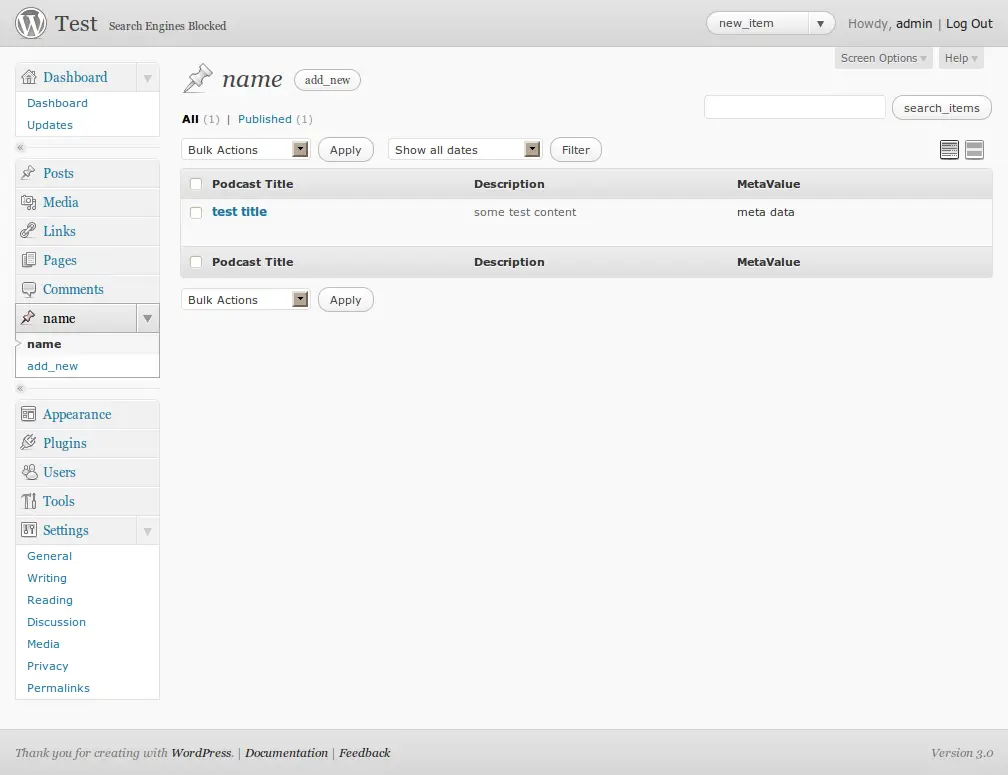
$columns = array(
"cb" => "<input type=\"checkbox\" />",
"title" => "Title",
"description" => "Description",
"metavalue" => "MetaValue",
);
return $columns;
}
The values for each column are set using the function we defined in the action. This function receives the name of the column being looked at as a single parameter. All that is needed is to grab a reference to the current $post object, which will contain our custom type data, and print the right data into the right place.
function custonpostRowValues($column)
{
    global $post;
    switch ($column) {
        case 'ID':
            print $post->ID
            break;
        case 'description':
            print $post->post_content
            break;
        case 'metavalue':
            print get_metadata('post', $post->ID, 'custompost_subtitle', true);
            break;
    }
}
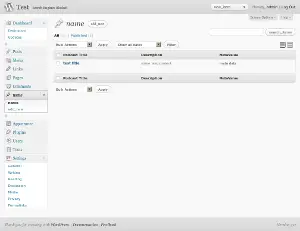
Reload the table for your custom content type to see the changes to the table, if should look something like the following image.
I have been looking at custom content types since the beta release of WordPress 3.0 and in my opinion it is a great start and has the ability to push WordPress further than it has been before. I think that many of the existing plugins (eg. the event creation plugins) can be made to use this system rather than using the usual categories and awkward category hiding, which tends to lead to problems. The only issue I can see is that we will soon have a market saturation of custom content types with lots of different plugins for doing different (or very similar) things.
What would be good is to create a custom content type creation plugin that can be used by authors to create their own custom content types without having to write any code. It would also be ideal if the ability to add and remove fields in the content was included. This would be the equivalent of the CCK module in Drupal and would make WordPress very useful as both a blog and a fully fledged content management system. There are a couple of plugins that have been released that do this (eg. Custom Page Type UI) but they don't really cover all functionality like metadata.
- title: Adds the text box that allows the title of the content type to be edited.
- editor: Adds the main content editing area.
- comments: Adds a check box that allows comments and trackbacks to be turned on and off.
- revisions: Adds a control that allows editors to look at previous revisions of the content type.
- trackbacks: Adds a text area that allows editors to add URLs that will be pinged when the post is updated.
- author: Adds a select box that will allow the selection of a different author.
- excerpt: Adds a text area that allows an excerpt to be attached to the content type.
- page-attributes: This will add in the template and hierarchy controls for hierarchical content types.
- thumbnail: Adds a control that will allow a thumbnail to be added to the content type.
- custom-fields: Adds in the control that allows meta-data editing of the content type.
- cb: This is a check box that will be used to identify the post in question.
- title: The title of the post.
- author: The author of the post.
- categories: The categories the post belongs to.
- tags: Tags set for the post.
- comments: The number of comments that the post has.
- date: The relevant date of the post. This would be published date for published posts, created date for draft posts etc.


Comments
Submitted by Ben on Tue, 07/13/2010 - 09:36
PermalinkSubmitted by philipnorton42 on Tue, 07/13/2010 - 13:06
PermalinkSubmitted by budda on Tue, 07/13/2010 - 22:03
PermalinkSubmitted by philipnorton42 on Tue, 07/13/2010 - 22:41
PermalinkSubmitted by insomnia on Tue, 08/24/2010 - 02:04
PermalinkSubmitted by Pure Collagen on Sat, 06/30/2012 - 20:36
PermalinkAdd new comment