After looking at Conway's game of life I have been looking at other forms of cellular automata. This lead me to discover Langton's ant, which is a different kind of cellular automata where an agent (namely an ant) is used to turn the squares on or off as it travels around a grid.
The rules of Langton's ant are quite simple. The ant simply follows two rules as it moves around the grid.
- At a white square, turn 90° clockwise, flip the colour of the square, move forward one unit.
- At a black square, turn 90° counter-clockwise, flip the colour of the square, move forward one unit.
This can be represented in code by looking at the current state of the square that the ant is stood on and then performing an action. Movement in a particular direction is achieved by adding or subtracting from the x or y coordinates depending on which way the ant is pointing.
I have been teaching myself a little more about JavaScript recently so I wanted to create a Langton's ant in JavaScript using a HTML canvas element.
To generate a canvas we just start a web page with the following content.
<canvas id="grid" width="500" height="500"></canvas>
As with Conway's game of life we can easily represent the grid of squares as a two dimensional array. Each cell in our grid can be represented as an object of type Cell. This object has a single property of 'alive' and two functions that allow us to interact with this property.
class Cell {
  alive = false;

  setAlive(alive) {
    this.alive = alive;
  }

  get isAlive() {
    return this.alive;
  }
}
The ant itself can be represented by an object of type Ant. The properties of the Ant object are its coordinates on our grid and in what direction it is currently facing. The direction is defined as a constant that we can define later.
class Ant {
  x = 0;
  y = 0;

  direction = ANTUP;
}
The grid of cells can be represented by an object of type Grid. This has a number of properties, including the array of cells, the ant, and the height and width of the grid itself. An initialisation function is then included so that we can pre-populate the cells of the grid with Cell objects and then create our Ant object.
class Grid {
  cells = [];
  ant;
  height = 0;
  width = 0;

  constructor(height, width) {
    this.height = height;
    this.width = width;
  }

  init() {
    for (let x = 0; x < this.width; x++) {
      this.cells[x] = [];
      for (let y = 0; y < this.height; y++) {
        const cell = new Cell();
        this.cells[x][y] = cell;
      }
    }
    this.ant = new Ant();
    this.ant.x = this.width / 2;
    this.ant.y = this.height / 2;
  }

  move() {
     // fill in this later
  }
}
With all that in place we can now instantiate the Grid object and start running our animation. The code below won't do an awful lot at the moment as we haven't defined out the and moves, but it will setup all the things we need to get going. The last call to setInterval() will call the 'ant' function about 13 times a second.
window.onload = function() {
  canvas = document.getElementById('grid');
  ctx = canvas.getContext('2d');
  const grid = new Grid(canvas.width, canvas.height);
  grid.init();
  setInterval(moveAnt, 1000/13, grid);
}

function moveAnt(grid) {
  grid.move();
  ctx.stroke();
}
We defined the Ant object with a direction, so let's define those directions now. We set each axis of the compass as a number, which means that in order to rotate clockwise we just need to increment and to rotate anti-clockwise we just need to decrement.
const ANTUP = 0;
const ANTRIGHT = 1;
const ANTDOWN = 2;
const ANTLEFT = 3;
With that in place we can flesh out the Ant object with some movement and rotation functions. Note that we can use neat little bit of modulus maths here in order to loop around the height, width and direction values. This not only means that we will loop from top to bottom and left to right, but also around in circles without having lots of if statements cluttering up the code.
class Ant {
  x = 0;
  y = 0;

  direction = ANTUP;

  moveForward(width, height) {
    switch (this.direction) {
      case ANTUP:
        this.x = ((this.x - 1) + width) % width;
        break;
      case ANTRIGHT:
        this.y = ((this.y + 1) + height) % height;
        break;
      case ANTDOWN:
        this.x = ((this.x + 1) + width) % width;
        break;
      case ANTLEFT:
        this.y = ((this.y - 1) + height) % height;
        break;
    }
  }

  rotateRight() {
    this.direction = ((this.direction + 1) + (ANTLEFT + 1)) % (ANTLEFT + 1);
  }

  rotateLeft() {
    this.direction = ((this.direction - 1) + (ANTLEFT + 1)) % (ANTLEFT + 1);
  }
}
In the code above, the movement of the Ant is achieved by adding or subtracting from the x or y coordinates. For example, in order to move up the grid we would subtract from the x value as x in a canvas starts from the upper left hand side.
With the Ant defined we can now fill in the move function in the Grid object. The canvas element lends itself very well to this kind of cellular processing as it's possible to draw a single 1x1 pixel square using the fillRect() function, so we are taking advantage of this function here.
The move function needs to do the following:
- Grab the current Cell object that the Ant is sitting on.
- Make a decision on the cell depending on its current state.
- If the cell is active then we fill in the square with white, rotate the Ant right and move the Ant forward one cell.
- If the cell is inactive then we fill the square with black, rotate the Ant left and move the Ant forward one cell.
To create a 1x1 pixel square on the canvas we just need to set the fill style of the canvas and then call the fillRect() function. In the code below I am drawing a black square on the current Ant location.
ctx.fillStyle = 'black';
ctx.fillRect(this.ant.x, this.ant.y, 1, 1);
At the end of the process we turn the cell that the Ant is currently on red, which allows us to see where the and it currently situated on the grid.
class Grid {
  /// .. snip .. ///
  move () {
    let cell = this.cells[this.ant.x][this.ant.y];
    if (cell.isAlive) {
      cell.alive = false;
      ctx.fillStyle = 'white';
      ctx.fillRect(this.ant.x, this.ant.y, 1, 1);
      this.ant.rotateRight();
      this.ant.moveForward(this.width, this.height);
    }
    else {
      cell.alive = true;
      ctx.fillStyle = 'black';
      ctx.fillRect(this.ant.x, this.ant.y, 1, 1);
      this.ant.rotateLeft();
      this.ant.moveForward(this.width, this.height);
    }
    ctx.fillStyle = 'red';
    ctx.fillRect(this.ant.x, this.ant.y, 1, 1);
  }
}
With all that in place we can run the simulation and we should see something like this.
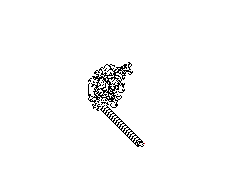
Note that this structure starts to build itself after 10,000 steps in the move cycle. Unfortunately, at 13 frames a second getting to this structure takes about 15 minutes. We can speed this up substantially by adding a loop to the move() function. This means that every time the move functions runs we process 100 septs in the Ant cycle and effectively jump ahead in the process. We therefore don't need to refresh the canvas until the Ant has made some progress.
class Grid {
  /// .. snip .. ///
  move () {
    for (let i = 0; i < 100; i++) {
      let cell = this.cells[this.ant.x][this.ant.y];
      if (cell.isAlive) {
        cell.alive = false;
        ctx.fillStyle = 'white';
        ctx.fillRect(this.ant.x, this.ant.y, 1, 1);
        this.ant.rotateRight();
        this.ant.moveForward(this.width, this.height);
      }
      else {
        cell.alive = true;
        ctx.fillStyle = 'black';
        ctx.fillRect(this.ant.x, this.ant.y, 1, 1);
        this.ant.rotateLeft();
        this.ant.moveForward(this.width, this.height);
      }
      ctx.fillStyle = 'red';
      ctx.fillRect(this.ant.x, this.ant.y, 1, 1);
      this.moves++;
    }
  }
}
With this in place it isn't long before we start seeing this kind of thing being displayed.
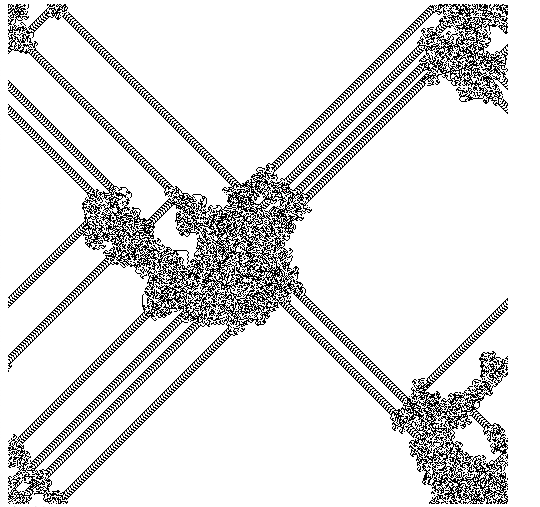
I think it's really interesting how creating something with just a couple of simple rules can create something with this kind of complexity. The picture created starts of random, and then the ant starts moving in these highways.
If you want to have a go with this code yourself then I have created a Langton's Ant codepen with all of the code above running. As a minor improvement to the above code I have also added a step counter so you can easily see how many moves the Ant has made. This involved adding a moves property to the Grid object and then incrementing it every time the move() function is run. A running printout is then added underneath the canvas by injecting the value of move into the HTML of the page.
One thing that rarely happens in nature is seeing one ant on its own. I realised that it should be possible to create a simulation with multiple ants and thanks to the object orented approach I took here it was quite simple to convert the code to simulate many ants at the same time. If you are interested in seeing the result then I also created a codepen for multiple ants.
If you want to read more then I can recommend looking at the wikipedia page about Langton's Ant. This article talks more about how the Ant moves and also mentions extensions that people have made that use more than one colour to alter the way the Ant moves on the grid.

Add new comment