I was scrolling through The Pi Hut website recently and my eye was drawn by a case for the Raspberry Pi Computer Module 4 (CM4) that looked like a modified Nintendo Gameboy. I had bought a CM4 for another project, but as that project wouldn't be delivered for a few months I was looking for something useful to do with the CM4 in the meantime.
The GPi Case 2 from Retroflag is a case that accepts the Raspberry Pi Compute Module 4 (CM4) and is used as an emulation station. Using the right software, it is possible to add files to the system that allow you to play games from a variety of different platforms. If you go for the WiFi CM4 you can also connect Bluetooth controllers to the unit and even use WiFi to transfer files.
The case is an update from a previous version of the case for the Raspberry Pi Zero. The addition of a CM4 gives this case a significant boost in performance and means that this case is actually quite a capable emulation station.
In this article I will look at what components are needed to get going with this system, how to install the components, and then how to load the files required to play games.
Shopping List
The case doesn't do a lot on its own, so there were some other components needed to get everything running. Here's a list of the components I bought for this system from ThePiHut in the UK (with the exception of the micro SD card).
All of this together cost around £170.
The CM4 can run a little hot when in use, especially when running some of the more intense games. For this reason I opted for the aluminium heat sink to help keep the unit cool. This did require a little bit of effort to install correctly, which I will cover later in this article. Also, the Lite version of the CM4 is highly recommended as you can use an external micro SD card to install the operating system of your choice (and fill it with lots of games).
Here is the unit running a demo of Doom on RecalBox.
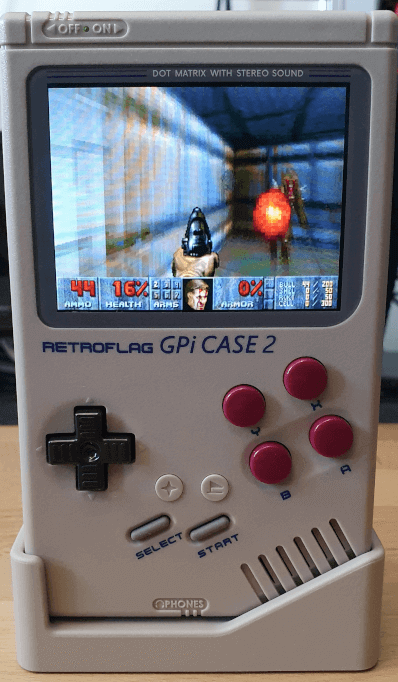
What you can see here is the speed of the system, but it is running Doom flawlessly here.
You can also see in the image above that case is plugged into the dock that comes with the package. This is ideal if you want to have a convenient way to charge your device, but you can also connect the system to a TV and run games through that. If you do this I highly recommend getting the WiFi edition of the CM4 as this comes with Bluetooth support, which means you can connect a controller to the system.
Installing The CM4
The instructions that come with the case say that you can just pop the CM4 into the case from the opening at the top and click it into place. This top opening (made to look like a game cartridge) covers about 75% of the CM4 and so actually getting the CM4 to click into place is quite difficult. Getting the SD card into place is also quite fiddly due to the small amount of space allowed.
I have read before getting the unit that the CM4 runs quite hot and so a heat sink of some kind is recommended. The heat sink works by being screwed to the CM4 through a PCB. It is not possible (without modification) to install the CM4 and the heat sink into the case as you can't get to the underside of the PCB. In addition, there are some plastic pegs that stick through the PCB and prevent the heat sink from sitting correctly.
I did try to just place the heat sink on top of the CM4 and press it down with some folded card, but I could feel the heat sink rattling around inside the case when in use. I decided it was best to install the heat sink correctly to avoid any damage to the CM4.
This meant that I needed to open up the case in order to extract the PCB and properly attach the heat sink using the provided screws. I also had to remove the plastic pegs inside the case that were stopping the correct insertion of the sink.
Opening up the case is fairly easy. There are three screws on the back of the case, plus another two underneath the opening at the top of the unit. Once you have everything unscrewed you'll need an opening tool (or guitar pick) to pry apart the two sides of the case as they are clipped together. The most difficult part here is prying apart the two halves of the case.
The following picture shows the case with the back removed and the battery placed to one side. The CM4 is in the image and is underneath the aluminium heat sink to the left hand side of the image. As there are a few elements here I'll point them out using some highlights.
- Red circles - Screws that you need to remove in order to extract the PCB fully. You can use a standard cross head screwdriver.
- Red boxes - Plastic clips that you need to move in order to get to the plastic tray that holds the screen in place. This is actually the tray that need to be altered to allow the CM4 to be attached to the PCB with the heat sink. I recommend concentrating on the two clips at the top of the case as the other two will follow suit. Use something soft that won't damage the PCB (or the CM4!).
- Large green box - The location of the battery. This will need to be removed in order to get to a couple of the screws. The sticky pad is very sticky, but can be made to release the battery after some effort. Thankfully the battery does stick down to the pad after removal so it doesn't rattle around the case.
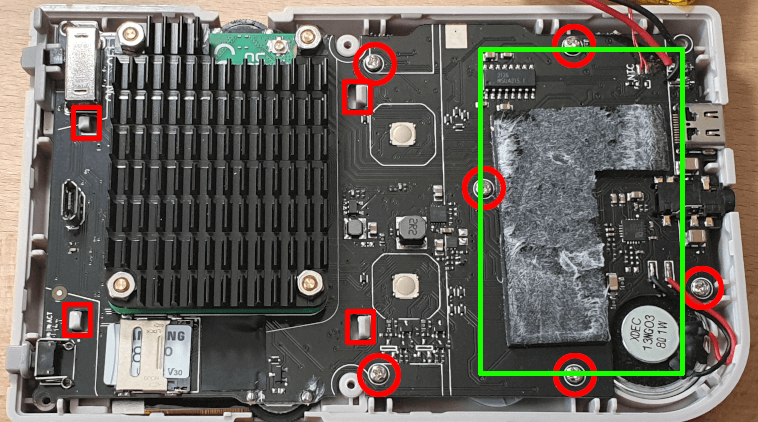
Once you have the screen caddy out, be careful of the ribbon cable and the screen. It is quite easy to damage these little screens and their cables if you aren't careful.
Here is the extracted PCB, showing the CM4 plug socket. The CM4 itself is lying to one side. The screen can just see underneath the PCB in this image.
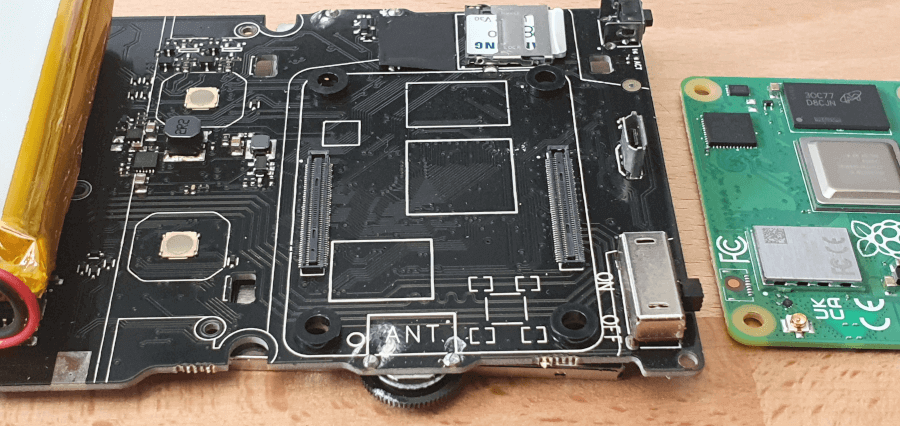
Note that in the above two pictures I have also installed the micro SD card into the PCB. I highly recommend doing this before you close everything up again as it is very fiddly to get it in with the case assembled.
The plastic pegs poke through the holes at the corners of the CM4 socket and belong to a small plastic caddy that holds the screen in place. You'll need to remove these using a file or snipping tool of some kind. I used a Dremmel to file down the pegs and smooth out the plastic caddy.
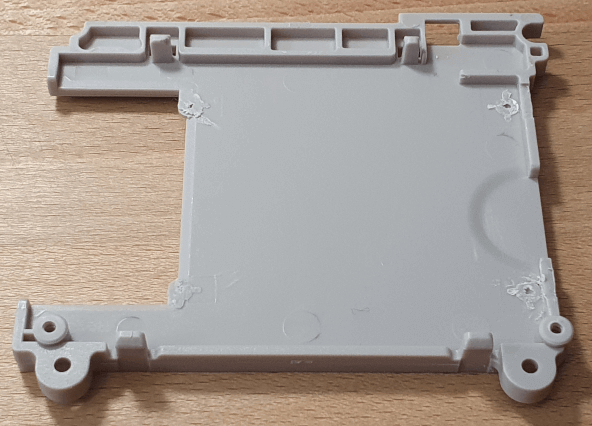
In addition to removing the pegs, you also need to remove a small amount of plastic from the caddy so that the screws of the CM4 fit into the case. The image below shows a side on view of the fully installed CM4, with the plastic caddy in the previous image installed as well. As you can see, the screws for the heat sink protrude a few millimeters above the PCB so you need to make space for it.
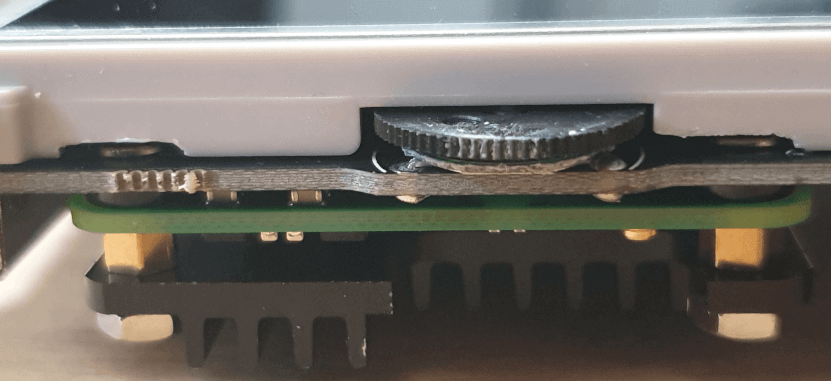
Be very careful here not to damage the screen as you screw in the hear sinc. You'll also want to to the filing in another location and make sure that the caddy is free of plastic dust before you install it.
Once you have the caddy in place you can re-install the PCB into the case. Make sure not to leave any dust or other particulates between the screen and the plastic protector on the front of the case as you will clearly see this when playing games.
The final step before you finish everything here is to install the areal for the wireless and Bluetooth signal. The areal on the CM4 is located in the cut away section of the heat sink, as you can see in the image below.
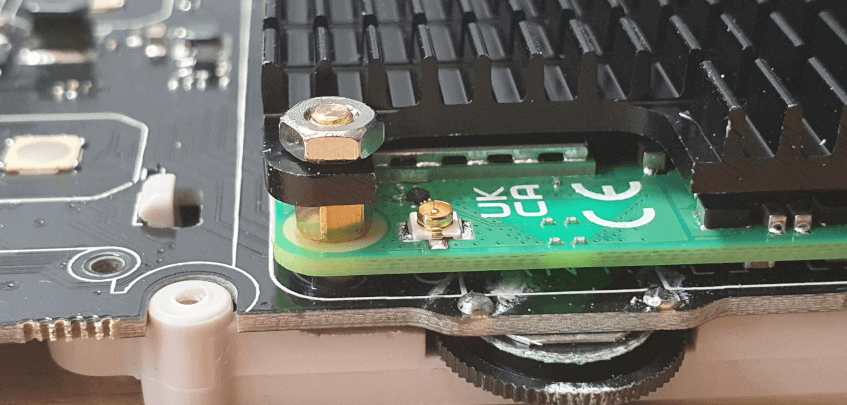
Getting the areal to attach correctly, and the cable to lie inside the case without getting trapped, or the socket popping out again, was a truly massive pain. If you do this you'll need a fair amount of patience to get everything fitted correctly. I highly recommend getting a decent pair of tweezers to assist you here. Don't rotate the areal plug once you have attached the cable as this will cause it to pop free again.
Once you have the areal installed you need to configure the CM4 to use that instead by editing the file at /boot/firmware/config.txt and adding the following line at the bottom.
# Switch to external antenna.
dtparam=ant2
This changes the areal in use from the default of "ant1" to the external of "ant2". You can even disable this entirely by using the argument "noant".
Thankfully, as the case is plastic you can just pop the areal inside the unit and it will get decent reception.
Installing Recalbox
Before installing the micro SD card into the case you need to flash it with an operating system. You can either install Retropie or Recalbox. I opted for Recalbox.
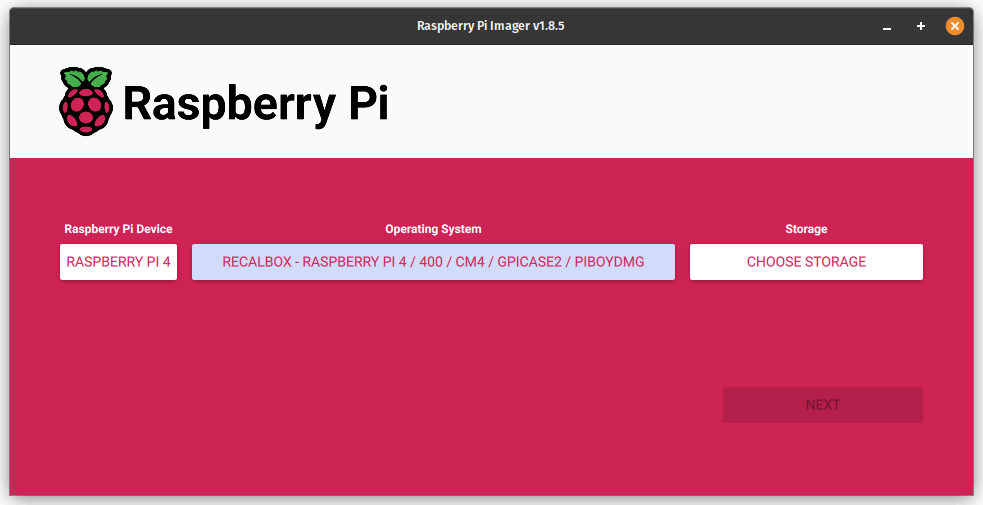
There are a couple of ways to install Recalbox, but I found the easiest way was to install the Raspberry Pi Imager program and use this to pick the right device and operating system from a set list of systems.
Here is a screenshot of the Raspberry Pi Imager, ready to install Recalbox onto the micro SD card for the CM4.
Once you have the os installed and the case has been re-assembled you can start enjoying a bit of retro gaming!
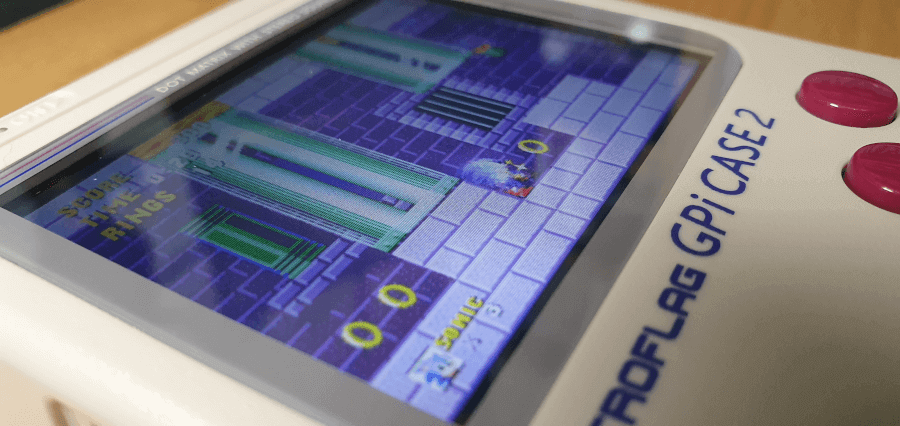
You will, of course, need to copy your favorite (legally obtained) ROM files over to the unit in order to start playing them. Recalbox does come with a few decent titles like Doom and Cave Story, as well as some open source games for various systems.
Whilst the built in games are pretty good, I think the best way to experience this system is by installing some of your favorite games.
WiFi Connection And Adding Games
After you turn the unit on for the first time, go into the settings and connect it to your local WiFi network. Once you do this the network settings will show you an IP address.
By plugging this IP address into a web browser browser you can see a web interface for Recalbox that will give you all sorts of information.
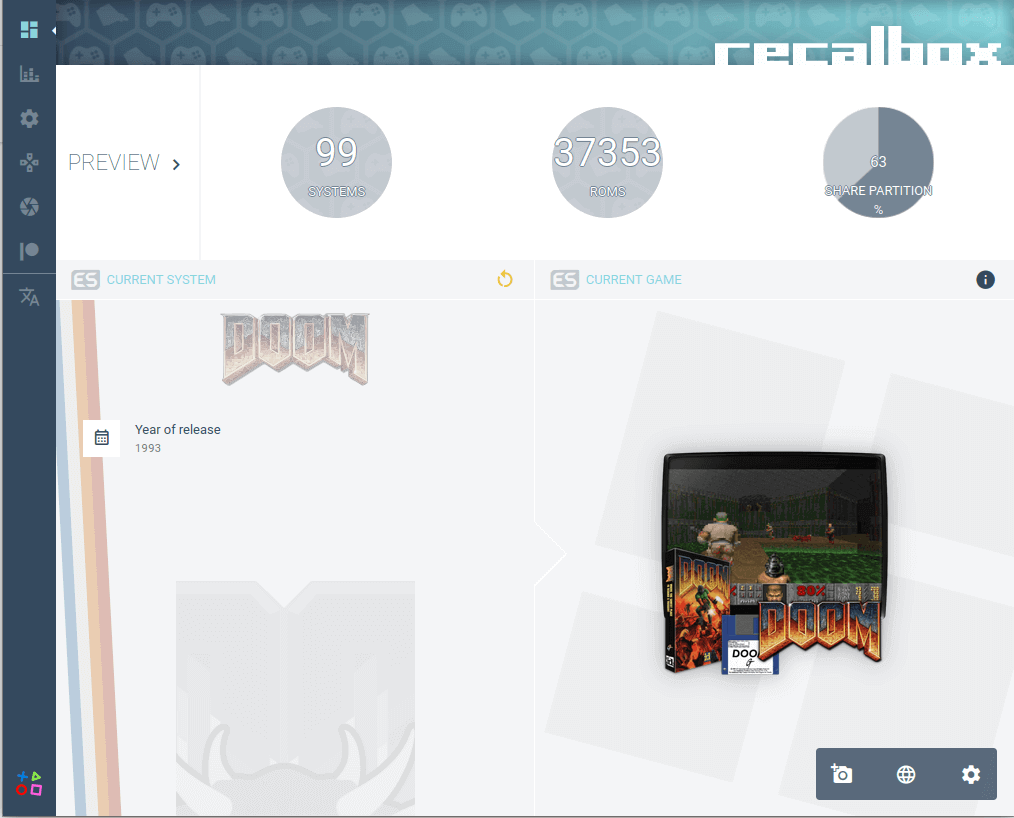
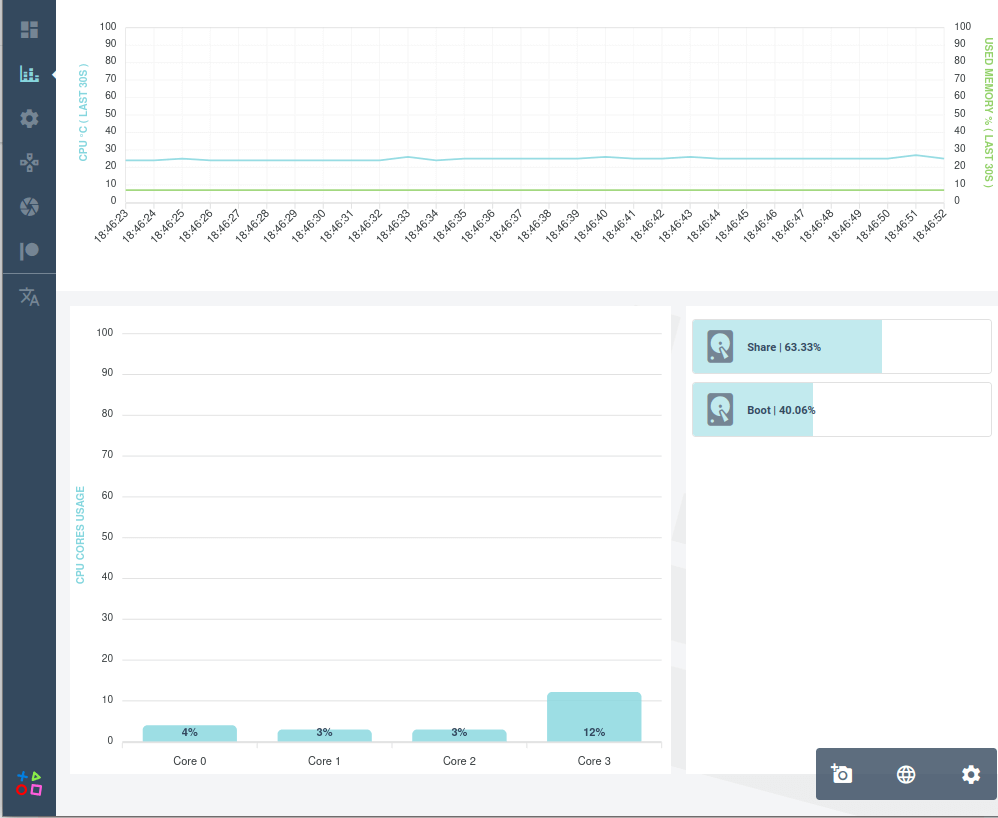
You can even see a performance tab where it gives you a live update of how the CM4 is running. As you can see here, the CM4 doesn't even break into a sweat when playing Doom.
One of the settings you'll find in the web interface is the ability to connect to a local SSH service, which makes managing the unit really easy as you can just log into Recalbox and see what's going on. The ability to add SSH so easily here is due to the architecture involved. RecalBox is essentially an application running on top Linux, it's really well put together and provides a slick interface with a solid foundation.
I used SSH to log into the box like this.
➜  ~ ssh root@192.168.x.x
root@192.168.x.x's password:
# ls
bluetooth                        recalbox.conf                    upgrade
configs                          recalbox.conf-pre-9.2.3-Pulstar  uuid
logs                             ssh
recalbox.backup                  udev
As the SSH service is running we have a handy way of copying files to the system without taking the micro SD card out. I used SCP (SSH Copy) to copy all of the ROMS and BIOS images onto the system like this.
scp * root@192.168.x.x:/recalbox/share/roms/snes/
You can also do the same with any BIOS files for systems that you want to use.
Copying all of the files I wanted onto the system took a few hours, but everything is solid enough and the connection was good so it didn't fail at all.
Conclusion
I really like this little console, a lot. I love having a dedicated device that can play lots and lots of games with nice feeling buttons. I own many of these games as physical copies and so it is good to be able to play them on the go.
The CM4 runs flawlessly and the Recalbox system is an amazing bit of kit that allows emulation of all kinds of different systems. I have been using the case for hours to play through a bunch of games.
The physical buttons on the case feel great. Whilst the D-pad is a little bit on the spongy side, it doesn't detract from the gaming experience.
What is also nice is that you can use the Bluetooth capability of the CM4 to attach any peripheral you want. I attached a PS4 controller, a mouse, and a keyboard to the system and they worked fine. This is particularly useful (essential really) when the unit is attached to a display as you can't use the buttons on the device when it is in the dock. Adding different controllers is also useful when playing games on platforms that have more than the 6 buttons and D-pad that the case has. I was able to get some PlayStation games running very well, but couldn't control them without an external controller.
Assembling everything was a bit of a pain, but mainly because I decided to also fully install a heat sink that required taking it entirely apart and removing some of the plastic tabs. I think that the case could have been designed slightly differently to accommodate the CM4 a little better. The design of the case makes sense when you realise that version 1 of the case was created to the Pi Zero, which is a much smaller unit and would just slot into the available cavity. I get the feeling that the PCB was made to accommodate the CM4 and the case itself didn't get the attention it needed.
The screen is great, with the retro games appearing crisp and clear and there is minimal ghosting on the display. My only issue is that the front of the screen is very easy to scratch, especially when the unit is in a pocket or bag. I guess I've been spoiled by the glass displays on phones that I take the old plastic screens for granted.
Although the cost of £170 might seem a little high, most of this cost is due to the CM4 and the extra parts for it. I went for a high end CM4 with 8Gig of RAM and built in WiFi, but you might be able to reduce the cost by around £40 by going for a CM4 with a lower spec and skipping the heat sink. I would recommend sticking with the Lite version as the micro SD card is easily quick enough to load most of the games you will play.
What model of CM4 you go for will depend on the games you want to play and how much performance you want. As you can see from the performance graphs above, even when bench marking Doom the unit was only had 10% memory usage and a max of 13% CPU usage. It doesn't even get warm when in heavy use.
I would recommend a micro SD card of around 127GB or 256GB as you can easily fill this with ROMs and BIOS files without even trying.
Ultimately, if you are into retro games and want something that you can play lots of different systems with physical buttons in a slick package then this is for you. As long as you are willing to do some hacking to get everything in place. The out of the box experience with Recalbox is ok, but it took me a few hours to get everything loaded.


Comments
hi, I read your review of the case 2.
What you forgot to mention is Recalbox runs KODI, which turns it into a brilliant media and streaming player.
You can play internet radios on it in a car so long as you have an in car mobile router and access to the AUX input of an in car audio system. Kodi also has a web interface on port 8081 so you can talk to it with a smart phone no worries.
I found using it in car over 4g it cut out for a short period just twice on a 2000km cross country run, so was 2 days of non stop music.
Perhaps you could get in touch with me.
You neglected to mention using an external aerial/antenna on the CM4 requires mods to the config.txt file so that the CM4 switches to the external socket. Not doing this means it continues to use the internal on board antenna....
Btw you can also connect an external DAC to it via USB which can turn it into a HD audio and HD video player....much better than the onboard USB DAC inside Case 2 - though that in itself is not bad compared with the headphone player on the CM4 chip!
G
Submitted by G T on Sat, 11/30/2024 - 16:34
PermalinkHi G, thanks for reading and taking the time to comment.
This was more a review of the case itself, rather than Recalbox, but you are right that Recalbox is an incredible system that includes all sorts of different software that I didn't touch on. I was mainly focused on the gaming aspect of the device, but you've clearly had extra uses as a media player in addition to that.
I never actually managed to get Kodi to start on my system, I set up the configuration options for it but the interface never starts for some reason.
I also didn't realise that I needed to change any config files to get the external antenna working on the CM4. I just wasn't using it! I'm glad you mentioned that as I was just using it without modification. Still, the CM4 clearly has a good internal antenna as the reception on my home wifi was very good. I've updated the post with that information now!
I also don't have an external DAC, but that is also good to know about. Thanks!
Phil
Submitted by philipnorton42 on Sun, 12/01/2024 - 11:54
PermalinkAdd new comment