When I first heard the term "Shadow DOM" I had to laugh at the name. I had visions of a cloak and dagger HTML element that would only be seen on the dark web. Or some sort of nefarious shadow site that was the after effect of a hack. In reality, this is quite a useful bit of technology that has a number of applications, although it does need a fairly modern browser to be able to use it.
Shadow DOM is part of the web components strategy, which includes custom elements and HTML templates. These give developers the power to create custom tools and experiences that are encapsulated away from other parts of the code.
In this article I will go though what the shadow DOM is, how to use it, and in what situations it comes in handy.
What Is The DOM?
Going back to basics slightly, the Document Object Model, or DOM, is used by programs like web browsers to create a picture of what HTML or XML elements exist on a web page or similar document. When your browser downloads some HTML it will parse it to create a series of nodes and objects to create a picture of what the page structure is. It's important to think of the DOM as a tree, where a root element has child elements, and those child elements might have multiple child elements.
In reality, the DOM is more of a programming interface that can be used to manipulate the structure of the page with JavaScript.
Using this API we can probe the DOM model to extract elements and find out what properties that element has. The following JavaScript snippet will extract the class and content of a div with the ID of "my-div".
// <div id="my-div" class="pull-left">Div content</div>
let specialDiv = document.getElementById("my-div");
let specialDivClass = specialDiv.getAttribute('class');
console.log(specialDivClass); // pull-left
let specialDivContents = specialDiv.innerHTML;
console.log(specialDivContents); // Div content
We can also use the DOM API to inject elements into the structure of the page. In the following example we are creating a div element with the contents of "Div contents" and injecting it at the end of the page. The "document.body" is a reference to anything within the content of the page that will be displayed.
var divElement = document.createElement('div');
divElement.innerHTML = 'Div contents';
document.body.appendChild(divElement);
There are a large collection of functions and attributes that you can use to manipulate the DOM, and this article would be considerably larger if I went into them all. A good starting point is the Mozilla page on the DOM structure.
The most important thing to note in the above functions is that the manipulation of the DOM directly changes the content of the page. This means that if you add a paragraph element then that element will inherit all of the properties that the page has and will be styled in accordance to the styles setup in the page.
What Is Shadow DOM?
Shadow DOM is a part of the DOM that is displayed on the web page but is disconnected from all other interactions. This means that if you inject a shadow DOM into your document structure then it will not be effected by any of the styles on the page. It will also not be found or changed by any actions of the normal JavaScript DOM traversal and manipulation.
It is possible to access the shadow DOM using JavaScript, but shadow DOM needs to be made available and you need to specifically access it. I'll address this more later on.
If you are familiar with iframes then think of it like the contents of an iframe. Whilst you can see the item on the page you can't directly alter it without altering the page behind the iframe. The shadow DOM works in the same way, except you can use the same DOM functions in JavaScript to action upon the contents of the shadow DOM.
As a simple example, let's take some HTML and CSS and inject a shadow DOM into the existing DOM structure to show the basic principles in place. Here is the HTML.
<p>This is not part of the shadow DOM.</p>
<div id="shadow-element"></div>
Here are the styles we set for the page.
p {
  border: 1px solid red;
  width: 4rem;
}
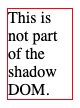
Displaying this on a web page shows us the paragraph with restricted width and a red border.
Now we can inject the shadow DOM into our page. We do this using the attachShadow() method, which must be run on a valid DOM element. This method accepts a mode as a parameter, which I'll address in a little bit. The method returns the shadow element that we have created.
let shadow = Element.attachShadow({mode: 'open'});
The following example will extract the div element from the above HTML and create a shadow DOM element on that element. We then create a paragraph with some text in that shadow DOM element.
let specialDiv = document.getElementById("shadow-element");

let shadow = specialDiv.attachShadow({mode: 'open'});

var divElement = document.createElement('p');
divElement.innerHTML = 'Paragraph contents';

shadow.appendChild(divElement);
Running this code produces the following output on the page.
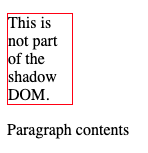
As you can see from the above image, the first paragraph element has a red border, but the paragraph element within the shadow DOM element does not get the same styles applied.
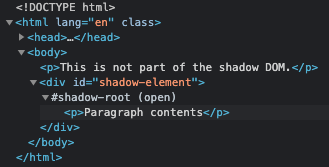
If we inspect the structure of the page we can see that a new "shadow-root" element has been created, in which sits the new paragraph we created.
The shadow DOM is quite widely supported by most major browsers. Firefox (from 63 onwards), Chrome, Opera and Safari all fully support it. The new Chromium-based Edge supports it as well, where as the older version of Edge didn't.
Best Practice With Shadow DOM
According to the Mozilla developer documentation on the shadow DOM, the best way of using this system is by using JavaScript objects and custom HTML elements. There are a number of HTML elements that can have a shadow DOM attached to them (which doesn't include the anchor element by the way) but it's a good idea to use your own element in order to further separate the shadow DOM from your page flow.
The custom element I have chosen for this element is my-custom-shadow-dom-element, here is my element in a page.
<my-custom-shadow-dom-element></my-custom-shadow-dom-element>
The next step is to set up the JavaScript class that will contain the shadow DOM code. This class extends the HTMLElement class, which is the internal class that is used for all internal HTML elements. All I'm doing in this class is adding the shadow DOM to the element and then adding a single paragraph element to the shadow DOM.
class MyCustomShadowDom extends HTMLElement {
  constructor() {
    // Always call the parent constructor.
    super();

    // Create the shadow DOM root element.
    let shadow = this.attachShadow({mode: 'open'});

    // Add some content to the shadow DOM.
    var pElement = document.createElement('p');
    pElement.innerHTML = 'This is part of the shadow DOM.';
    shadow.appendChild(pElement);
  }
}
In order to trigger this class we just need a single line of code. This will register the new HTML element and trigger the constructor. Without the following line the shadow DOM will not be injected into the page.
customElements.define('my-custom-shadow-dom-element', MyCustomShadowDom);
Running this code together will create a page with a single paragraph on the page, inside a shadow DOM element.
Another step in getting best practice with shadow DOM is to use the connectedCallback() method. This method is run every time the element is added to the DOM and we can use it to inject the elements we need into the shadow DOM. The following class has the same functionality as the previous version, but is set out slightly differently to make use of connectedCallback().
class MyCustomShadowDom extends HTMLElement {
  constructor() {
    // Always call the parent constructor.
    super();
    // Create the shadow DOM root element.
    this.shadow = this.attachShadow({mode: 'open'});
  }
  connectedCallback() {
    // Add some content to the shadow DOM.
    var pElement = document.createElement('p');
    pElement.innerHTML = 'This is part of the shadow DOM.';
    this.shadow.appendChild(pElement);
  }
}
Note that we are now setting the shadow DOM to be a property of the class so that we can access it from anywhere within the class.
Finally, it's also a good idea to create some sort of wrapper element using a div or a span to encapsulate things. So rather than just adding a paragraph element to the shadow DOM you instead create a div element and add the paragraph to that element.
class MyCustomShadowDom extends HTMLElement {
  constructor() {
    // Always call the parent constructor.
    super();
    // Create the shadow DOM root element.
    this.shadow = this.attachShadow({mode: 'open'});
  }
  connectedCallback() {
    // Create a wrapper div element.
    let wrapper = document.createElement('div');
    this.shadow.appendChild(wrapper);

    // Add some content to the shadow DOM.
    var pElement = document.createElement('p');
    pElement.innerHTML = 'This is part of the shadow DOM.';
    wrapper.appendChild(pElement);
  }
}
The above code still produces the same looking HTML, we are now just wrapping it in a div element. This wrapping will become important later, but this approach allows a better approach at encapsulating the elements in the shadow DOM as well as the shadow DOM itself.
Adding Styles To The Shadow DOM
As I have mentioned before, adding styles to the page has no effect on the styles within a shadow DOM element. So how can we add styles to the shadow DOM?
There are a couple of ways to do this.
The first is to inject a style element into the page by adding to the wrapping element I talked about at the end of the best practices section. This is why the wrapper element becomes important, it can be used to inject styles and other elements that are useful to the functionality and design of the shadow DOM. The following example shows the style element being added to the wrapper element, which allows the added paragraph tag to get the same styles as the global styles we set earlier in this article.
class MyCustomShadowDom extends HTMLElement {
  constructor() {
    // Always call the parent constructor.
    super();
    // Create the shadow DOM root element.
    this.shadow = this.attachShadow({mode: 'open'});
  }
  connectedCallback() {
    // Create a wrapper div element.
    let wrapper = document.createElement('div');
    this.shadow.appendChild(wrapper);

    // Add styles to the wrapper element.
    let style = document.createElement('style');
    style.textContent = `
p {
  border: 1px solid red;
  width: 4rem;
}
`;
    wrapper.appendChild(style);

    // Add some content to the shadow DOM.
    var pElement = document.createElement('p');
    pElement.innerHTML = 'This is part of the shadow DOM.';
    wrapper.appendChild(pElement);
  }
}
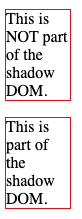
Running the above code injects the styles and shows the shadow DOM using the same styles as the main page.
The second approach of adding styles to the page using an external stylesheet file. A link element is created and given the attributes of 'rel' and 'href' so that it points to an external stylesheet file. This is the usual way that styles are added to pages so we aren't doing anything special here.
class MyCustomShadowDom extends HTMLElement {
  constructor() {
    // Always call the parent constructor.
    super();
    // Create the shadow DOM root element.
    this.shadow = this.attachShadow({mode: 'open'});
  }
  connectedCallback() {
    // Create a wrapper div element.
    let wrapper = document.createElement('div');
    this.shadow.appendChild(wrapper);

    // Add styles to the wrapper element.
    const linkElem = document.createElement('link');
    linkElem.setAttribute('rel', 'stylesheet');
    linkElem.setAttribute('href', 'style.css');

    // Attach the created element to the shadow dom
    wrapper.appendChild(linkElem);

    // Add some content to the shadow DOM.
    var pElement = document.createElement('p');
    pElement.innerHTML = 'This is part of the shadow DOM.';
    wrapper.appendChild(pElement);
  }
}
This method is perhaps the best way as you can easily abstract out your styles and utilise a CSS build process instead of painstakingly managing the styles within the JavaScript code. I'd imagine it comes down to how many styles you need in your shadow DOM, but if you start out my injecting the link method then you'll have a more extensible solution later on.
Closed vs Open Shadow DOM
So far in this article I have only shown the shadow DOM in open mode. It is also possible to create a shadow DOM in closed mode. Let's look at the differences.
When creating a shadow DOM in open mode you are basically allowing it to be probed and changed by JavaScript within the page just like any other DOM element. The element itself stores the fact that it contains a shadow DOM element and this can be accessed to manipulate the shadow DOM. The element containing the shadow DOM contains a special property called shadowRoot that can be accessed in order to find the shadow DOM itself.
The following example shows an additional paragraph being added to the already created shadow DOM.
// Find the custom element on the page.
var customElement = document.getElementsByTagName("my-custom-shadow-dom-element")[0];
// Access the shadowRoot property.
let myShadowDom = customElement.shadowRoot;
// Inject a new paragraph into the shadow DOM.
var pElement = document.createElement('p');
pElement.innerHTML = 'This was added outside of the shadow DOM class.';
myShadowDom.appendChild(pElement);
This changes the page to look like this.

We can also use this to alter the text within the paragraph within the shadow DOM.
customElement.shadowRoot.querySelector("p").innerText = "I changed the text from outside the shadow DOM class!";
If you have a problem with code on the page being able to change your shadow DOM then fear not, this is where closed mode comes in.
Closed mode essentially prevents the JavaScript on the page from being able to detect or manipulate the shadow DOM. Let's change one of the above examples to be a closed shadow DOM element. This is done by changing the mode to 'closed'.
class MyCustomShadowDom extends HTMLElement {
  constructor() {
    // Always call the parent constructor.
    super();
    // Create a CLOSED shadow DOM root element.
    this.shadow = this.attachShadow({mode: 'closed'});
  }
  connectedCallback() {
    // ...
  }
}
Now, if we try to access the shadow DOM through the element we attached it to, we find that the shadowRoot element is empty.
var customElement = document.getElementsByTagName("my-custom-shadow-dom-element")[0];
let myShadowDom = customElement.shadowRoot;
console.log(myShadowDom); // prints "null".
There is, however, a workaround. Notice that in my class I have created a property called 'shadow'. As this property is public I can just access the shadow DOM through that property.
var customElement = document.getElementsByTagName("my-custom-shadow-dom-element")[0];
let myShadowDom = customElement.shadow;
console.log(myShadowDom); // prints "[object ShadowRoot] {}".
We can easily close this loophole by using the relatively new private syntax in the ECMA standard. Changing the class to have a private property means that there is no way we can access the shadow DOM from outside the MyCustomShadowDom class.
class MyCustomShadowDom extends HTMLElement {
  #shadow;
  constructor() {
    // Always call the parent constructor.
    super();
    // Create the shadow DOM root element.
    this.#shadow = this.attachShadow({mode: 'closed'});
  }
  connectedCallback() {
    // Create a wrapper div element.
    let wrapper = document.createElement('div');
    this.#shadow.appendChild(wrapper);
    // ...
  }
}

customElements.define('my-custom-shadow-dom-element', MyCustomShadowDom);

var customElement = document.getElementsByTagName("my-custom-shadow-dom-element")[0];
console.log(customElement.shadowRoot); // Prints "null".
console.log(customElement.shadow); // Prints "undefined".

// The following will result in a syntax error.
console.log(customElement.#shadow);
Using private properties means that our closed shadow DOM is protected from outside manipulation. This is great if you are using this technique in a secure environment and need that extra level of protection.
Examples Of Use
I have been through how to create a Shadow DOM element on your page, but what is it good for? Here are some examples of how this might come in useful.
- Embedding widgets and other tools onto other websites. I have long struggled with the idea of embedding my own tools on other pages. Almost always the injected code will be broken by pre-existing elements on the page. This is complicated by the fact that you never know what sort of markup or styles already exist on the site. By using a shadow DOM you can inject your tool on any website without the any unexpected side effects. If you've seen a live chat widget on a web page then there is a good chance that it was created using a shadow DOM.
- Separating a component from the rest of the page. Let's say you've been given the task of adding a new component to a page on a legacy web application. This can often be difficult as the markup you add will interact with other elements on the page and the pre-existing styles can cause your new markup to behave in unexpected ways. By using a shadow DOM element you can inject your component and styles without fear of it being broken by the legacy parts of the application.
- Displaying CSS styles. Perhaps a smaller use of shadow DOM, but it can be used to demonstrate CSS styles on the page without those styles leaking out into the rest of the page. You can show CSS techniques or even full templates without having to adapt your own page to override those styles.
In conclusion, the shadow DOM technology is really powerful and allows you to inject you own custom components into pages without having to worry about the styles and scripts that are already on the page.
If you want to have a play with the shadow DOM component then I have created a couple of codepen examples that you are free to experiment with.
Shadow DOM in open mode example.
Shadow DOM in closed mode example.

Comments
Excellent article! Thank you very much.
Submitted by Mandy on Thu, 07/01/2021 - 18:17
PermalinkAdd new comment