A calculator is a great application to create when learning how to code as it contains many of the things that most GUI applications will have, including behind the scenes processing of results. Things like triggering events from buttons, accepting user input, and producing output from that input are pretty standard in GUI applications and a calculator has all of them. There are also a couple of features in Python that makes building the application pretty simple.
In this article I will look at designing and building the interface using Tkinter, followed by creating the code to process the entered sums into a result.
Creating The Interface
The very first thing to do is to think about the interface we need for the calculator. What we need to create a calculator is the input/output readout and buttons for the following items:
- The numbers 0 to 9.
- A point button to create decimal numbers.
- Buttons to add, subtract, multiply and divide.
- A button to clear the display of the calculator.
- An equals sign to run the calculation.
Before launching into just spitting out the buttons into the display it's a good idea to figure out how they will be shown. If we place the input/output of the calculator at the top of the display we can create a full bar that contains the numbers the user entered and the result of the calculation. Grouping similar buttons like the numbers and symbols together is useful as well as it allows users to find the button they need.
Looking at existing layouts of calculators there tends to be one or two buttons that are bigger than the other buttons. This allows the calculator to be shown in a grid without the correct number of buttons to fill the grid. If we therefore extend one of the buttons (like the equals symbol) into different rows or columns then we can create an interface with an odd number of buttons.
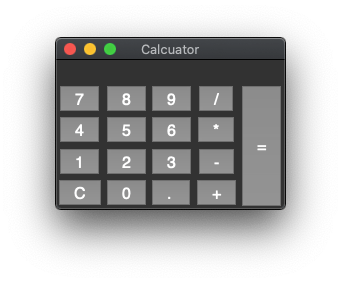
The layout of the calculator we will create will look like the following ascii diagram.
+-------------------+
|                   |
+---+---+---+---+---+
| 7 | 8 | 9 | / |   |
+---+---+---+---|   |
| 4 | 5 | 6 | * |   |
+---+---+---+---|   |
| 1 | 2 | 3 | - | = |
+---+---+---+---|   |
| C | 0 | . | + |   |
+---+---+---+---+---+
The equals button will stretch down the right hand side of the application across the four rows of buttons. The dialog showing the calculation (and result) will sit at the top of the form.
First, let's get the framework of the application setup. The following code will create the application window.
import tkinter as tk

class Calculator(tk.Tk):

    def __init__(self):
        super().__init__()

        self.title("Calcuator")

if __name__ == "__main__":
    calculator = Calculator()
    calculator.mainloop()
With that in place, we can start adding the form elements to the __init__() method.
The first thing to add is the label that will show the calculations across the top of the application. This is a standard Tkinter Label element, using the grid() method with the columnspan attribute to add this into the application window so that it spans across the five columns we are going to add. This is added to row "0" so that it appears as the first row in the application.
        self.calculator_output = tk.Label(width=25, relief=tk.FLAT, bd=1, justify=tk.RIGHT, font="Helvetica 16")
        self.calculator_output.grid(columnspan=5, row=0)
Next, we add the equals button to the application, which is a standard Tkinter Button element. The grid() method is again used to add the button into column 4 and row 1 of the grid. The rowspan attribute is set to 4 to allow the button to extend down downwards. In addition to the position of the button we also set the action of the button to be a method called button_action() using the command configuration setting, which we will address later on in the article.
        self.buttons['button_equals'] = tk.Button(self, text='=', font="Helvetica 16")
        self.buttons['button_equals'].config(height=6)
        self.buttons['button_equals'].config(command=lambda button='=': self.button_action(button))
        self.buttons['button_equals'].grid(column=4, row=1, rowspan=4)
Finally, it's time to set the rest of the buttons to the grid. The code below sets up the button labels we want as a multi-dimensional array, which we then loop through to create the buttons in a given column and row. We add 1 to the row as the Label element at the top of the application takes up row 0.
        self.controls = [
            ['7','8','9','/'],
            ['4','5','6','*'],
            ['1','2','3','-'],
            ['C','0','. ','+'],
        ]

        for i in range(0, len(self.controls)):
            for j in range(0, len(self.controls[i])):
                button_label = self.controls[i][j]
                self.buttons['button_' + str(i) + '_' + str(j)] = tk.Button(self, text=button_label, font="Helvetica 16")
                self.buttons['button_' + str(i) + '_' + str(j)].config(command=lambda button=button_label: self.button_action(button))
                self.buttons['button_' + str(i) + '_' + str(j)].grid(column=j, row=i+1)
Again, we set the configuration of the button to respond to a button press by triggering the method button_action().
With all this in place we are left with an __init__() method that looks like this.
class Calculator(tk.Tk):

    def __init__(self):
        super().__init__()

        self.title("Calcuator")

        self.buttons = {}

        self.calculator_output = tk.Label(width=25, relief=tk.FLAT, bd=1, justify=tk.RIGHT, font="Helvetica 16")
        self.calculator_output.grid(columnspan=5, row=0)

        self.buttons['button_equals'] = tk.Button(self, text='=', font="Helvetica 16")
        self.buttons['button_equals'].config(height=6)
        self.buttons['button_equals'].config(command=lambda button='=': self.button_action(button))
        self.buttons['button_equals'].grid(column=4, row=1, rowspan=4)

        self.controls = [
            ['7','8','9','/'],
            ['4','5','6','*'],
            ['1','2','3','-'],
            ['C','0','. ','+'],
        ]

        for i in range(0, len(self.controls)):
            for j in range(0, len(self.controls[i])):
                button_label = self.controls[i][j]
                self.buttons['button_' + str(i) + '_' + str(j)] = tk.Button(self, text=button_label, font="Helvetica 16")
                self.buttons['button_' + str(i) + '_' + str(j)].config(command=lambda button=button_label: self.button_action(button))
                self.buttons['button_' + str(i) + '_' + str(j)].grid(column=j, row=i+1)
We can run this it will show us the following application.
With the layout sorted we need to add the events so that the buttons do something when the user clicks them.
Adding Events
During the setup of the buttons we added configuration to trigger a method called button_action() when they are clicked. The setup of the configuration is done in a way that passes the label of the button to the method. This means we have a handy way of finding out what button was pressed without having to extract that data from the event, we can just inspect the string passed to the event method.
The simplest implementation of the method is to grab the label (which we called calculator_output) and extract the current label from that element. We then add the value of the button pressed to the label and add that back into the text configuration setting of the label. This basically spits out what was entered into the label.
    def button_action(self, button_pressed):
            current_value = self.calculator_output.cget('text')
            self.calculator_output.config(text=str(current_value) + button_pressed)
Obviously not that useful, so let's add a more useful version of the method that does the calculation.
What we need to do it look at the button being pressed and react in different ways depending on that string. Ultimately, we either react to the "=" or "C" buttons in special ways, but will otherwise just add the label of the button to the output.
For the "=" button we take the current value of the calculator_label item and pass it through the eval() function. This function is built into Python and is used to evaluate code, essentially running any code passed to it. The upshot here is that we can pass in a value of "1+1" and Python will automatically evaluate this expression to "2". We also add a "try: except:" expression around this function in order to prevent errors from crashing the application.
Pressing the "C" button just clears the output by setting the text of the calculator_label to a blank string.
The code that listens to the input looks like this.
    def button_action(self, button_pressed):
        # React to the button being pressed.
        if button_pressed == '=':
            current_value = self.calculator_output.cget('text')
            try:
                result = eval(current_value)
                if result != '':
                    self.calculator_output.config(text=result)
            except:
                self.calculator_output.config(text=current_value)
        elif button_pressed == 'C':
            self.calculator_output.config(text='')
        else:
            current_value = self.calculator_output.cget('text')
            self.calculator_output.config(text=str(current_value) + button_pressed)
If we now run that code we now have a fully working calculator.
Let's try it out.

Now we press equals...
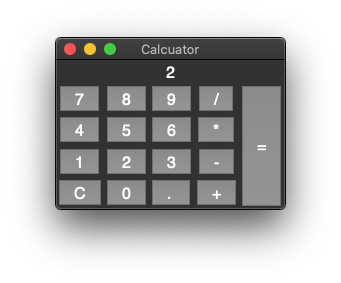
Great! That works.
It's even possible to add sums like "1+1+1" and get the answer "3" since the use of eval() will correctly add the three values together.
Conclusion
Whilst this calculator works up to a point, it is doing a couple of bad practices to achieve this effect. There is no input validation and using eval() is not safe as it is slow can create security problems if users are able to enter arbitrary code. The eval() function works since we have a label as the user input and not a text element, but it's quite easy to enter a bunch of symbols and cause the evaluation to fail. The use of eval(), however, quite a common example when creating calculators as the use of eval() simplifies the code considerably.
A better approach, especially for a simple calculator, would be to inspect the user input to ensure that they can't enter more than one symbol per calculation. This means that when the equals button is pressed the already validated input can just be split by the input string by the symbol and then perform the calculation needed. This would prevent the user from entering rubbish and would mean we didn't have to use eval() to generate our result.
I'll leave that improvement as an exercise for the user, or for another article.
If you are interested in getting all of the code for this calculator then I have created it as a gist.

Charles Collins