Inspired by a YouTube video I saw on awesome Numberphile channel about how to draw hitomezashi stitch patterns I decided to recreate them in Python with the aid of the Tkinter Canvas element. The pattern is quite simple and is an example of simple rules creating complex patterns, which I have an interest in.
The idea behind hitomezashi stitch patterns is to take two sets of numbers and draw lines on a grid. One set of numbers is the horizontal and one set is the vertical lines of the grid. The lines drawn are dashed but the key difference is that each start of the line is offset from the start depending on a certain factor. In the video Ayliean MacDonald uses letters of a phrase and offsets the start of the line if the letter is a vowel. She also uses the numbers of pi and offsets if the line if the number is odd.
By using these simple rules the following picture is generated.
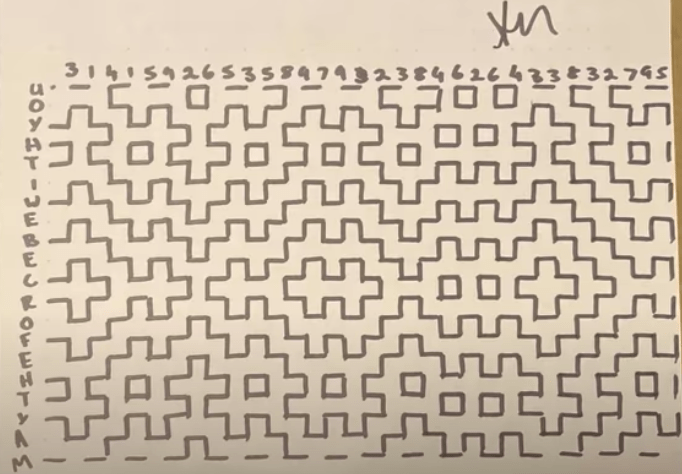
As you can see, the effect created here is quite nice. The lines don't physically interact with each other, but join together to form shapes and patterns almost like they have been drawn like that. They aren't though, it's just a pattern created from simple rules.
To get started drawing this pattern in python we need an application that contains a Tkinter Canvas element with a white background. The class we create takes two numbers as arguments to the constructor that can be used to generate the numbers, which then get used to draw the lines. We assign the values to the class parameters horizontal_line_length and vertical_line_length so that they can be referenced later on.
import tkinter as tk
from tkinter import Canvas
import random, math

   def __init__(self, vertical = 30, horizontal = 30):
      super().__init__()

      self.horizontal_line_length = vertical
      self.vertical_line_length = horizontal

      # Set application title.
      self.title("Hitomezashi Stitch Pattern")

      # Do not allow users to resize the application window.
      self.resizable(False, False)

      # Create the canvas widget and add it to the applciation.
      self.canvas = Canvas(background='white')
      self.canvas.pack(fill=tk.BOTH, expand=True)

if __name__ == "__main__":
    sentence_clock = Pattern(40, 50)
    sentence_clock.mainloop()
With the setup code in place we can now start writing code to generate the numbers, and ultimately draw the pattern.
The first step here is to generate the numbers that will be used to draw the horizontal and vertical lines. This is accomplished using a method called generate_numbers() that generates two arrays of numbers of a given length. The length is taken from the horizontal_line_length and vertical_line_length parameters that were set up in the __init__() method.
   def generate_numbers(self):
      # Set up the vertical and horizontal numbers.
      self.horizontal_numbers = []
      self.vertical_numbers = []

      for horizontal in range(0, self.horizontal_line_length):
         self.horizontal_numbers.append(random.randrange(0,2))

      for vertical in range(0, self.vertical_line_length):
         self.vertical_numbers.append(random.randrange(0,2))
There isn't much more to it than that really. This method is run by adding the method call to the __init__() method.
      # Generate the numbers.
      self.generate_numbers()
With the two set of numbers created we now need to loop through them and draw out the pattern of the hitomezashi stitch pattern. The rule we'll follow here is that if the number is odd we will draw the line with an offset, otherwise we start at the start of the line (i.e. we draw the line at 0). The lines are actually drawn using a couple of methods called dashed_vertical_line() and dashed_horizontal_line(), which we'll come onto next.
   def draw_pattern(self):
      for index, value in enumerate(self.vertical_numbers):
         if value % 2 == 0:
            self.dashed_vertical_line(index * 10, 0)
         else:
            self.dashed_vertical_line(index * 10, 10)

      for index, value in enumerate(self.horizontal_numbers):
         if value % 2 == 0:
            self.dashed_horizontal_line(index * 10, 0)
         else:
            self.dashed_horizontal_line(index * 10, 10)
The two methods that draw the lines are quite similar, both using the create_line() method of the canvas in order to draw the lines. They just work out how many segments of the line to draw and then draw the lines 10 pixels at a time, leaving a gap of 10 pixels between segments.
   def dashed_horizontal_line(self, depth, start):
      for x in range(0, int(self.vertical_line_length/2)):
         points = [
            start,
            depth,
            start + 10,
            depth
         ]
         self.canvas.create_line(points, fill="black", width=2)
         start = start + 20

   def dashed_vertical_line(self, depth, start):
      for x in range(0, int(self.horizontal_line_length/2)):
         points = [
            depth,
            start,
            depth,
            start + 10
         ]
         self.canvas.create_line(points, fill="black", width=2)
         start = start + 20
To initiate the line drawing we add the draw_pattern() method to the __init__() method.
      # Draw the pattern using the vertical and horizontal number ranges.
      self.draw_pattern()
Finally, one nice feature to add is to resize the application window to fit the canvas that we create. This is done by grabbing the top level window object from the application and setting the geometry of the window to match the vertical and horizontal lengths of the number arrays.
   def resize_window(self):
      # Re-calculate the size of the window to fit the pattern in.
      toplevelwindow = self.winfo_toplevel()
      toplevelwindow.wm_geometry(str(self.vertical_line_length * 10) + "x" + str(self.horizontal_line_length * 10))
This is added to the __init__() method along with the other calls.
      # Resize the window.
      self.resize_window()
When we run the application we get the following output.
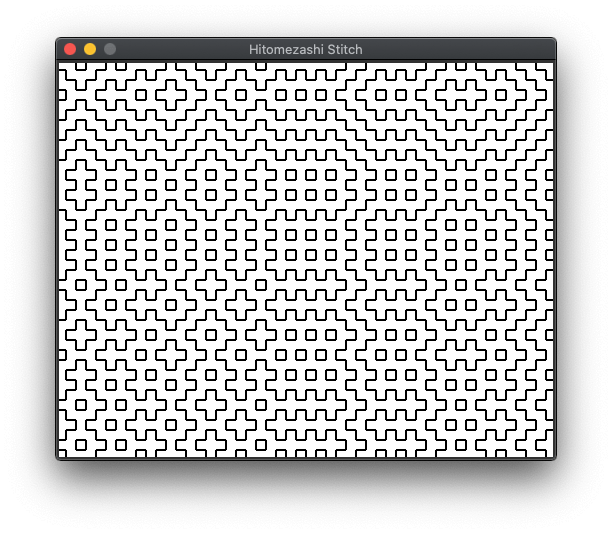
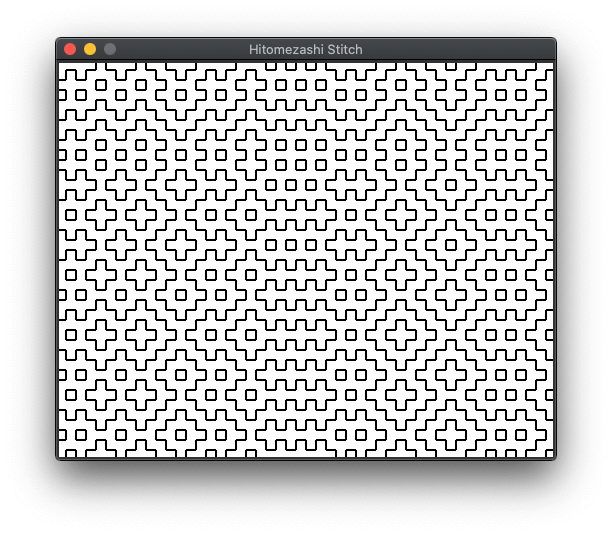
Closing the application and restarting it produces a new random pattern.
This is the square hitomezashi stitch pattern created. The Numberphile video also goes on to create patterns using triangles and even adds colours to the patterns. I haven't done that here, but there is nothing to stop the above pattern being adapted to include those features.
Further improvements could be made to add an entry widget to the application in order to allow the user to enter their own patterns. A button could also be added to randomise the pattern on every click. This would be better than restarting the application to view another pattern. You could even add a scaling factor so that the pattern is drawn with a different scale each time (i.e. instead of a line 10 pixels long).
If you want to have a play with this code and continue adding features then I have created a gist that has everything needed.
You should check out the Numberphile YouTube channel as well, there is usually some inspiration for working out some programming solution or drawing interesting shapes.

Add new comment