A problem I've been struggling with for a while now is managing my bookmarks. Every time I come across an interesting article I want to read, a good resource I want to keep, or a neat tool I want to try I create a bookmark.
Over time I have collected a large collection of bookmarks so when I add a new one to the list it gets lots in the pile. I've tried to create directories to keep "new" bookmarks or organise them into sections, but I always end up scrabbling to find them.
The problem is that web browsers don't allow you to categorise or search bookmarks so I can never find them again. Also when I swap browsers (which I have done twice this year) I end up having to migrate them over and set up synchronising between computers. This always removes the favicons of the sites so I have even more trouble finding the right link.
After losing yet another bookmark again recently I decided to do something about it. I realised that #! code was the best place for it as I'm always logged into the site, so I set about creating a link directory on the site. I didn't just want a big list of links though. In my mind a good link directory takes a screenshot of the site when the link is created so that it is easy to see what links are there from the screenshot of the original site.
In this article I will go through how I set up the link directory, how links are added, and how the site is able to take screenshots of the links as they are added to the directory.
Creating The Link Content Type
To store the links I created a content type called "Link" and added a few fields to it.
- URL - This uses the Link field type to store the URL in use. Using the field settings I disabled the title field and required external links. The link field widget means that we get some basic validation for the form, although we won't be using that too much.
- Tags - Some tags that we can use for the links. This helps to categorise them.
- Image - An image field that stores the screenshot for the link. This is used in favour a media field as we want the image to be connected directly to the Link item and don't need it to be shared elsewhere.
- Image updates off? - This is a boolean field that can be used to prevent updating the screenshot. This allows us to generate the screenshot in a number of different ways, but prevent it from being updated if it isn't updated automatically.
- Description - In order to provide context for searching the system a short description field is added. This will also help when looking through the link directory in the future, especially if the site has since gone offline.
- Date last checked - Thinking of sites going offline, a timestamp field is used to store when the link was last checked. This will be used in the future to check links in the site to ensure that they are still online.
With the content type in place I also created a view so that the links could be shown in a directory. I used a simple grid setup to display the links with screenshots as a grid.
Taking A Screenshot Of The Site
Now we have a place to store our links we need to look at creating the screenshot of the site, which was relatively straightforward to do with PHP. It does, however, require a bit of work to get everything set up correctly.
Over the past couple of years I have been plugging away at a PHP sitemap checker package that uses a couple of different engines to grab links from a sitemap.xml file and check them for validity. I use this quite a bit for checking for the sitemap.xml files and scanning sites for broken links.
This package has the ability to use a headless Chrome browser (via the Chrome PHP package) to scan and (optionally) take a screenshot of the page in question. I adapted this system to scan and take a screenshot of a single page, using Chromium, rather than Chrome. Chromium is the package that is the basis of Chrome, and so has less tracking and other features than Chrome does. This makes Chromium ideal for this purpose.
The process of scanning a page uses the following steps:
- Create a
\Hashbangcode\SitemapChecker\Url\Url object. This takes a single parameter as the argument for the constructor, which is just the URL we want to test. The object pulls apart the URL into the relevant bits (schema, host, path etc) so that it can be validated and standardised with similar links. For example, a search page might be a valid URL, but having lots of copies of the search page with just the page number being different is something I wanted to spot. - Create a
\Hashbangcode\SitemapChecker\Crawler\ChromeCrawler object, which is a wrapper around the URL processing system and allows links to be processed and turned into results. - We then create a
\HeadlessChromium\BrowserFactory object, which is our link between the crawler and the Chromium instance. The constructor of this object takes a string, which is the location of the Chrome/Chromium executable. I downloaded the binary for Chromium and placed it on the server, the location of which is set using a configuration option. I haven't shown that here, but you get the idea. - Options are set for Chromium to set a specific window size and a few other options to allow Chromium to run in headless mode. This allows us to spin up Chromium and take a screenshot without running into issues like no cookies being present. We also don't care about the browser crashing so a couple of options are set for this.
- We then set the engine of the crawler to be the Chromium browser so when we process the URL we use Chromium.
- Two settings in the
ChromeCrawler object are options to take a screenshot and the type of data to return from the action of taking a screenshot. In our case we want to return the screenshot as data, rather than saving the screenshot as a file. This means we can inject it into a Drupal File entity using a core Drupal service.
Here is the code that runs all of the above steps.
$urlObj = new Url($url);
$crawler = new ChromeCrawler();
$browserFactory = new BrowserFactory('/path/to/the/chrome/binary');

$options = [
  'windowSize' => [1280, 960],
  'noSandbox' => TRUE,
  'userDataDir' => sys_get_temp_dir(),
  'startupTimeout' => '120',
  'envVariables' => [
    'XDG_CONFIG_HOME' => sys_get_temp_dir(),
    'XDG_CACHE_HOME' => sys_get_temp_dir(),
  ],
  'customFlags' => [
    '--disable-crash-reporter',
    '--no-crashpad',
  ],
];
$browserFactory->setOptions($options);

try {
  $crawler->setEngine($browserFactory->createBrowser());
}
catch (\RuntimeException $e) {
  return NULL;
}

$crawler->setTakeScreenshot(TRUE);
$crawler->setScreenshotType(ChromeCrawler::SCREENSHOT_TYPE_DATA);

$result = $crawler->processUrl($urlObj);
The $result variable here contains all of the information about the page generated from the URL lookup, including the title, description, headers, and size of the page. If everything went well with the request this object also contains the screenshot of the page as an base64 encoded image, which we can use to generate the physical file and create the file entity.
Once we have ensured that the result is actually a valid page by checking the response code then we can generate the file entity. This is done using the file_system service to ensure that the correct directories exist for our file and the file.repository service to create the file entity from the image data we have.
I've written before about converting base64 encoded data into file entities in Drupal in a previous article. This approach follows some of the same steps, but I get the data from a different location.
Here is the code that creates the file from base64 encoded data.
$fileData = $result->getScreenshotFileData();
if (is_string($fileData) && $fileData !== '') {
  $fileData = base64_decode($fileData);
  $directory = self::LINK_IMAGE_DIRECTORY;
  if ($this->fileSystem->prepareDirectory($directory, FileSystemInterface::CREATE_DIRECTORY)) {
    $fileName = $directory . '/' . $result->getUrl()->generateHash() . '.png';
    $file = $this->fileRepository->writeData($fileData, $fileName, FileExists::Replace);
  }
}
At this point, the $file variable now contains (if everying went well) the File entity that we can attach to our Link entity and save it to the database. All of this code is wrapped up in a service, so all we need to do to get the screenshot data is to call the service with the URL we want to test like this.
$result = $this->crawlerService->crawlUrl($url);
Then we can generate the File entity using that result object.
$file = $this->crawlerService->writeResultsFileDataToDisk($result);
This can then be added to the Link node using the following.
$node->set('field_link_image', [
  'target_id' => $file->id(),
  'alt' => $node->getTitle(),
]);
Creating screenshots from a URL using Chromium works quite well. Although there are some limitations when taking automated screenshots of sites, especially in the current world of abusive AI crawlers. Lots of sites will mask their result, or just flat out block you, and even when you do get a screenshot it might be covered with cookie banners. I'll come onto solving some of those limitations in another article.
Here's an example of a screenshot from the site.
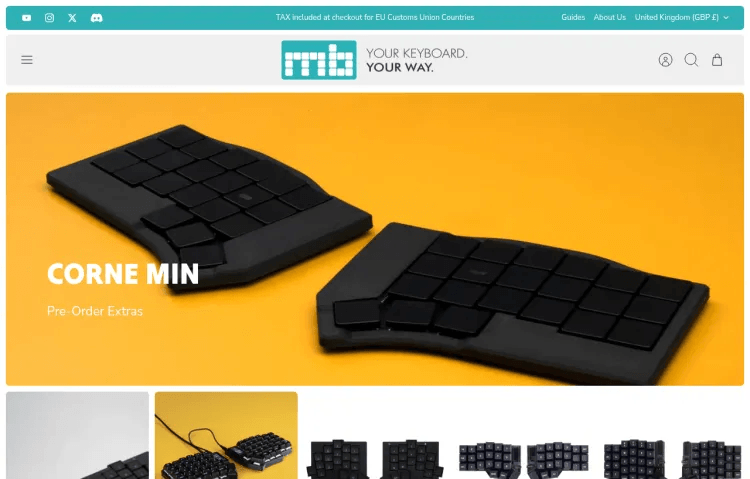
Let's look at tying this screenshot generation into the Link entity.
Link Hook Event
The first avenue to injecting this code into the Link entity is to use a hook.
The best hook to use here is the hook_node_presave() hook, which will allow us to update the data in the Link entity before it is saved to the database. Since I'm using Drupal 11 I can use the new OOP hook system to add this hook.
Here is the full class that contains the presave hook that updates the image and last checked timestamp of the Link. We also use the setting in the "field_link_image_update" field to make sure we want to automatically update the Link image before doing so.
Note that we have set a entity bundle class for the Link elsewhere so all we need to do is make sure that the incoming entity is of the correct type before continuing.
<?php

namespace Drupal\link_directory\Hook;

use Drupal\Core\Hook\Attribute\Hook;
use Drupal\Core\Messenger\MessengerInterface;
use Drupal\Core\StringTranslation\StringTranslationTrait;
use Drupal\file\FileInterface;
use Drupal\link_directory\Entity\Link;
use Drupal\link_directory\Entity\LinkInterface;
use Drupal\link_directory\Service\CrawlerServiceInterface;
use Drupal\node\NodeInterface;

/**
 * Hooks for the link node.
 */
class LinkHooks {

  use StringTranslationTrait;

  public function __construct(
    protected CrawlerServiceInterface $crawlerService,
    protected MessengerInterface $messenger,
  ) {}

  /**
   * Implements hook_node_presave().
   *
   * Perform actions on the link as it is saved.
   */
  #[Hook('node_presave')]
  public function linkUpdate(NodeInterface $node):void {
    if (!($node instanceof LinkInterface)) {
      // Only act upon Link nodes.
      return;
    }

    if ($node->isNew()) {
      // Don't act upon new nodes.
      return;
    }

    if ($node->get('field_link_url')->isEmpty()) {
      // Don't run this process for empty links.
      return;
    }

    $url = $node->get('field_link_url')->getValue();
    $url = $url[0]['uri'];

    $result = $this->crawlerService->crawlUrl($url);

    if ($result === NULL) {
      // Crawler failed, don't update the Link.
      return;
    }

    if ($result->getResponseCode() === 403) {
      // We can't update this as it's protected, so just ignore it.
      return;
    }

    if ($result->getResponseCode() !== 200) {
      // The site was down or something.
      $this->messenger->addError($this->t('The URL %url returned an incorrect status and so was not updated.', ['%url' => $url]));
      return;
    }

    if ($node->hasField('field_link_last_checked')) {
      $node->set('field_link_last_checked', time());
    }

    $imageUpdateOff = (bool) $node->get('field_link_image_update')->getValue()[0]['value'];

    if ($imageUpdateOff === TRUE) {
      // Don't update the image.
      return;
    }

    $file = $this->crawlerService->writeResultsFileDataToDisk($result);

    if ($file instanceof FileInterface) {
      // If we have a file then inject this into the page.
      $node->set('field_link_image', [
        'target_id' => $file->id(),
        'alt' => $node->getTitle(),
      ]);
    }
  }

}
Notice that the hook doesn't save the node here, which this is deliberate. The presave hook is used to update the data in the entity before it is saved to the database so we just add the data we want to save and continue. If we did save the node here the save action would trigger another call to the hook_node_presave() hook, and because that hook saves the node it would trigger another call to the hook, and so on and so on.
I'm using a separate field for the last checked time because I wanted it to be different from the node created/updated times. As the last checked is only updated if the link was active we can use this to automatically scan the links and use this field to check to see what links aren't active any more. I'll address automatic link checking in a later article in this series, but for now it isn't used much.
With this in place the data and screenshot of the Link are updated when the page is saved (assuming that the Link is configured correctly). I wanted to make it easy for me to add a link to the site, so I decided to build a form to do this.
Creating A Link Submit Form
Whilst I could easily go into the content creation dialog and create new content I wanted a way to simply create Links in the link directory by just throwing a URL at a form. This would then create the Link content item, take a screenshot of the site, and save everything to the database.
I won't post all the entire form class here, but the form built step here is pretty simple, we just need a field for the URL and a submit button.
  public function buildForm(array $form, FormStateInterface $form_state) {
    $form['url'] = [
      '#type' => 'textfield',
      '#title' => $this->t('URL'),
      '#required' => TRUE,
      '#default_value' => $form_state->getValue('url'),
      '#description' => $this->t('This form will strip out any query parameters and fragments from the URL.'),
    ];

    $form['submit'] = [
      '#type' => 'submit',
      '#value' => $this->t('Submit'),
    ];

    return $form;
  }
The validation handler for this form is quite extensive, but the main focus is to make sure that the URL entered is valid and doesn't contain any query strings or fragments. We are only really interested in the host and path for the link directory as query strings either contain tracking information or parameters to alter the current page. The validation handler also checks to see if the link already exists in the database, so we don't create duplicate items. Once the URL entered has been fully validated it is then formatted and stored in the form state for the submit handler to pick up.
When the form is submitted we need to use the crawler service to fetch data from the URL entered and then create a Link object. If we have screenshot data then we update the Link with that information and save it to the database. The final step is to invalidate any caches for node lists so that the Link will appear as an item in our link directory.
  public function submitForm(array &$form, FormStateInterface $form_state) {
    $ignore404 = (bool) $form_state->getValue('ignore_404');
    $url = $form_state->getValue('url');

    $result = $this->crawler->crawlUrl($url);

    if ($result === NULL) {
      $this->messenger()->addError($this->t('Unable to start the Chrome instance.'));
      return;
    }

    if ($result->getResponseCode() === 403) {
      $headers = $result->getHeaders();
      if (isset($headers['cf-mitigated'][0]) && $headers['cf-mitigated'][0] === 'challenge') {
        $this->messenger()->addWarning($this->t('Entered URL %url returned an Cloudflare challenge, you will need to do this by hand.', ['%url' => $url]));
        return;
      }
    }

    if ($result->getResponseCode() !== 200) {
      $this->messenger()->addError($this->t('Entered URL %url returned an incorrect status and so was not entered.', ['%url' => $url]));
      return;
    }

    $title = $result->getTitle();
    if ($title === NULL || $title === '') {
      // Set a default title as the URL for the occasional site that doesn't
      // have a title.
      $title = $url;
    }

    // Create the node.
    $node = Node::create([
      'type' => 'link',
      'field_link_url' => $url,
      'title' => $title,
      'uid' => $this->currentUser->id(),
      'status' => 1,
    ]);

    $file = $this->crawler->writeResultsFileDataToDisk($result);

    if ($file instanceof FileInterface) {
      $node->set('field_link_image', [
        'target_id' => $file->id(),
        'alt' => $title,
      ]);
    }

    try {
      $node->save();
    }
    catch (\Exception $e) {
      $this->messenger()->addError($this->t('Failed to create page.'));
      return;
    }

    $params = ['%label' => $node->toLink()->toString(), '%url' => $url];
    $this->messenger()->addStatus($this->t('Link %label created for URL %url.', $params));

    $cacheTags = ['node_list', 'node_view'];
    Cache::invalidateTags($cacheTags);
  }
When the form refreshes we see a message giving us a link to the Link that we created. As the form only creates the URL, title and image of the Link this gives us the ability to quickly enter the node and add information to the description and tags fields.
Conclusion
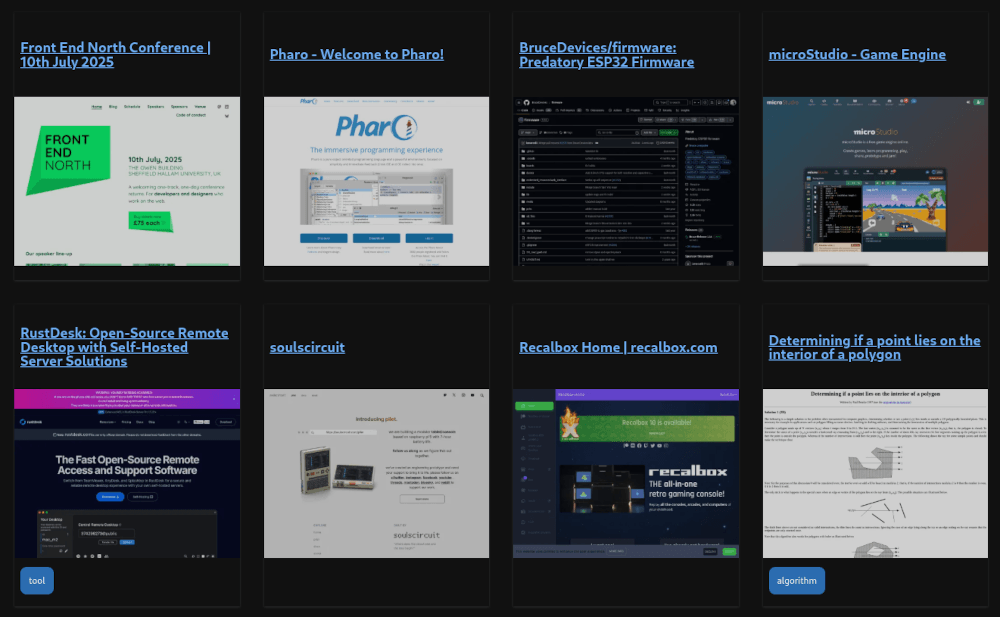
After a couple of weeks of creating links in the directory I now have a few pages of results. I've been adding tags to things slowly so that I can find things, but the search system is working really well. All of the screenshots captured are exactly the same size, which makes creating a grid display of them quite easy.
Here's a preview of the link directory in action, with a small sample of 8 pages. You can see that even the JavaScript heavy pages still rendered correctly.
The success rate of taking a screenshot of the site is on the low side. Although the Chromium browser does a good job of rendering the page and producing an image we can use, actually getting to that point has proven to be quite difficult. Many websites have multiple levels of protection to prevent automated requests, especially in this world of abusive AI crawlers and copyright theft, which is completely understandable. Attempting to take a screenshot of any page on Drupal.org will result in a error code from Fastly and the screenshot would just contain a "are you human" check if I allowed it to continue. GitHub will refuse to load stylesheets in this mode so any shots of GitHub repositories look quite broken.
Even if the browser is able to access the site and take a screenshot I have a secondary issue of cookie consent checks, newsletter popups, intrusive advertising and other annoying things that destroy the site screenshot. I therefore got to thinking how I could take screenshots of a web page in a different way and still get the effect I wanted.
If you're wondering where the link directory is, then it is currently hidden from view for anonymous users. It's currently a work in progress but I wanted to show some of the steps involved in creating it.
Join me in part 2 where I look at solving some of the problems of taking a screenshot of a site using a different mechanism.

Add new comment