Last year I was looking through the shop at Mechboards and saw that they had a number of Lily58 R2G (ready to go) kits available. These are kits that have all of the soldering done and are pretty much complete, they just need some switches, keycaps and assembly.
My trusty Keychron K2 has been my daily driver for about 3 years now, so I was looking for something a bit different to type on. I have found that if I try to swap to a keyboard that is similar to the K2 I end up hitting the wrong keys.
The different layout of the Lily58 meant that I wouldn't make mistakes hitting the wrong keys when the keyboard was so similar. I knew I would need to learn a different typing style, but that shouldn't take me too long.
The kit it self is pretty bare bones as it doesn't come with switches or keycaps, so I set about ordering them along with the board. The board contains hotswap sockets for the switches, LED lighting and two LED screens.
Switches
After some deliberation I went for some Gateron SMD Blacks, also from Mechboards.
These are linear switches with a 60g actuation force, so whilst not the heaviest to type on, they should certainly provide a smooth typing experience.
The "SMD" here stands for "Surface Mounted Device", which are devices like LEDs that are attached to the surface of the board. These switches are essentially half transparent and allow light from LEDs to shine through them, which is useful for the Lily58 since it has surface mounded LEDs for RGB lighting.
Finding Keycaps
The Lily58 is an ortholinear keyboard, which means that the keys are arranged in straight rows, rather than staggered like they are on "normal" keyboards.
As this is an ortholinear keyboard it means that it's actually quite difficult to find keycaps for it. This is a common problem if you go for this type of keyboard as there aren't many stores in the UK that sell these sets.
What you need is a set of keycaps that are the same height but also the same shape. Most keycaps tend to be CherryMX style where the bottom row (with the spacebar) is shorter than the top row. There are a few different variants of this style.
As a result I initially went for a set of OEM profile keycaps which are the same height, but have different shapes for different keys. For example, the arrow keys on most keyboards will slope towards each other.
The OEM keycaps I bought were again from Mechboards. These were shine-through keycaps that I thought would look good with the LED lights contained in the board itself. They are "double shot" meaning that they contain two molds of plastic and so are hard wearing.
Assembly
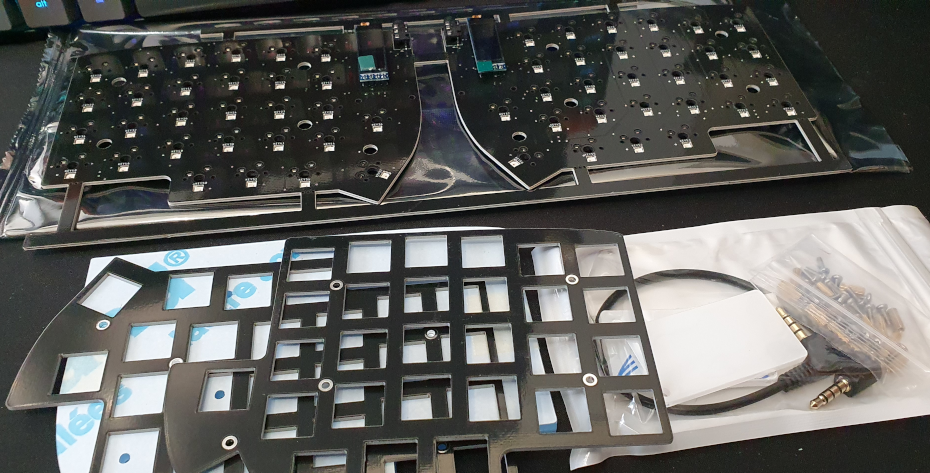
The package from Mechboards contained the components needed for the keyboard, unassembled.
Here's the contents of the pack.
After about half an hour I had everything put together and running.
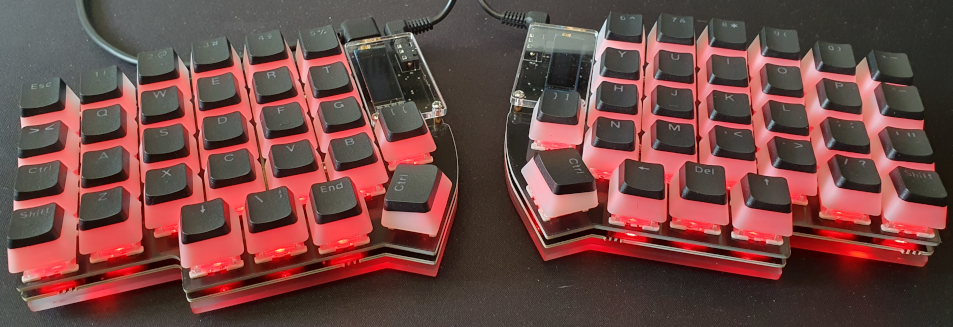
The default colour of the LEDs is red, which shows that the board is working.
Here you can clearly see the ortholinear arrangement of the keys. This image is also a bit of a demonstration of the difficulty in getting a keycap set that will fit the keyboard. I had to use a Ctrl key for the two innermost keys (which act as the space bar and enter keys) which makes them stick up at a strange angle. The rest of the keys fitted quite well though.
The "case" is pretty minimal, and is essentially used to protect the board from direct contact. I certainly wouldn't call this a complete case, but it does the job I need for office use. It is possible to get more complete Lily58 cases from online suppliers, even Mechboards occasionally has some for sale.
With the keyboard assembled it was a case of configuring the keyboard.
Configuring With VIA
The keyboard runs QMK, which is an open source keyboard operating system. I've talked about this before when I looked at a RoMac Plus FauxMax Macropad Kit.
As well as configuring through QMK controls it can also be configured though VIA. All you have to do is plug the keyboard in and visit the website. The VIA app should detect the board and load it up.
Permission Issue
I did have a small issue with permissions doing this so I thought I would detail it here. If you load up VIA and find that nothing happens then try the following.
If you are using Chrome then head over to the page at chrome://device-log/, which will show you an error log. If you see an error that looks like this.
Failed to open '/dev/hidraw1': FILE_ERROR_ACCESS_DENIED
When you need to allow access to a file on your hard disk. On Linux this involves using the following command.
sudo chmod 777 /dev/hidraw1
Once that is done you might need to restart Chrome, but it should start up VIA and connect to your keyboard correctly.
Configuring
Once the keyboard is connected I saw the following screen showing all of the keys.
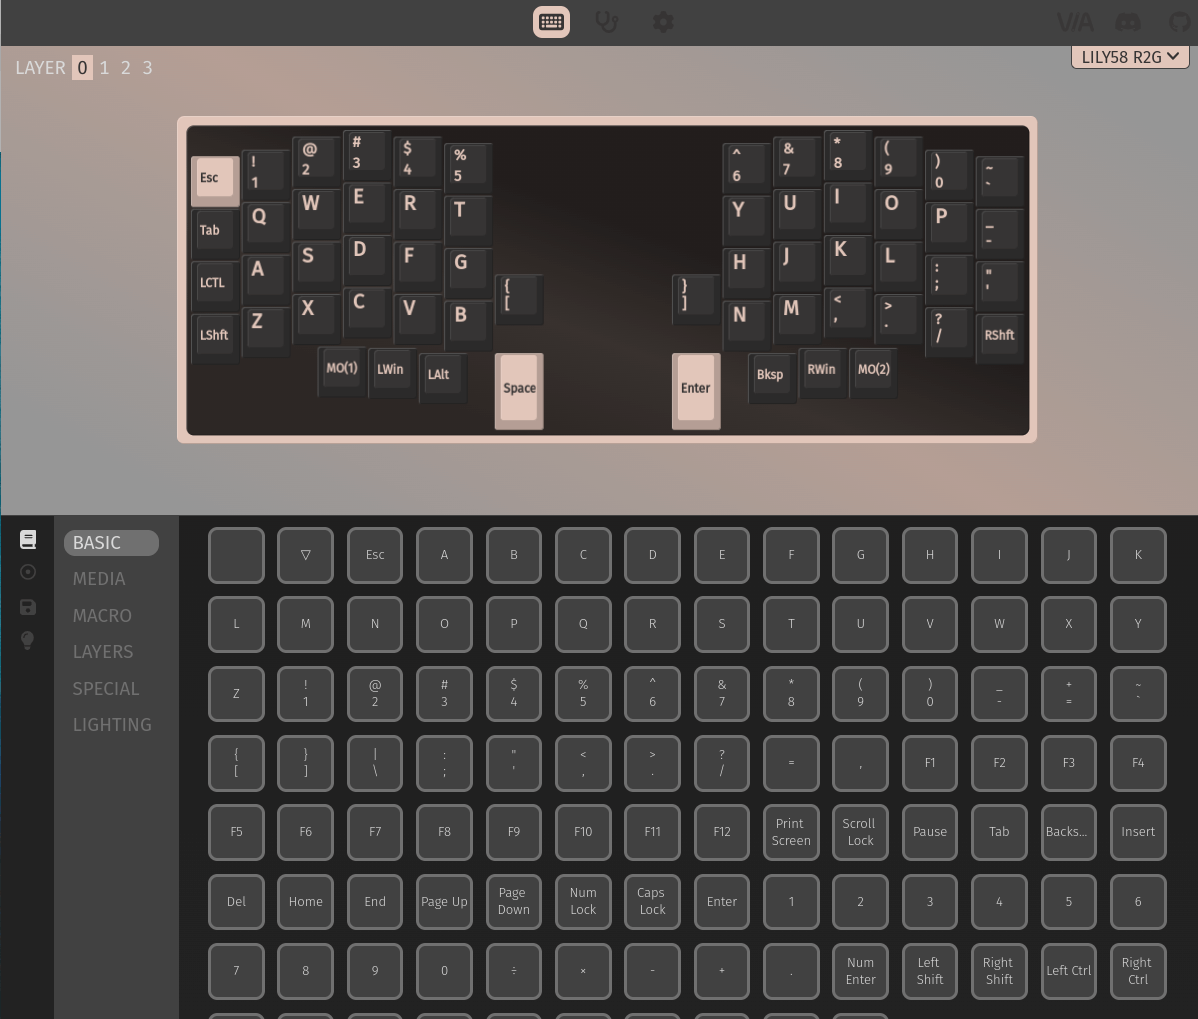
You might notice that there's a few keys missing here, and that's because the keyboard is layered. This means that you can press a button to change the function of every key on the keyboard, meaning that you can get access to any key you need.
In the case of the Lily58 there are 3 layers you can use straight away. The keyboard operates in "normal" mode, but you can also select "upper" and "lower" layers to get access to different keys.
Using this system you can update keys, change and add layers, and even update the colours of the LEDs.
New Keycaps
After a few weeks of use I found another set of keycaps that better suited the ortholinear layout of the board.
This picture shows the fully assembled keyboard and demonstrates the two LED screens that each section of the keyboard has.
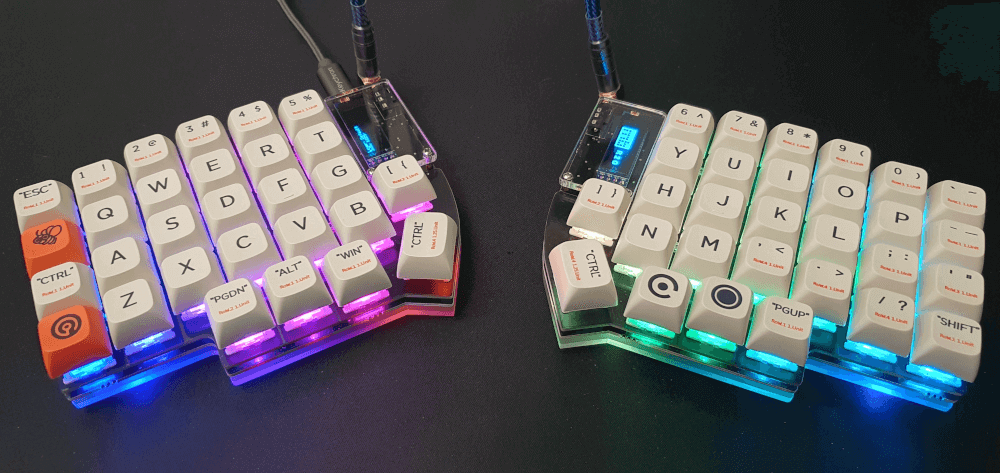
The cable also had a bit of a refresh here courtesy of Pexon PCS.
The LED effect looks good during the day, but it really shines at night.
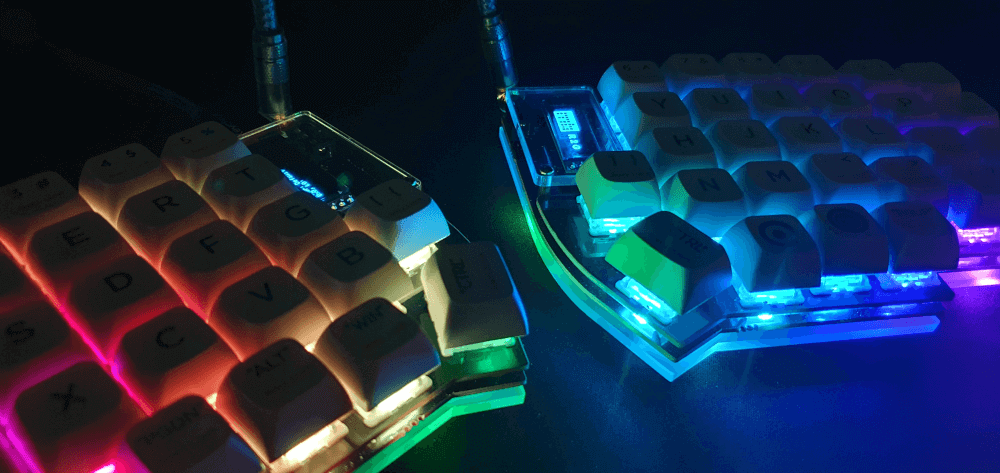
This looks really nice on my desk.
Typing Experience
After assembling everything and ensuring that the configuration worked, what was the typing experience like? Well, not great if I'm honest. I spent several weeks trying to type on the board as much as possible, but I ended up being very slow and continuously made lots of mistakes.
I found the most difficult thing was to type non-standard characters that are commonplace on most keyboards. The ~ or | keys for example, which easily typed on full keyboards need to be selected via a layer on the Lily58. I would often find myself stopping to look up what layer the key was on and how to press it. This really slowed me down, but I also found myself pressing space or enter interchangeably, which caused some confusion when typing on IRC.
I did persevere with the keyboard and try to complete typing tutors with it, but after a few weeks I sort of gave up and put the keyboard to one side.
Conclusion
The Lily58 is not an easy keyboard to get into. There is a bit of a learning curve, especially if you are used to typing on "normal" staggered keyboards. I found programming much more difficult, and that was mostly because I found it hard to type the correct characters.
I'm sure that given enough time I would get used to the keyboard and start typing faster. It did show me that I have very bad typing habits that I really need to break through to make use of the board.
I did speak with someone who bought the same keyboard and they said that they loved it. It was their daily use keyboard for several months and they found it difficult to type on different keyboards.
If you have the time to get into it, then this is a really solid, lightweight, and very customizable keyboard. Although I don't use it for typing I do tend to plug it in when playing games as it gives a smaller form factor that works well with WASD setups.
The ready to go products from Mechboards are really worth it as they give you access to some devices that you might not normally see. This isn't an advert, I just really like the service that Mechboards provide.

Elimkeys