I finished my last post on sorting colours using PHP looking at incorporating all three dimensions into the display of the colours. This lead to some interesting displays of colours in discs using different shapes or lengths as an indication of the colour in question. It was still lacking actually rendering out the third dimension in any meaningful way though.
As I am essentially looking at three dimensional data I thought about displaying the data as a cube in a 3D engine. I could then map the three dimensions of colours (red, green, blue) into the three dimensions of the 3D engine (x, y, z). This means creating a 3D scene with random colour data and rendering that scene out. Funnily enough, there aren't a lot of people writing 3D rendering engines in PHP so I looked into writing a very basic version that would just show point data.
What I needed to do was render simple points (called vertices) in a 3D space and then use some form of projection system to display them in 2D, which I could then render out as an image. The first step in creating the 3D engine is creating the Vertex object that can store our data. All this needs is the parameters that will store the x, y, z coordinates of the vertex in 3D space.
The following Vertex class allows us to create a single vertex containing x, y, and z coordinate data.
class Vertex {
  public $x;
  public $y;
  public $z;

  public function __construct($x, $y, $z) {
    $this->x = $x;
    $this->y = $y;
    $this->z = $z;
  }
}
Next we need to set up some sort of Scene object to manage the collection of vertices. The Scene object is an implementation of the Iterator interface from PHP and so needs to implement certain methods to be able to called in a for loop. All this class does is provide a nice mechanism to store the Vertex objects in it.
<?php

class Scene implements \Iterator {

  protected $scene = [];

  private $position = 0;

  public function add(Vertex $vertex) {
    $this->scene[] = $vertex;
  }

  public function count() {
    return count($this->scene);
  }

  /**
   * {@inheritdoc}
   */
  public function current() {
    return $this->scene[$this->position];
  }

  /**
   * {@inheritdoc}
   */
  public function next() {
    ++$this->position;
  }

  /**
   * {@inheritdoc}
   */
  public function key() {
    return $this->position;
  }

  /**
   * {@inheritdoc}
   */
  public function valid() {
    return isset($this->scene[$this->position]);
  }

  /**
   * {@inheritdoc}
   */
  public function rewind() {
    $this->position = 0;
  }

}
With this in place we can now add Vertex objects to the Scene and then loop through the scene as if it was a normal array. This is possible thanks to the use of the Iterator interface from PHP. The following code will create a Scene object, add a single Vertex object to it and then print out the coordinates of that Vertex.
$scene = new Scene();
$scene->add(new Vertex(0, 0, 0));

foreach ($scene as $key => $sceneVertex) {
  echo $sceneVertex->x . ':' . $sceneVertex->y . ':' . $sceneVertex->z . PHP_EOL;
}
One thing I want to do is create the Vertex with the x, y, z coordinates of the colour in question, but then rotate and move that colour within the scene. As I don't want the actual colour to change as the movements are applied I decided that extending the Vertex class into a new Colour class would allow me to create a single object that would contain both parts and keep them separated from each other. Here is the Colour class that extends the Vertex class (meaning we can still use the Scene class to manage the objects).
class Colour extends Vertex {
  public $red = 0;
  public $green = 0;
  public $blue = 0;

  public function __construct($x, $y, $z)
  {
    $this->red = $x;
    $this->green = $y;
    $this->blue = $z;
    parent::__construct($x, $y, $z);
  }
}
With that in place I can now create a Colour object and move it around the 3D scene without the colour changing.
As I am going to be rendering the scene around the origin (ie. 0, 0, 0) I will need to translate each vertex slightly that that the centre of the cube is also at the origin. As the three different colour values range from 0 to 255 the cube generated will currently have one corner at the origin so this needs to be moved around to allow it to be in the centre of the scene.
Moving a vertex in 3D space is called translation, and is just a case of adding two vertices together. To add a vertex to another vertex we just add the x, y and z coordinates together. This has the effect of moving the object in 3D space.
The following translate() method is added to the Vertex class and translates the current vertex by a vertex passed to it as a parameter.
public function translate(Vertex $vertex) {
  $this->x = $this->x + $vertex->x;
  $this->y = $this->y + $vertex->y;
  $this->z = $this->z + $vertex->z;
}
To translate the cube of 0 to 255 into the origin we need to translate it by half of that value, in other words we need to move it by -128 in the x, y and z planes so that a value of 128 (ie half way between 0 and 255) lies at the origin. Using a translation vertex we can create the Colour objects and use the translate() method to move the vertex to a new location. The following code will generate 1000 random colours and move them by -128 in the x, y, and z coordinates. Each vertex is then added to the Scene object to generate the scene.
$translationVertex = new Vertex(-128, -128, -128);

for ($i = 0; $i < 1000; $i++) {
  $red = ceil(mt_rand(0, 255));
  $green = ceil(mt_rand(0, 255));
  $blue = ceil(mt_rand(0, 255));

  $colourVertex = new Colour($red, $green, $blue);
  $colourVertex->translate($translationVertex);
  $scene->add($colourVertex);
}
With 1000 vertices added to the scene we can look at how to render them. Rendering a 3D scene in 2D is perhaps the important part of this process and is called projection. What we are doing is taking the 3D information and projecting it onto a flat plane so that we can view it as a flat image. There are plenty of tutorials out there discussing the finer points of different projection methods, but for the purposes of this I will be using orthogonal projection (ie. flat) which is essentially taking the x and y coordinates of the vertex and projecting it onto a 2D grid, essentially negating the z coordinates.
Projection works using a matrix that you multiply by the vertex to get the new coordinates. Matrix multiplication forms a large part of 3D mathematics and is really important to understand. If you think of a vertex like a 1D matrix then you can multiply the vertex by the matrix to find the projection of that vertex. For orthogonal projection the projection matrix is as follows.
$projectionMatrix = [
  [1, 0, 0,],
  [0, 1, 0,],
  [0, 0, 0,],
];
If we take a vertex with the coordinates of 100, 35, 77 then we can perform the following matrix multiplication calculation on the projection matrix to find our new x and y coordinates.
[1 0 0]   [100]
[0 1 0] x [35]
[0 0 0]   [77]

(1 x 100) + (0 x 35) + (0 x 77)   [100]
(0 x 100) + (1 x 35) + (0 x 77) = [35]
(0 x 100) + (0 x 35) + (0 x 77)   [0]
Take a look at matrixmultiplication.xyz for a some neat animations on how to do matrix multiplications using different dimensions of matrix.
You might have actually spotted that the matrix calculation we are performing here doesn't do anything to the x and y values. It's important to understand how a 3D scene is rendered and so the projection calculation is an important part of this. You can apply any sort of projection matrix you want using this same method to show different perspectives.
Putting this all together, let's render the colours into our 2D image. The only other bit of logic here is that the calculated x and y coordinates are then shifted to be in the middle of the image. This is needed with this simplistic form of perspective mapping. If I was using a different approach with a camera position being part of the calculation then this wouldn't be needed. Each point is given a +1 to make it slightly easier to see.
// Set up projection matrix.
$projectionMatrix = [
  [1, 0, 0,],
  [0, 1, 0,],
  [0, 0, 0,],
];

// Set up the image.
$im = imagecreatetruecolor($imageX, $imageY);
$backgroundColour = imagecolorallocate($im, 255, 255, 255);

// Loop through the scene.
foreach ($scene as $key => $sceneVertex) {
  // Get the colour.
  $filledColour = imagecolorallocate($im, $sceneVertex->red, $sceneVertex->green, $sceneVertex->blue);

  // Project the vertex onto the plane.
  $x = ($sceneVertex->x * $projectionMatrix[0][0]) + ($sceneVertex->y * $projectionMatrix[1][0]) + ($sceneVertex->z * $projectionMatrix[2][0]);
  $y = ($sceneVertex->x * $projectionMatrix[0][1]) + ($sceneVertex->y * $projectionMatrix[1][1]) + ($sceneVertex->z * $projectionMatrix[2][1]);
  $z = ($sceneVertex->x * $projectionMatrix[0][2]) + ($sceneVertex->y * $projectionMatrix[1][2]) + ($sceneVertex->z * $projectionMatrix[2][2]);

  // Move the origin to be in the middle of the frame.
  $x = $x + $imageX / 2;
  $y = $y + $imageY / 2;

  // Draw the vertex on the image.
  imagefilledrectangle($im, $x, $y, $x+1, $y+1, $filledColour);
}

// Render the image out.
imagejpeg($im, 'scene-' . time() . '.png');
Running all this code produces the following image.
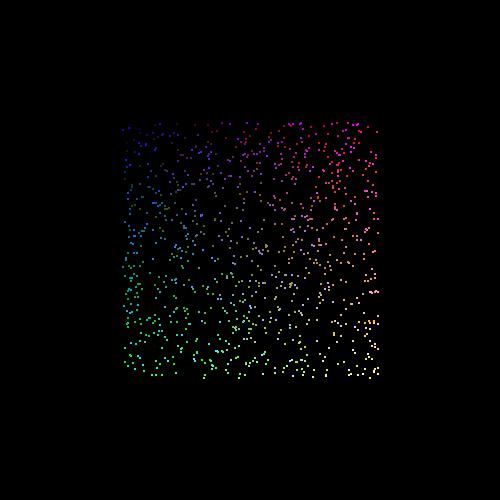
This is looking at the cube face on. Although it looks like we are showing the correct colours it's not clear that this is a cube. So let's add some rotation so that we can view the cube in a perspective.
Rotation in a 3D plain requires some more matrix maths. Each plane of rotation (x, y, or z) requires a slightly different calculation that rotates the point around the origin. Note that rotating around a different point (not origin) requires slightly different maths here. All we need to do is plug the right values into the matrix and then multiply the vertex by that matrix. The result of the matrix multiplication is then stored in the vertex x, y and z coordinates.
Here is the code to rotate a vertex around the origin. The single parameter here is the angle in radians (ie, not degrees).
public function rotateX($angle) {
  $matrix = [
    [1, 0, 0],
    [0, cos($angle), sin($angle)],
    [0, -sin($angle), cos($angle)],
  ];

  $x = ($this->x * $matrix[0][0]) + ($this->y * $matrix[0][1]) + ($this->z * $matrix[0][2]);
  $y = ($this->x * $matrix[1][0]) + ($this->y * $matrix[1][1]) + ($this->z * $matrix[1][2]);
  $z = ($this->x * $matrix[2][0]) + ($this->y * $matrix[2][1]) + ($this->z * $matrix[2][2]);

  $this->x = $x;
  $this->y = $y;
  $this->z = $z;
}

public function rotateY($angle) {
  $matrix = [
    [cos($angle), 0, -sin($angle)],
    [0, 1, 0],
    [sin($angle), 0, cos($angle)],
  ];

  $x = ($this->x * $matrix[0][0]) + ($this->y * $matrix[0][1]) + ($this->z * $matrix[0][2]);
  $y = ($this->x * $matrix[1][0]) + ($this->y * $matrix[1][1]) + ($this->z * $matrix[1][2]);
  $z = ($this->x * $matrix[2][0]) + ($this->y * $matrix[2][1]) + ($this->z * $matrix[2][2]);

  $this->x = $x;
  $this->y = $y;
  $this->z = $z;
}

public function rotateZ($angle) {
  $matrix = [
    [cos($angle), sin($angle), 0],
    [-sin($angle), cos($angle), 0],
    [0, 0, 1],
  ];

  $x = ($this->x * $matrix[0][0]) + ($this->y * $matrix[0][1]) + ($this->z * $matrix[0][2]);
  $y = ($this->x * $matrix[1][0]) + ($this->y * $matrix[1][1]) + ($this->z * $matrix[1][2]);
  $z = ($this->x * $matrix[2][0]) + ($this->y * $matrix[2][1]) + ($this->z * $matrix[2][2]);

  $this->x = $x;
  $this->y = $y;
  $this->z = $z;
}
Using the above we can apply a x, y and z rotation to each vertex as it is rendered by 0.5 radians, which is about 28 degrees.
  $sceneVertex->rotateY(0.5);
  $sceneVertex->rotateX(0.5);
  $sceneVertex->rotateZ(0.5);
Adding the rotation produces the following image.
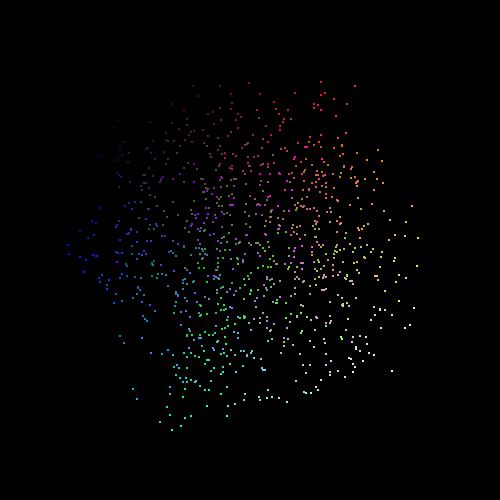
This is looking more like a cube now that we can see the other panes of the cube coming into the perspective of the render. I'll admit that it's a bit difficult to see properly, so I created a collage of images with the cube rotating and created a gif out of it. This might be slow to load onto the page, but it shows the rotation of colours around a central point really clearly.
Out of interest I added about 2,500,000 different colours to the scene and rendered this into a coloured cube. I reduced the size of each vertex here to 1 pixel and this produced the following image.
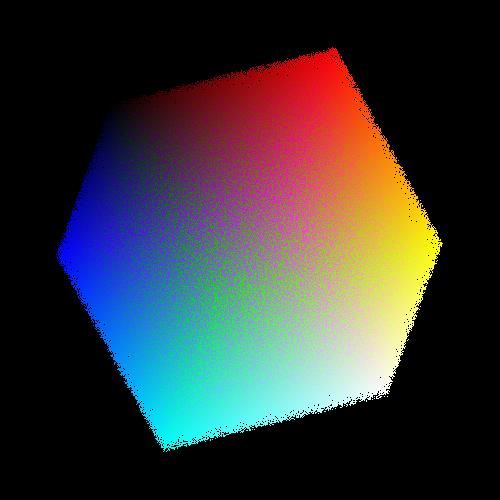
This looks quite like the image of a colour cube that can be found on wikipedia. Note that black (or 0, 0, 0 in the reg, green, blue colour space) is in the top left and white (255, 255, 255) is in the bottom right. The cube looks a little bit messy because we are rendering every colour without first ensuring that we aren't going to be rendering one colour over the top of another. Ignoring the z index here has caused a little side effect of not rendering the colours behind first and then rendering the colours in front afterwards. This means some of the green colour is bleeding through to the front where we should be seeing only red.
Technically, I haven't done any form of sorting here. I have just plotted the coordinates of colours in three dimensions and then rendered them onto a two dimensional image. Most of the work done here was in figuring out all of the maths involved to actually generate an image. So what if we did sort the colours? This would definitely help the rendering process and would mean that the cube generated wouldn't be as messy. Adding a sort function to the Scene class means that we can sort the scene by the z coordinates meaning that things in the background would be rendered first and then things in the foreground would be rendered second, essentially overlapping the items in the background.
The following sort function was added to the Scene class. This just runs a sort on the vertices in the Scene object using the usort() PHP function and compares the z axis of the vertex.
public function sort() {
  usort($this->scene, function ($a, $b) {
    $aValue = $a->z;
    $bValue = $b->z;
    return $aValue <=> $bValue;
  });

  return $this;
}
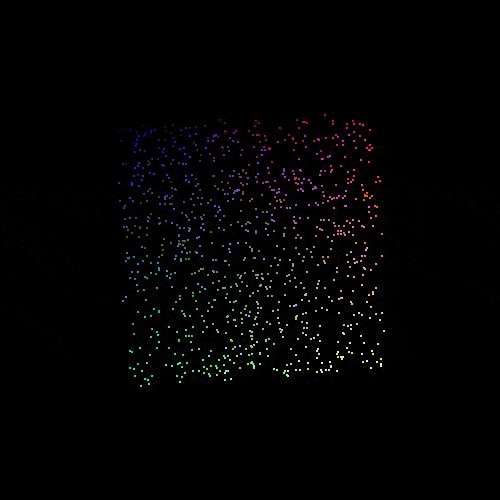
Running a sort on the scene before rendering it out produces the following image.

This looks really nice and clearly shows the relationship between colour and the coordinates in a 3D space. I haven't changed the position or colours of the previous cube in any way, all I've done is made sure that items in the background aren't printed out on top of items in the foreground.
If you are interested in looking into a 3D engine in PHP a bit more then you might be interested to know that I have fleshed out the code a bit and created a PHP3D project on github. It's far from feature complete but has some starting points of matrix calculations and rotations. I probably won't put a lot more work into it as there isn't an awful lot of use for a 3D engine in PHP, but it was useful in getting this post written and for me to figure out some of the maths involved. Feel free to use it or extend it as you need.

Add new comment