Using frameworks to handle the authentication of your PHP application is perfectly fine to do, and normally encouraged. They abstract away all of the complexity of managing users and sessions that need to work in order to allow your application to function.
That said, it is important to take a step back and understand how authentication works in PHP. This allows you to more accurately debug problems with framework authentication systems that you make common use of.
Creating an authentication system using PHP is pretty simple since PHP has many of the features and functions built in. In fact, frameworks will simply wrap this feature set into a coherent authentication model that can be expanded to introduce new features.
In this article I will go through the steps required to create an authentication system using PHP and MariaDB. I will assume you have a little bit of knowledge about PHP, but that you want to know more about how to authenticate users.
Links to the chapters:
In order to simplify the setup of this project we will be using DDEV. This is a Docker based environment that contains the needed elements required for a PHP website to function. DDEV can be configured in a number of different ways, but in this case we will have the following components.
- PHP 8.1.
- Nginx as the web server.
- MariaDB 10.4 as the database server.
MariaDB is functionally the same as MySQL (more or less) and the PHP code that is used to interact with it is called MySQLi. You can easily swap this for MySQL and the code will work in the same way.
Using DDEV means that we don't need to install those programs on the local machine. This has a number of benefits, including having a resilient development platform that can be re-configured without having to install new software. The platform speeds up and simplifies the installation and development process of the environment.
Follow along the DDEV instructions on installation and then run the following command in a newly created directory to start configuring your project.
ddev config
This will run you through a few questions to aid you in setting things up. First, is the name of the project (which will be the name of the directory you are currently in).
Creating a new DDEV project config in the current directory (/home/me/Development/php-session-example)
Once completed, your configuration will be written to /home/me/Development/php-session-example/.ddev/config.yaml

Project name (php-session-example):
If this is acceptable then just press enter to go on to the next question. Remember that this will form the URL of your local development environment.
Next, DDEV wants to know what the "docroot" location is. This is the directory that will be used for the web server root directory, which is essentially where your PHP files will be served from.
The docroot is the directory from which your site is served.
This is a relative path from your project root at /home/me/Development/php-session-example
You may leave this value blank if your site files are in the project root
Docroot Location (current directory): web

Warning: the provided docroot at /home/me/Development/php-session-example/web does not currently exist.
Create docroot at /home/me/Development/php-session-example/web? [Y/n] (yes): yes
For the purposes of this project we need to set this to be "web", and because that directory doesn't exist DDEV asks us if we would like to create it, to which I answered yes.
Finally, we need to select the type of project that we will be working with. There's lots to choose from here, but we just want the standard "php" project so type that and hit enter.
Project Type [backdrop, craftcms, django4, drupal10, drupal6, drupal7,
drupal8, drupal9, laravel, magento, magento2, php, python, shopware6,
silverstripe, typo3, wordpress] (php): php
Selecting this will finish the configuration step and set your project up.
You can now visit the web page at https://phpsession.ddev.site. There's no content there at the moment so you'll just see a "403 Forbidden" page as the web server doesn't know what you want to do with the request.
Before we begin writing code I want to show the structure of the project we will end up with.
/web
  index.php
  login.php
  logout.php
  page.php
database_connection.php
install.php
Note that the /web directory is where the web server will serve files from. Meaning that the database_connection.php and install.php files are outside of the view of the web server.
Although not essential, it is generally a good idea to move some of your more secret files (like database connection details) outside of your web directory so that they aren't accidentally served to your users. If you manage to misconfigure your web server in some way then you might serve PHP source code instead of interpreting it. If this happens then you'll only leak non-sensitive PHP source code, rather than database credentials. It is also possible that PHP can crash and cause this to happen, but this is much less likely.
Feel free to create these files before you start. Even if they are blank they will help in finding the right place to put things.
There are a few ways to connect PHP to a MariaDB database so for the purpose of this project we will be using the MySQL Improved or mysqli library. This library replaced the old MySQL library that was removed in PHP 7.0.0 and provides a number of objects or functions to allow PHP to connect to MySQL or MariaDB databases.
To handle the database connection we will create a file called database_connection.php. This will contain the database parameters and will connect to the database itself.
The file just needs to contain the following code.
<?php

// Database parameters.
$databaseHost = "db";
$databaseUsername = "db";
$databasePassword = "db";
$databaseName = "db";

// Ensure the MySQL client will throw the appropriate exceptions. This is the
// default setting for PHP 8.1.
mysqli_report(MYSQLI_REPORT_ERROR | MYSQLI_REPORT_STRICT);

// Connect to the database.
try {
  $mysqli = new mysqli($databaseHost, $databaseUsername, $databasePassword, $databaseName);
} catch (mysqli_sql_exception $e) {
  // An error occurred when attempting to connect to the database.
  print('MySQLi connection error: ' . $e->getMessage() . ' in ' . $e->getFile() . ' on line ' . $e->getLine());
  exit();
}
With this file in place we just need to include it in any PHP script that requires a database connection. If the database fails to connect (for whatever reason) then a message will be printed and the script will terminate.
require_once 'database_connection.php';
With this file included, we can just use the $mysqli variable to perform any database functions that we need.
Now that we have a database connection we need to generate a table to store the users for our authentication system. Rather than copy and paste the needed SQL into the command prompt we will create a script that will setup the table and add a couple of users.
// Include the database connection.
require_once 'database_connection.php';

// Drop the 'users' table (if it exists).
$mysqli->query("DROP TABLE IF EXISTS `users`;");

// Create the 'users' table.
$sql = "CREATE TABLE `users` (
    `id` INT NOT NULL AUTO_INCREMENT,
    `username` varchar(255) NOT NULL COMMENT 'The username of the user.',
    `password` varchar(255) NOT NULL COMMENT 'The password of the user.',
    `name` varchar(255) NULL DEFAULT '' COMMENT 'The name of the user.',
    PRIMARY KEY (`id`)
) ENGINE=InnoDB DEFAULT CHARSET=utf8mb4 COLLATE=utf8mb4_unicode_ci COMMENT='Storage for user authentication details.';";
$mysqli->query($sql);
With the table created we can then add a couple of test users.
When creating the users we pass their password through the password_hash() function that will create a one time hash of their password. This means that instead of storing the password as plain text, we instead store a hashed version of the password. A hash function takes a string and passes it through a number of processes that turns the string into a random looking string of characters. The key feature is that the same string will always return the same hash value and that it should be impossible to get back the original string from the hashed value.
For example, the password of "password" will convert to the hash value of "$2y$10$RCnjJFeAVAbrSkTaYVkj3.IHZF0vC9WgOoQrcYNB.xxtc0wqgitYS" using the bcrypt hashing algorithm.
This might seem like a needless extra step, but it's actually an important step in the security of any authentication system. By storing the passwords as a one way hash it means that if the database is leaked (or compromised in any way) then no one will be able to recreate the passwords from the hashed values in the database.
If you want to know more about the PHP password functions then this article explains what the PHP password functions are and how to use them.
There is the code that creates two users in the database.
// Generate two test users.
$userData = [
    [
        'user1',
        password_hash('password', PASSWORD_DEFAULT),
        'User One',
    ],
    [
        'user2',
        password_hash('letmein', PASSWORD_DEFAULT),
        'User Two',
    ],
];

$stmt = $mysqli->prepare("INSERT INTO `users`(`username`, `password`, `name`) VALUES (?, ?, ?);");

foreach ($userData as $id => $userDatum) {
    $stmt->bind_param("sss", ...$userDatum);
    $stmt->execute();
}

echo 'Authentication example table (re)created and the default users installed.' . PHP_EOL;
By default, when we use the password_hash() function, we get to benefit from the addition of a password salt.
A password salt is a value added to the password just before hashing; the same value is then added to the password when logging in so that it matches the hashed value. Whilst the user's password is saved in a hashed form it is possible to brute force the original string to match the hash value. If an attacker managed to get hold of the user's hashed password then they would eventually be able to crack it by just trying lots of different strings until they found one that matched.
This might seem far fetched, but the older MD5 hashing algorithm was retired when a research paper proved that the algorithm could be brute forced in just 5 minutes with a pretty basic computer. There are lots of different techniques to this approach as well, you can cut down the strings you test by using "rainbow tables" of known passwords, which are much more likely to be correct.
The addition of a salt value (the longer the better) makes this task much more difficult as the attacker needs to guess both the password and the salt value to find a matching hash. As we haven't used a standard salt in the password_hash() function, a random salt is be generated by password_hash() for each password hashed. This is the intended mode of operation.
With all that in place we just need to run the install.php file using the PHP interpreter inside the DDEV docker container.
ddev exec php install.php
Alternatively, we can log into the DDEV docker container and run the install script that way.
ddev ssh
php install.php
Once run, the install script will have created the users for our authentication system to work.
Before starting on the functionality of the application, let's have a quick aside to think about theming it.
The theme of this website will be handled by a CSS framework called Bootstrap. This means that instead of adding a bunch of custom styles to the system we just need to add some classes to the HTML elements to add styles to our application.
To include Bootstrap into the site we just need to add the following line of code to the head section of the website.
<link href="https://cdn.jsdelivr.net/npm/bootstrap@5.3.1/dist/css/bootstrap.min.css" rel="stylesheet" integrity="sha384-4bw+/aepP/YC94hEpVNVgiZdgIC5+VKNBQNGCHeKRQN+PtmoHDEXuppvnDJzQIu9" crossorigin="anonymous">
I won't go in to depth on how to use Bootstrap, but let's break down one of the elements in detail.
The following is the HTML that makes up the header of the site.
<div class="container">
    <header class="d-flex flex-wrap py-3 mb-4 border-bottom">
        <a href="/" class="d-flex align-items-center mb-3 mb-md-0 me-md-auto text-dark text-decoration-none">
            <span class="fs-4">Authentication Example</span>
        </a>
    </header>
</div>
The first div element has a single class called "container".
- container - HTML containers are the most basic layout element in Bootstrap and are required when using certain layout systems (like grid). In this case we are setting the max-width for each of the different breakpoints in the responsive layout.
The inner header element has the following classes.
- d-flex - This sets the flex display mode on the element.
- flex-wrap - Makes elements in the flex container wrap, or break onto the next line if that's appropriate.
- py-r - Sets the top and bottom padding of the element to a value calculated by multiplying a 1rem by 1.5.
- mb-4 - This sets the bottom margin of the element to a value calculated by multiplying a 1rem by 1.5.
- border-bottom - Adds a border to the bottom of the element.
The largest number of classes is applied against the a element.
- d-flex - This sets the flex display mode on the element.
- align-items-center - Aligns the elements within this element to the centre.
- mb-3 - Sets the bottom margin of the element to a value of 1rem.
- mb-md-0 - This sets the bottom margin of the element to 0 when the width of the browser window is under 768px.
- me-md-auto - Sets the right margin of the ending element to be auto. This allows us to add multiple elements and keep the same margin on the last element in the list.
- text-dark - Makes the text colour a dark grey colour. This makes the element stand out from other text on the page, which is black.
- text-decoration-none - Turns off any text decoration for this element. As this is an a element the element would otherwise get an underline decoration, so this rule turns off that decoration.
Finally, the inner span element has just one class.
- fs-4 - Sets the font size of the element to 1rem multiplied by 1.5.
Putting all of this together creates the following header on the page.

This header will be used throughout the project to give the project a unified experience. We also haven't written any custom CSS to do this.
If you want to know more about Bootstrap then take a look at the Bootstrap documentation page. I won't go into all of the different classes used in this project, but if you want to know more then that documentation site is a good starting point.
Bootstrap is often useful when you want to speed up the development of a site as the styles can be quickly applied to any markup with ease. The downside is that you can often easily make a site that clearly looks like it was created with Bootstrap. Customising the theme to change these styles can often be quite difficult; it's often best to augment the existing styles and add your own classes.
With our styles now working we can start work on the pages of the site and just add in the classes to get them looking good with minimal effort.
The login form is pretty simple. In the file login.php we just need to add in the following HTML markup. This will generate a form consisting of a username and password field. A submit button will also allow our user to submit the form.
<form action="login.php" method="post">
    <h2>Login</h2>

    <div class="form-outline mb-4">
        <label class="form-label" for="form-username">Username</label>
        <input type="text" name="username" placeholder="Username" id="form-username" autocomplete="autocomplete" class="form-control" value="<?php echo $_POST['username'] ?? '';?>">
    </div>

    <div class="form-outline mb-4">
        <label class="form-label" for="form-password">Password</label>
        <input type="password" name="password" placeholder="Password" id="form-password" autocomplete="autocomplete" class="form-control">
    </div>

    <button type="submit" class="btn btn-primary btn-block mb-4">Login</button>
</form>
This creates the following form, along with the header element added in the previous step.
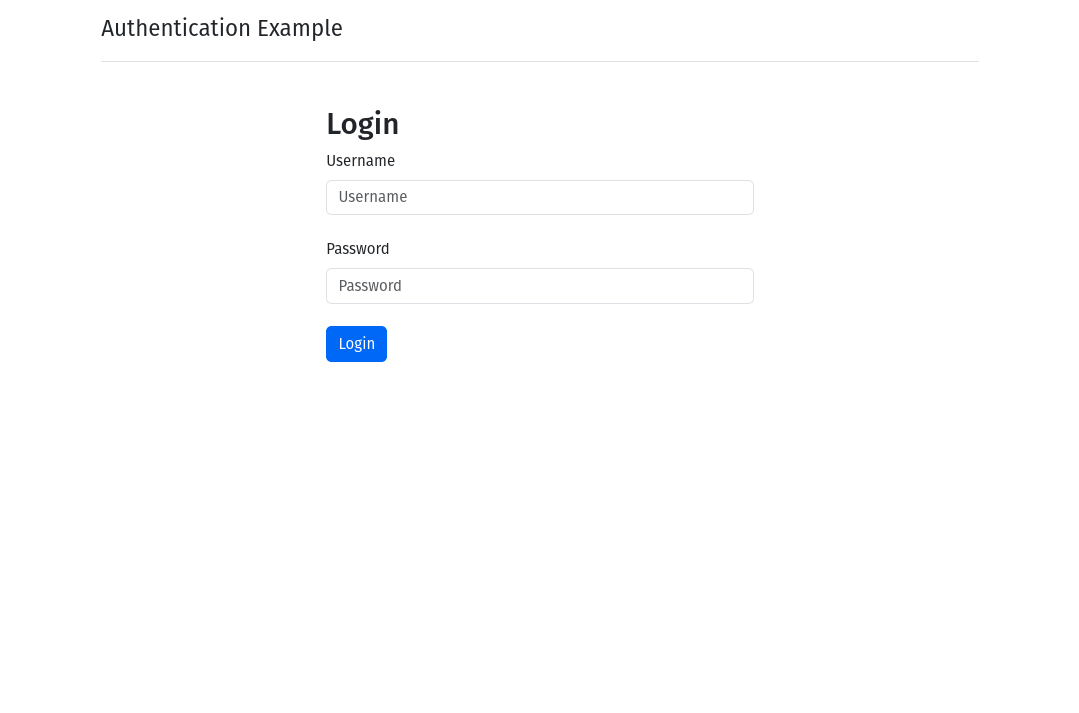
Note that the "username" field will update itself with the value that the user entered, which helps the user if they get their password wrong.
The action of this form is login.php, which means that the form loads itself, which is a technique known as form redux.
Now that we have the login form we can start authenticating users.
When the form is submitted it will reload the page and create values that we can detect in the $_POST superglobal. The $_POST superglobal is a special array that contains information about form submissions and means we can detect if the user has filled in the form by looking at these values. If the $_POST['username'] and $_POST['password'] array items contain information in them then we can say that the form has been submitted.
As an aside PHP has of a number of superglobal variables, which include $_GET, $_FILES, $_REQUEST, $_SESSION, $_ENV and $_COOKIE. We will make use of $_POST and $_SESSION in this application, but it's worth having a look at the other superglobals to make sure you understand what they do.
Here is the block of code we add to the top of the page to detect the form submission.
// Initialise the error variable.
$error = '';

if (isset($_POST['username']) && isset($_POST['password'])) {
  // User credentials have been entered, trim them to prevent common
  // whitespace mistakes.
  $username = trim($_POST['username']);
  $password = trim($_POST['password']);

  // Include the database connection.
  require_once '../database_connection.php';

  // Attempt to authenticate the user.
  $authenticationSuccessful = checkAuthenticationDetails($username, $password, $mysqli);

  // ... React to the user's authentication attempt.
}
Using the data from the form submission we can then extract and hand them to a function that will check that the user is able to authenticate.
We call the function authenticate and pass the username, password and the database connection to it. The job of the function is to find the user's record from the database and compare the hashed password in their database record with the hash of the password they just entered. If the two hash values are the same then we can say that they entered the correct password.
Here is the checkAuthenticationDetails() function in full.
/**
 * Check the user credentials against the values in the database.
 *
 * @param string $username
 *   The provided username.
 * @param string $password
 *   The provided password.
 * @param mysqli $mysqli
 *   The MySQL connection.
 *
 * @return bool
 *   True if the user account was authenticated.
 */
function checkAuthenticationDetails(string $username, string $password, mysqli $mysqli): bool
{
  // Make sure the username and password fields have something in them.
  if ($username === '' && $password === '') {
    // As the username and password fields are empty we return false to show
    // that the authentication attempt was not successful.
    return false;
  }

  // Search the database for the user based on their username.
  $stmt = $mysqli->prepare("SELECT password FROM users WHERE username = ?;");
  $stmt->bind_param("s", $username);
  $stmt->execute();
  $result = $stmt->get_result()->fetch_assoc();

  if ($result === null) {
    // If the result here is null, then the user doesn't exist. We return false
    // to show that the authentication attempt was not successful.
    return false;
  }

  // Validate the supplied password against the hashed password in the database.
  if (password_verify($password, $result['password']) === false) {
    // The user account exists but the supplied password doesn't verify
    // correctly, meaning that it is not the same. Return false to show that
    // the authentication attempt was not successful.
    return false;
  }

  // Finally, return true so that we can react to a successful authentication.
  return true;
}
The checkAuthenticationDetails() function does a single thing only, it returns a boolean based on the user's credentials. If this function returns true then we can log the user in, if it returns false then the user can't be logged in. Writing functions that do a single thing is good practice as it makes the code easier to deal with.
The login process consists of adding their username to the $_SESSION superglobal, which will persist into the next page load. We'll go into more detail about this in the next section, but once we have added their information to the $_SESSION superglobal we then redirect them to the index.php page using the header() function before stopping any further code execution.
  if ($authenticationSuccessful) {
    // The user authenticated correctly, so we load their user details from the
    // database and store them in the $_SESSION variable. The presence of the
    // username in the session superglobal shows that they logged in correctly.
    $stmt = $mysqli->prepare("SELECT id, name FROM users WHERE username = ?;");
    $stmt->bind_param("s", $username);
    $stmt->execute();
    $result = $stmt->get_result()->fetch_assoc();

    $_SESSION['username'] = $username;
    $_SESSION['name'] = $result['name'];
    $_SESSION['user_id'] = $result['id'];

    // Redirect the user back to the homepage.
    header("Location: index.php");
    exit();
  } else {
    // Authentication was not successful, update the error variable so that we can print a message to the user.
    $error = 'Username or password is incorrect.';
  }
If the user doesn't exist or the password doesn't match then the checkAuthenticationDetails() function returns false. In this case we set an error string that we can then print out to show the user why they weren't able to be logged in. It's a really good idea to tell the user that there was a general problem with their authentication details, rather than being specific as to what sort of error it was. This gives attackers less information to be able to hack into the system or guess how many user accounts exist.
The error messages returned from this function can be printed out like this.
<form action="login.php" method="post">
    <h2>Login</h2>
    <?php if ($error !== '') { ?>
        <p class="alert alert-danger"><?php echo $error; ?></p>
    <?php } ?>
Finally, we need to add a couple of extra components to the start of the file. A call to session_start() is essential so that we can get access to the sessions and session data inside PHP. This must be called before we can get access to sessions so it is added to the top of every page.
// Start the session to include the session variables.
session_start();
Then, we need to ensure that any authenticated user who visits this page doesn't see the login form again, so we add a simple redirect to push the user back to the index.php file if they have session data. The user_id is added when the user logs into the application, so if that exists then we can say that the user is logged in.
if (isset($_SESSION['user_id'])) {
    // If the 'user_id' session variable is present then the user is already
    // authenticated. In this case we redirect them to the homepage.
    header("Location: index.php");
    exit();
}
The login page now allows users to authenticate into the system, so let's look at how we can protect pages.
Now that we have a login form we need a way to protect pages on the site. This can be done by just detecting the presence of the users's ID in the $_SESSION superglobal. If this has been set then we can we can say that the user has passed through the authentication function successfully and has created a viable session.
Every page that needs to interact with the session system in PHP must start with a call to session_start(). This will initialise the session and allow us to store and retrieve session data.
<?php

// Start the session to include the session variables.
session_start();

if (!isset($_SESSION['user_id'])) {
    // If 'user_id' isn't set then the user isn't authenticated. Redirect them
    // to the login.php page.
    header('Location: login.php');
    exit();
}
?>
If this parameter isn't present then we redirect the user back to the login page.
As the user has an active session we can do interesting things with the data in their session. As we logged the user in we added some details to the $_SESSION superglobal, which we can then get access to this data on protected pages.
For example, to print out the user's name from the $_SESSION we write the following code.
<p>Welcome <?php echo htmlspecialchars($_SESSION['name']); ?></p>
This creates a very simplified personalisation feature that just uses the session variables we created when the user logged in.
Just as important as allowing users to log into a site is allowing them to log out again.
To do this we just create a file called logout.php and add the following code to it. This will initialise the session using session_start() and then clear all session data using session_unset(). For good measure we also call session_destroy(), which will clear out any session data associated with this session. Finally, we redirect the user back to the homepage of the application.
<?php

// Start the session to include the session variables.
session_start();

// Unset any session variables created for this session.
session_unset();

// Destroy the session.
session_destroy();

// Redirect the user to the index page.
header("Location: index.php");
With this file in place we just need to add a link to give users the ability to log out of the site.
<a href=/logout.php#">Log out</a>
When a user clicks this link they will be logged out of the application.
The entire application can be pieced together from the code above, but you can also find all of the code on github. Getting up and running with the application is pretty simple, although it assumes that you already have the prerequisite packages of Git and DDEV installed.
To get the codebase, open up a command terminal and use the "git clone" command and pass in the Git repository of the PHP Session Example project.
git clone git@github.com:hashbangcode/php-session-example.git
Change directory to the directory we just created with the git clone command.
cd php-session-example
Everything is already configured in terms of DDEV, so you just need to start it with the "ddev start" command.
ddev start
Once everything is running (it might take a few minutes) we need to create the user table and the users of the system using the install.php script. Run the following command to do this.
ddev exec php install.php
That's everything you need to do to get the website up and running.
You can now visit the local site at https://phpsession.ddev.site/ and log into the system using the following passwords.
| Username | Password |
| user1 | password |
| user2 | letmein |
Log in and click around the site. There's a couple of protected pages that you need to be logged in to see.
We now have an authentication system that protects a small number of pages from being accessed. Although feature complete, this is a pretty simple system that doesn't have a lot of extra functionality. There is some very basic templating going on as the logged in header section is injected into the site for all authenticated pages.
There are a few more features that can be added to this system to make it more robust:
- Cross site scripting protection - In its current state it is possible for the login form to be "triggered" from another site. This can be an attack vector that can be used by attackers to steal user credentials by creating phishing sites. The phishing site will simply record the information the user added and pass this onto the real application, which will log them in as normal. With this protection in place it isn't possible to perform this type of attack without the user being told that there was an error.
- Brute force protection - If an attacker did want to break into the system they would just need to guess at the usernames and passwords. There is no protection to this attack so all an attacker would need is time to churn through thousands of requests a minute until one worked. What brute force protection does is if a user fails to enter their password correctly a certain number of times then their account is blocked so that it can't be broken into. It's also possible to block IP addresses to prevent this sort of attack from blocking multiple users on the site.
- Database Session Storage - One good feature that we haven't touched on here is the ability to get PHP to store its sessions in the database. By default, PHP stores its sessions as files on the file system of the server. By moving these sessions into the database we can store more data with the user session data. It also allows us to manage the sessions on the site, so if we wanted to log everyone out then all we'd need to do is truncate the sessions table. File based PHP sessions don't work with websites that are load balanced unless care has been taken to share the session files between all of the web nodes. If this hasn't been done then users will appear to be randomly logged out if they happen to be served by a web node that doesn't have their PHP session file available.
- Password change/reset - There is no way for the user to change or reset their password. If a user forgets their password then they are simply locked out of the system and an administrator will need to reset their password manually. This is more of a usability addition, but allowing your users to self manage their accounts will cut down on the amount of time spent by developers just handling support requests like this.
I will leave these features as an exercise for the user. If, however, you want to see any of them being implemented then please ask and I will add additional articles that expand on this system. Also, if you spot any problems or want to know more details then please leave a comment below.
Most of these features can be found in most PHP content management systems and frameworks that have authentication systems. This is why PHP frameworks are popular, as they allow you to concentrate on building the experience for your users and not have to worry about making sure your authentication system is robust.
Finally, I want to reiterate that this system is intended to be used for educational purposes only. Please do not use this system in important production environments. It is perfectly fine (assuming you have changed the default passwords!) to use this to protect small project sites, but since it lacks important features for preventing brute force attacks (and similar) it should be avoided for any mission critical site.
Update 10/08/2024: After revisiting the code a few months on I realised there were some issues. I have modified some of the code in the repo and updated the explanations here.

Add new comment