If you have ever used a paint program then you might have used a flood fill algorithm. This is a mechanism by which an area of an image can be filled with a different colour and is normally depicted by a pain can pouring paint.
The flood fill algorithms used to fill in spaces in images are well known, and have been used for decades in all kinds of systems, not just graphics processing programs.
When researching about drawing parabolic curves in PHP a few sources looked at filling in spaces inside the curve using a flood fill algorithm. I looked a little at the PHP function imagefill(), but I was more interested in the core principles of the flood fill algorithms, and how they worked.
In this article we will look at two flood fill algorithms, in PHP, and then extend them to look at using a threshold to control how much of the image is filled in.
Creating A Test Image
In order to test these functions I wanted to create a simple test image. This would have a collection of straight and curved surfaces that we could use the enclose an area and perform a flood fill on that area.
To that end I created the following code.
$height = 100;
$width = 100;
$img = imagecreatetruecolor($width, $height);
// Create the colors.
$black = imagecolorallocate($img, 0, 0, 0);
$white = imagecolorallocate($img, 255, 255, 255);
$red = imagecolorallocate($img, 255, 0, 0);
// Draw two concentric circles.
$length = $height / 2;
imageellipse($img, $height / 2, $width /2, $length, $length, $white);
imageellipse($img, $height / 2, $width /2, $length / 2, $length / 2, $white);
// Draw a shape.
$points = [
  10,10,
  $width - 10, 20,
  $width - 10, $height / 2,
  $width / 2, $height / 2,
  $height / 2, $height - 10,
  10, 10
imageopenpolygon($img, $points, $white);
This creates an image like this, which we can use to test the algorithms here.
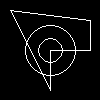
This is deliberately a small image to show the flood fill algorithms in practice without taking up lots of system resources processing large images. I've made the image a little bigger to show it clearly here.
Using this code you can easily generate larger images to show the algorithms working correctly, but now that we have a test image, let's look at the first algorithm.
Recursive Flood Fill
The simplest flood fill algorithm, at least in terms of implementation, is the recursive flood fill algorithm. In this algorithm each pixel inside the area to be filled is inspected and we then recurse to inspect the connected four pixels. The recursion is stopped if we reach the edge of the shape or the edge of the image.
The "edge" is determined by a change in colour between the selected background and the colour found at the pixel. If we set the colour to red (defined in the image creation code above) and set the background to black, then as we traverse the image the white colour of the test shape is easy to detect.
If we haven't reached the edge of the image, or the colour is different then the current pixel is filled in, then the recursion is continued in the four cardinal directions (south, north, east, west) until the recursion is stopped.
Whilst this algorithm does a good job of filling in the space available, the issue is that the recursion stack can get quite large, especially if the image is large. This means that the algorithm, although working well, can run out of memory quite quickly on systems with a small amount of resource.
Here's the implementation of the algorithm, with descriptions of the steps for each part.
/**
 * Fill using a recursive algorithm.
 * @param resource $img
 *   The current image resource.
 * @param int $x
 *   The starting x coordinates.
 * @param int $y
 *   The starting y coordinates.
 * @param int $background
 *   The background colour.
 * @param int $colour
--
  // Set the color of this pixel
  imagesetpixel($img, $x, $y, $colour);
  // Recurse to the south.
  fill_recurse($img, $x + 1, $y, $background, $colour);
  // North.
  fill_recurse($img, $x - 1, $y, $background, $colour);
  // East.
  fill_recurse($img, $x, $y + 1, $background, $colour);
  // West.
  fill_recurse($img, $x, $y - 1, $background, $colour);
}
Let's use this algorithm to fill in a part of our test image. We select a point slightly to the left of the centre point in order to fill the innermost circle with the red colour.
fill_recurse($img, ($width / 2), ($height / 2) -1, $black, $red);
This produces the following image.
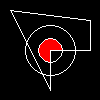
This works well, and follows the edges of the shapes we have drawn very well.
Moving the point at which we start the flood fill to the left slightly, within the two concentric circles, using the following code.
fill_recurse($img, ($width / 2) - 19, ($height / 2) -1, $black, $red);
This produces the following image.

You you can see, even the jagged diagonal lines are not a problem for this algorithm. It is able to fill the selected area perfectly fine.
Flood Fill With Scan
The alternative algorithm from the recursive algorithm is to use a fill and scan method. This system uses the same edge finding technique but in this case we use a combination of two functions to achieve the effect.
The first function, called filled_wth_scan() accepts the same parameters as the recursive_fill() function. What we do here is to use an array of vertical points, starting at the given coordinate.
From the starting point we fill in the colour available and then attempt to scan to the left of the this point, filling in the colour every time we spot a pixel that is available. We then perform the same action point to the right of the image.
After these two loops we should then have a line that stretches from left to right across the available area. We then go to the scan section of the algorithm, which is used to add more points to the vertical pixels array.
/**
 * Use the fill and scan algorithm to fill in an area.
 * @param resource $img
 *   The current image resource.
 * @param int $x
 *   The starting x coordinates.
 * @param int $y
 *   The starting y coordinates.
 * @param int $background
 *   The background colour.
 * @param int $colour
 *   The fill colour.
function fill_with_scan($img, $x, $y, $background, $colour) {
  $a = [];
  // Ad the first point to scan.
  $a[] = ['x' => $x, 'y' => $y];
  // Loop through the pixels we have in the array.
  while (count($a) > 0) {
    // Get the next pixel out of the array and set the colour.
    $point = array_pop($a);
    imagesetpixel($img, $point['x'], $point['y'], $colour);

    // Find the next point to use, from the x pixel.
    $lx = $point['x'];
    while($lx > 0 && imagecolorat($img, $lx - 1, $point['y']) === $background) {
      // Set the pixel at this point.
      imagesetpixel($img, $lx - 1, $point['y'], $colour);
      // Look backwards.
      $lx = $lx - 1;
    }
    while($point['x'] + 1 < imagesx($img) && imagecolorat($img, $point['x'] + 1, $point['y']) === $background) {
      // Set the pixel at this point.
      imagesetpixel($img, $point['x'] + 1, $point['y'], $colour);
      // Look forwards.
      $point['x'] = $point['x'] + 1;
    }
    // Scan the image and add more pixels to the array if applicable.
    if ($point['x'] - 1 >= 0 && $point['y'] + 1 < imagesy($img)) {
      scan($img, $background, $lx, $point['x'] - 1, $point['y'] + 1, $a);
    }
    if ($point['x'] - 1 >= 0 && $point['y'] - 1 >= 0) {
      scan($img, $background, $lx, $point['x'] - 1, $point['y'] - 1, $a);
    }
}
The second function, the scan, takes in two x coordinates and a y coordinate, which is always set either above or below the current line in the fill_and_scan() function.
It then loops through the pixels on that line, between the two x coordinates and adds additional points to the pixels array that can be used to fill in the area.
/**
 * Scan the image.
 * @param resource $img
 *   The image resource.
 * @param int $background
 *   The background iae.
 * @param int $lx
 *   The left x.
 * @param int $rx
 *   The right x.
 * @param int $y
 *   The y position.
 * @param array $as
 *   The array of pixels.
function scan($img, $background, $lx, $rx, $y, &$a) {
  $spanAdded = false;
  for ($x = $lx; $x <= $rx; $x++) {
    if (imagecolorat($img, $x, $y) !== $background) {
      $spanAdded = false;
    }
    elseif ($spanAdded === false) {
      $a[] = ['x' => $x, 'y' => $y];
      $spanAdded = true;
    }
}
This function is slightly more difficult to follow than the recursive fill function, but essentially it fills in a line and then "scans" the above and below that line to see if there is anything else to fill in. If there is then a pixel is added and the function continues. The slight disadvantage of this function is that if the area to be filled in is quite complex then the scan will potentially run over the same pixel a few times to ensure that all of the area has been filled in. It does, however, work, even with complex shapes and isn't (quite) as memory intensive as the recursive system since the pixel array never really gets that large.
This function can be run in the following way, by selecting a point just off of the centre of the image.
fill_with_scan($img, ($width / 2), ($height / 2) -1, $black, $red);
This produces the following image.

Both of these algorithms work well to fill in an area of an image.
Seeing these algorithms in action made we wonder if they could be enhanced to introduce a threshold on the fill algorithms. By adding a threshold to the colour being filled in it is then possible to fill the selected colour across different background colours, assuming that those background colours are below that threshold.
Creating A Threshold
So far, the algorithms we have looked at have only been able to detect a simple change in colour as the border of the area. If the colour doesn't match the background then it is considered to be the edge of the shape we are trying to fill. This is fine for very simple areas, but falls apart a little when we want to fill in an area of a picture, for example.
A better approach to this is to create a threshold where we don't just look at one colour, but a threshold between one colour and the next. If the difference between two colours is less than the threshold then the colour is considered inside the shape and can be changed.
The function to compare the background colour with the current colour (against the threshold) is as follows.
/**
 * Compare the background colour to the colour being set.
 * @param int $colour
 *   The colour to check.
 * @param int $background
 *   The background colour.
 * @param int $threshold
 *   The color compare threshold.
 * @return bool
 *   True if the difference between the colour and the background is less than
 *   the set threshold.
function compare_background(int $colour, int $background, int $threshold): bool
    // Convert the colours into their separate shades.
    $r1 = ($colour >> 16) & 0xFF;
    $g1 = ($colour >> 8) & 0xFF;
    $b1 = $colour & 0xFF;
    $r2 = ($background >> 16) & 0xFF;
    $g2 = ($background >> 8) & 0xFF;
    $b2 = $background & 0xFF;
    if (abs($r1 - $r2) <= $threshold
      && abs($g1 - $g2) <= $threshold
      && abs($b1 - $b2) <= $threshold) {
        // The difference between the background and the colour is less than the
        // set threshold.
        return true;
    }
    // The colour does not match.
    return false;
}
What this function does is to extract the individual red, green, blue values from the colours passed and compare them with the threshold value. To keep things simple, our threshold level is just a single value so the comparison is made between the different colours and the threshold value. If the difference is less than the threshold then we consider the colour to be "inside" and return true.
In our code we need to watch for this function returning true, and colour the pixel to our selected fill colour if that happens.
To test this function it makes sense that we create a new image. What we need is an image with a set of boundaries that we can test the threshold with, rather than a bunch of simple shapes.
Take the following code.
$height = 100;
$width = 255;
$img = imagecreatetruecolor($width, $height);
for ($i = 0; $i <= $width; $i += 17) {
  $tempColour = imagecolorallocate($img, $i, $i, $i);
  imagefilledrectangle($img, $i, 0, $i + 17, $height, $tempColour);
$fill($img, $threshold, ($height / 2) - 1, $black, $red, $threshold);
imagepng($img, 'thresholdtest.png');
imagedestroy($img);
This produces the following image, which has an increasingly white colour going from left to right across the width of the image.

We can test the threshold fill algorithms here by attempting to fill the image from the far left hand side and supplying different threshold levels. The idea is that setting a very high threshold level should fill the entire image since the colour will always be considered "inside".
Flood Fill Recursive With Threshold
Using the compare_background() function we can alter the fill recursive algorithm to introduce the threshold level.
This algorithm mostly remains the same, but here we need an additional check to make sure that the colour hasn't already been set to the selected colour. Without this check in place there is a danger that setting the threshold too high will cause an infinite recursion to happen, which we don't want.
/**
 * Fill using a recursive algorithm.
 * @param resource $img
 *   The current image resource.
 * @param int $x
 *   The starting x coordinates.
 * @param int $y
 *   The starting y coordinates.
 * @param int $background
 *   The background colour.
 * @param int $colour
 *   The fill colour.
 * @param int $threshold
 *   The color compare threshold.
function fill_recurse($img, $x, $y, $background, $colour, $threshold)
    if ($x === -1 || $y === -1 || $x === imagesx($img) || $y === imagesy($img)) {
        // x or y is -1 or the image has zero dimensions.
        return;
    }
    $currentColour = imagecolorat($img, $x, $y);
    if (compare_background($currentColour, $background, $threshold) === false) {
        // The color isn't the same as the background which means that we
        // either have the edge or a coloured area.
        return;
    }
    if ($currentColour === $colour) {
        // The current colour has already been set at this pixel.
        return;
    }
    // Set the color of this pixel
    imagesetpixel($img, $x, $y, $colour);
    // Recurse to the south.
    fill_recurse($img, $x + 1, $y, $background, $colour, $threshold);
    // North.
    fill_recurse($img, $x - 1, $y, $background, $colour, $threshold);
    // East.
    fill_recurse($img, $x, $y + 1, $background, $colour, $threshold);
    // West.
    fill_recurse($img, $x, $y - 1, $background, $colour, $threshold);
}
Since the result of this code is the same as the fill and scan I will hold off the result of this algorithm until later.
Let's look at the fill and scan with the threshold system in place.
Flood Fill And Scan With Threshold
The fill and scan algorithm works in almost exactly the same way, the only difference is that we have replaced the pixel comparisons with a call to the compare_background() function.
/**
 * Use the fill and scan algorithm to fill in an area.
 * @param resource $img
 *   The current image resource.
 * @param int $x
 *   The starting x coordinates.
 * @param int $y
 *   The starting y coordinates.
 * @param int $background
 *   The background colour.
 * @param int $colour
 *   The fill colour.
 * @param int $threshold
 *   The color compare threshold.
function fill_with_scan($img, int $x, int $y, int $background, int $colour, int $threshold)
    $a = [];
    // Ad the first point to scan.
    $a[] = ['x' => $x, 'y' => $y];
    // Loop through the pixels we have in the array.
    while (count($a) > 0) {
        // Get the next pixel out of the array and set the colour.
        $point = array_pop($a);
        imagesetpixel($img, $point['x'], $point['y'], $colour);
        // Find the next point to use, from the x pixel.
        $lx = $point['x'];
        while ($lx > 0 && compare_background(imagecolorat($img, $lx - 1, $point['y']), $background, $threshold) === true) {
            // Set the pixel at this point.
            imagesetpixel($img, $lx - 1, $point['y'], $colour);
            // Look backwards.
            $lx = $lx - 1;
        }
        while ($point['x'] + 1 < imagesx($img) && compare_background(imagecolorat($img, $point['x'] + 1, $point['y']), $background, $threshold) === true) {
            // Set the pixel at this point.
            imagesetpixel($img, $point['x'] + 1, $point['y'], $colour);
            // Look forwards.
            $point['x'] = $point['x'] + 1;
        }
        // Scan the image and add more pixels to the array if applicable.
        if ($point['x'] - 1 >= 0 && $point['y'] + 1 < imagesy($img)) {
            scan($img, $background, $lx, $point['x'] - 1, $point['y'] + 1, $a, $threshold, $colour);
        }
        if ($point['x'] - 1 >= 0 && $point['y'] - 1 >= 0) {
            scan($img, $background, $lx, $point['x'] - 1, $point['y'] - 1, $a, $threshold, $colour);
        }
    }
 * Scan the image.
 * @param resource $img
 *   The image resource.
 * @param int $background
 *   The background colour.
 * @param int $lx
 *   The left x.
 * @param int $rx
 *   The right x.
 * @param int $y
 *   The y position.
 * @param array $a
 *   The array of pixels.
 * @param int $threshold
 *   The color compare threshold.
function scan($img, int $background, int $lx, int $rx, int $y, array &$a, int $threshold, $colour)
    $spanAdded = false;
    for ($x = $lx; $x <= $rx; $x++) {
        $currentColour = imagecolorat($img, $x, $y);
        if ($currentColour >= $colour || compare_background($currentColour, $background, $threshold) === false) {
            $spanAdded = false;
        } elseif ($spanAdded === false) {
            $a[] = ['x' => $x, 'y' => $y];
            $spanAdded = true;
        }
    }
}
I ran this code using an increasing threshold level and then spliced together all of the images created into a single (long) image to show the effect of increasing the threshold limit.

This clearly shows that as we increase the threshold of the fill function the more of the image is filled in. The final image is of the threshold at basically 100% and so we completely fill the entire image with the selected colour.
These algorithms are used in a wide range of applications outside of graphics programs. For example, we can use the algorithm to fill in an area in an image and then count the number of pixels that we changed, which gives us the exact area of that section of image. This is particularly useful when faced with complex shapes that would otherwise be difficult to measure in this way.
If you found this interesting then see the Wikipedia page on Flood Fill algorithms details a lot of the systems used here. I used some of the pseudo code to create the original algorithms, but the threshold system is not detailed there.

Add new comment